使用 systemd 來管理啟動項

最近在設置 Linux 系統時,我想知道如何確保服務和其他單元的依賴關係在這些依賴於它們的服務和單元啟動之前就已經啟動並運行了。我需要更多 systemd 如何管理啟動程序的相關知識,特別是在本質上是一個並行的系統中如何是決定服務啟動順序的。
你可能知道 SystemV(systemd 的前身,我在這個系列的 第一篇文章 中解釋過)通過 Sxx 前綴命名啟動腳本來決定啟動順序,xx 是一個 00-99 的數字。然後 SystemV 利用文件名來排序,然後按照所需的運行級別執行隊列中每個啟動腳本。
但是 systemd 使用單元文件來定義子程序,單元文件可由系統管理員創建或編輯,這些文件不僅可以用於初始化時也可以用於常規操作。在這個系列的 第三篇文章 中,我解釋了如何創建一個掛載單元文件。在第五篇文章中,我解釋了如何創建一種不同的單元文件 —— 在啟動時執行一個程序的服務單元文件。你也可以修改單元文件中某些配置,然後通過 systemd 日誌去查看你的修改在啟動序列中的位置。
準備工作
先確認你已經在 /etc/default/grub 文件中的 GRUB_CMDLINE_LINUX= 這行移除了 rhgb 和 quiet,如同我在這個系列的 第二篇文章 中展示的那樣。這讓你能夠查看 Linux 啟動信息流,你在這篇文章中部分實驗中需要用到。
程序
在本教程中,你會創建一個簡單的程序讓你能夠在主控台和後續的 systemd 日誌中查看啟動時的信息。
創建一個 shell 程序 /usr/local/bin/hello.sh 然後添加下述內容。你要確保執行結果在啟動時是可見的,可以輕鬆的在 systemd 日誌中找到它。你會使用一版攜帶一些方格的 「Hello world」 程序,這樣它會非常顯眼。為了確保這個文件是可執行的,且為了安全起見,它需要 root 的用戶和組所有權和 700 許可權。
#!/usr/bin/bash
# Simple program to use for testing startup configurations
# with systemd.
# By David Both
# Licensed under GPL V2
#
echo "###############################"
echo "######### Hello World! ########"
echo "###############################"
在命令行中執行這個程序來檢查它能否正常運行。
[root@testvm1 ~]# hello.sh
###############################
######### Hello World! ########
###############################
[root@testvm1 ~]#
這個程序可以用任意腳本或編譯語言實現。hello.sh 程序可以被放在 Linux 文件系統層級結構(FHS)上的任意位置。我把它放在 /usr/local/bin 目錄下,這樣它可以直接在命令行中執行而不必在打命令的時候前面帶上路徑。我發現我創建的很多 shell 程序需要從命令行和其他工具(如 systemd)運行。
服務單元文件
創建服務單元文件 /etc/systemd/system/hello.service,寫入下述內容。這個文件不一定是要可執行的,但是為了安全起見,它需要 root 的用戶和組所有權和 644 或 640 許可權。
# Simple service unit file to use for testing
# startup configurations with systemd.
# By David Both
# Licensed under GPL V2
#

[Unit]
Description=My hello shell script

[Service]
Type=oneshot
ExecStart=/usr/local/bin/hello.sh

[Install]
WantedBy=multi-user.target
通過查看服務狀態來確認服務單元文件能如期運行。如有任何語法問題,這裡會顯示錯誤。
[root@testvm1 ~]# systemctl status hello.service
● hello.service - My hello shell script
     Loaded: loaded (/etc/systemd/system/hello.service; disabled; vendor preset: disabled)
     Active: inactive (dead)
[root@testvm1 ~]#
你可以運行這類 「oneshot」(單發)類型的服務多次而不會有問題。此類服務適用於服務單元文件啟動的程序是主進程,必須在 systemd 啟動任何依賴進程之前完成的服務。
共有 7 種服務類型,你可以在 systemd.service(5) 的手冊頁上找到每一種(以及服務單元文件的其他部分)的詳細解釋。(你也可以在文章末尾的 資料 中找到更多信息。)
出於好奇,我想看看錯誤是什麼樣子的。所以我從 Type=oneshot 這行刪了字母 「o」,現在它看起來是這樣 Type=neshot,現在再次執行命令:
[root@testvm1 ~]# systemctl status hello.service
● hello.service - My hello shell script
     Loaded: loaded (/etc/systemd/system/hello.service; disabled; vendor preset: disabled)
     Active: inactive (dead)

May 06 08:50:09 testvm1.both.org systemd[1]: /etc/systemd/system/hello.service:12: Failed to parse service type, ignoring: neshot
[root@testvm1 ~]#
執行結果明確地告訴我錯誤在哪,這樣解決錯誤變得十分容易。
需要注意的是即使在你將 hello.service 文件保存為它原來的形式之後,錯誤依然存在。雖然重啟機器能消除這個錯誤,但你不必這麼做,所以我去找了一個清理這類持久性錯誤的方法。我曾遇到有些錯誤需要 systemctl daemon-reload 命令來重置錯誤狀態,但是在這個例子里不起作用。可以用這個命令修復的錯誤似乎總是有一個這樣的聲明,所以你知道要運行它。
然而,每次修改或新建一個單元文件之後執行 systemctl daemon-reload 確實是值得推薦的做法。它提醒 systemd 有修改發生,而且它可以防止某些與管理服務或單元相關的問題。所以繼續去執行這條命令吧。
在修改完服務單元文件中的拼寫錯誤後,一個簡單的 systemctl restart hello.service 命令就可以清除錯誤。實驗一下,通過添加一些其他的錯誤至 hello.service 文件來看看會得到怎樣的結果。
啟動服務
現在你已經準備好啟動這個新服務,通過檢查狀態來查看結果。儘管你可能之前已經重啟過,你仍然可以啟動或重啟這個單發服務任意次,因為它只運行一次就退出了。
繼續啟動這個服務(如下所示),然後檢查狀態。你的結果可能和我的有區別,取決於你做了多少試錯實驗。
[root@testvm1 ~]# systemctl start hello.service
[root@testvm1 ~]# systemctl status hello.service
● hello.service - My hello shell script
     Loaded: loaded (/etc/systemd/system/hello.service; disabled; vendor preset: disabled)
     Active: inactive (dead)

May 10 10:37:49 testvm1.both.org hello.sh[842]: ######### Hello World! ########
May 10 10:37:49 testvm1.both.org hello.sh[842]: ###############################
May 10 10:37:49 testvm1.both.org systemd[1]: hello.service: Succeeded.
May 10 10:37:49 testvm1.both.org systemd[1]: Finished My hello shell script.
May 10 10:54:45 testvm1.both.org systemd[1]: Starting My hello shell script...
May 10 10:54:45 testvm1.both.org hello.sh[1380]: ###############################
May 10 10:54:45 testvm1.both.org hello.sh[1380]: ######### Hello World! ########
May 10 10:54:45 testvm1.both.org hello.sh[1380]: ###############################
May 10 10:54:45 testvm1.both.org systemd[1]: hello.service: Succeeded.
May 10 10:54:45 testvm1.both.org systemd[1]: Finished My hello shell script.
[root@testvm1 ~]#
從狀態檢查命令的輸出中我們可以看到,systemd 日誌表明 hello.sh 啟動然後服務結束了。你也可以看到腳本的輸出。該輸出是根據服務的最近調用的日誌記錄生成的,試試看多啟動幾次這個服務,然後再看狀態命令的輸出就能理解我所說的。
你也應該直接查看日誌內容,有很多種方法可以實現。一種辦法是指定記錄類型標識符,在這個例子中就是 shell 腳本的名字。它會展示前幾次重啟和當前會話的日誌記錄。如你所見,我已經為這篇文章做了挺長一段時間的研究測試了。
[root@testvm1 ~]# journalctl -t hello.sh
<剪去>
-- Reboot --
May 08 15:55:47 testvm1.both.org hello.sh[840]: ###############################
May 08 15:55:47 testvm1.both.org hello.sh[840]: ######### Hello World! ########
May 08 15:55:47 testvm1.both.org hello.sh[840]: ###############################
-- Reboot --
May 08 16:01:51 testvm1.both.org hello.sh[840]: ###############################
May 08 16:01:51 testvm1.both.org hello.sh[840]: ######### Hello World! ########
May 08 16:01:51 testvm1.both.org hello.sh[840]: ###############################
-- Reboot --
May 10 10:37:49 testvm1.both.org hello.sh[842]: ###############################
May 10 10:37:49 testvm1.both.org hello.sh[842]: ######### Hello World! ########
May 10 10:37:49 testvm1.both.org hello.sh[842]: ###############################
May 10 10:54:45 testvm1.both.org hello.sh[1380]: ###############################
May 10 10:54:45 testvm1.both.org hello.sh[1380]: ######### Hello World! ########
May 10 10:54:45 testvm1.both.org hello.sh[1380]: ###############################
[root@testvm1 ~]#
為了定位 hello.service 單元的 systemd 記錄,你可以在 systemd 中搜索。你可以使用 G+Enter 來翻頁到日誌記錄 記錄的末尾,然後用回滾來找到你感興趣的日誌。使用 -b 選項僅展示最近啟動的記錄。
[root@testvm1 ~]# journalctl -b -t systemd
<剪去>
May 10 10:37:49 testvm1.both.org systemd[1]: Starting SYSV: Late init script for live image....
May 10 10:37:49 testvm1.both.org systemd[1]: Started SYSV: Late init script for live image..
May 10 10:37:49 testvm1.both.org systemd[1]: hello.service: Succeeded.
May 10 10:37:49 testvm1.both.org systemd[1]: Finished My hello shell script.
May 10 10:37:50 testvm1.both.org systemd[1]: Starting D-Bus System Message Bus...
May 10 10:37:50 testvm1.both.org systemd[1]: Started D-Bus System Message Bus.
我拷貝了一些其他的日誌記錄,讓你對你可能找到的東西有所了解。這條命令噴出了所有屬於 systemd 的日誌內容 —— 當我寫這篇時是 109183 行。這是一個需要整理的大量數據。你可以使用頁面的搜索功能,通常是 less 或者你可以使用內置的 grep 特性。-g( 或 --grep=)選項可以使用兼容 Perl 的正則表達式。
[root@testvm1 ~]# journalctl -b -t systemd -g "hello"
[root@testvm1 ~]# journalctl -b -t systemd -g "hello"
-- Logs begin at Tue 2020-05-05 18:11:49 EDT, end at Sun 2020-05-10 11:01:01 EDT. --
May 10 10:37:49 testvm1.both.org systemd[1]: Starting My hello shell script...
May 10 10:37:49 testvm1.both.org systemd[1]: hello.service: Succeeded.
May 10 10:37:49 testvm1.both.org systemd[1]: Finished My hello shell script.
May 10 10:54:45 testvm1.both.org systemd[1]: Starting My hello shell script...
May 10 10:54:45 testvm1.both.org systemd[1]: hello.service: Succeeded.
May 10 10:54:45 testvm1.both.org systemd[1]: Finished My hello shell script.
[root@testvm1 ~]#
你可以使用標準的 GNU grep 命令,但是這不會展示日誌首行的元數據。
如果你只想看包含你的 hello 服務的日誌記錄,你可以指定時間來縮小範圍。舉個例子,我將在我的測試虛擬機上以 10:54:00 為開始時間,這是上述的日誌記錄開始的分鐘數。注意 --since= 的選項必須加引號,這個選項也可以寫成 -S "某個時間"。
日期和時間可能在你的機器上有所不同,所以確保使用能匹配你日誌中的時間的時間戳。
[root@testvm1 ~]# journalctl --since="2020-05-10 10:54:00"
May 10 10:54:35 testvm1.both.org audit: BPF prog-id=54 op=LOAD
May 10 10:54:35 testvm1.both.org audit: BPF prog-id=55 op=LOAD
May 10 10:54:45 testvm1.both.org systemd[1]: Starting My hello shell script...
May 10 10:54:45 testvm1.both.org hello.sh[1380]: ###############################
May 10 10:54:45 testvm1.both.org hello.sh[1380]: ######### Hello World! ########
May 10 10:54:45 testvm1.both.org hello.sh[1380]: ###############################
May 10 10:54:45 testvm1.both.org systemd[1]: hello.service: Succeeded.
May 10 10:54:45 testvm1.both.org systemd[1]: Finished My hello shell script.
May 10 10:54:45 testvm1.both.org audit[1]: SERVICE_START pid=1 uid=0 auid=4294967295 ses=4294967295 msg='unit=hello comm="systemd" exe="/usr/lib/systemd"'
May 10 10:54:45 testvm1.both.org audit[1]: SERVICE_STOP pid=1 uid=0 auid=4294967295 ses=4294967295 msg='unit=hello comm="systemd" exe="/usr/lib/systemd/"'
May 10 10:56:00 testvm1.both.org NetworkManager[840]: <error> [1589122560.0633] dhcp4 (enp0s3): error -113 dispatching events
May 10 10:56:00 testvm1.both.org NetworkManager[840]: <info>  [1589122560.0634] dhcp4 (enp0s3): state changed bound -> fail
<剪去>
since 選項跳過了指定時間點的所有記錄,但在此時間點之後仍有大量你不需要的記錄。你也可以使用 until 選項來裁剪掉你感興趣的時間之後的記錄。我想要事件發生時附近的一分鐘,其他的都不用:
[root@testvm1 ~]# journalctl --since="2020-05-10 10:54:35" --until="2020-05-10 10:55:00"
-- Logs begin at Tue 2020-05-05 18:11:49 EDT, end at Sun 2020-05-10 11:04:59 EDT. --
May 10 10:54:35 testvm1.both.org systemd[1]: Reloading.
May 10 10:54:35 testvm1.both.org audit: BPF prog-id=27 op=UNLOAD
May 10 10:54:35 testvm1.both.org audit: BPF prog-id=26 op=UNLOAD
<剪去>
ay 10 10:54:35 testvm1.both.org audit: BPF prog-id=55 op=LOAD
May 10 10:54:45 testvm1.both.org systemd[1]: Starting My hello shell script...
May 10 10:54:45 testvm1.both.org hello.sh[1380]: ###############################
May 10 10:54:45 testvm1.both.org hello.sh[1380]: ######### Hello World! ########
May 10 10:54:45 testvm1.both.org hello.sh[1380]: ###############################
May 10 10:54:45 testvm1.both.org systemd[1]: hello.service: Succeeded.
May 10 10:54:45 testvm1.both.org systemd[1]: Finished My hello shell script.
May 10 10:54:45 testvm1.both.org audit[1]: SERVICE_START pid=1 uid=0 auid=4294967295 ses=4294967295 msg='unit=hello comm="systemd" exe="/usr/lib/systemd>
May 10 10:54:45 testvm1.both.org audit[1]: SERVICE_STOP pid=1 uid=0 auid=4294967295 ses=4294967295 msg='unit=hello comm="systemd" exe="/usr/lib/systemd/>
lines 1-46/46 (END)
如果在這個時間段中仍然有大量的活動的話,你可以使用這些選項組合來進一步縮小結果數據流:
[root@testvm1 ~]# journalctl --since="2020-05-10 10:54:35" --until="2020-05-10 10:55:00" -t "hello.sh"
-- Logs begin at Tue 2020-05-05 18:11:49 EDT, end at Sun 2020-05-10 11:10:41 EDT. --
May 10 10:54:45 testvm1.both.org hello.sh[1380]: ###############################
May 10 10:54:45 testvm1.both.org hello.sh[1380]: ######### Hello World! ########
May 10 10:54:45 testvm1.both.org hello.sh[1380]: ###############################
[root@testvm1 ~]#
你的結果應該與我的相似。你可以從這一系列的實驗中看出,這個服務運行的很正常。
重啟 —— 還是走到這一步
到目前為止,你還沒有重啟過安裝了服務的機器。所以現在重啟吧,因為畢竟這個教程是關於啟動階段程序運行的情況。首先,你需要在啟動序列中啟用這個服務。
[root@testvm1 ~]# systemctl enable hello.service
Created symlink /etc/systemd/system/multi-user.target.wants/hello.service → /etc/systemd/system/hello.service.
[root@testvm1 ~]#
注意到這個軟鏈接是被創建在 /etc/systemd/system/multi-user.target.wants 目錄下的。這是因為服務單元文件指定了服務是被 multi-user.target 所「需要」的。
重啟機器,確保能在啟動階段觀察數據流,這樣你能看到 「Hello world」 信息。等等……你看見了么?嗯,我看見了。儘管它很快被刷過去了,但是我確實看到 systemd 的信息顯示它啟動了 hello.service 服務。
看看上次系統啟動後的日誌。你可以使用頁面搜索工具 less 來找到 「Hello」 或 「hello」。我裁剪了很多數據,但是留下了附近的日誌記錄,這樣你就能感受到和你服務有關的日誌記錄在本地是什麼樣子的:
[root@testvm1 ~]# journalctl -b
<剪去>
May 10 10:37:49 testvm1.both.org systemd[1]: Listening on SSSD Kerberos Cache Manager responder socket.
May 10 10:37:49 testvm1.both.org systemd[1]: Reached target Sockets.
May 10 10:37:49 testvm1.both.org systemd[1]: Reached target Basic System.
May 10 10:37:49 testvm1.both.org systemd[1]: Starting Modem Manager...
May 10 10:37:49 testvm1.both.org systemd[1]: Starting Network Manager...
May 10 10:37:49 testvm1.both.org systemd[1]: Starting Avahi mDNS/DNS-SD Stack...
May 10 10:37:49 testvm1.both.org systemd[1]: Condition check resulted in Secure Boot DBX (blacklist) updater being skipped.
May 10 10:37:49 testvm1.both.org systemd[1]: Starting My hello shell script...
May 10 10:37:49 testvm1.both.org systemd[1]: Starting IPv4 firewall with iptables...
May 10 10:37:49 testvm1.both.org systemd[1]: Started irqbalance daemon.
May 10 10:37:49 testvm1.both.org audit[1]: SERVICE_START pid=1 uid=0 auid=4294967295 ses=4294967295 msg='unit=irqbalance comm="systemd" exe="/usr/lib/sy>"'
May 10 10:37:49 testvm1.both.org systemd[1]: Starting LSB: Init script for live image....
May 10 10:37:49 testvm1.both.org systemd[1]: Starting Hardware Monitoring Sensors...
<剪去>
May 10 10:37:49 testvm1.both.org systemd[1]: Starting NTP client/server...
May 10 10:37:49 testvm1.both.org systemd[1]: Starting SYSV: Late init script for live image....
May 10 10:37:49 testvm1.both.org systemd[1]: Started SYSV: Late init script for live image..
May 10 10:37:49 testvm1.both.org audit[1]: SERVICE_START pid=1 uid=0 auid=4294967295 ses=4294967295 msg='unit=livesys-late comm="systemd" exe="/usr/lib/>"'
May 10 10:37:49 testvm1.both.org hello.sh[842]: ###############################
May 10 10:37:49 testvm1.both.org hello.sh[842]: ######### Hello World! ########
May 10 10:37:49 testvm1.both.org hello.sh[842]: ###############################
May 10 10:37:49 testvm1.both.org systemd[1]: hello.service: Succeeded.
May 10 10:37:49 testvm1.both.org systemd[1]: Finished My hello shell script.
May 10 10:37:49 testvm1.both.org audit[1]: SERVICE_START pid=1 uid=0 auid=4294967295 ses=4294967295 msg='unit=hello comm="systemd" exe="/usr/lib/systemd>"'
May 10 10:37:49 testvm1.both.org audit[1]: SERVICE_STOP pid=1 uid=0 auid=4294967295 ses=4294967295 msg='unit=hello comm="systemd" exe="/usr/lib/systemd/>
May 10 10:37:50 testvm1.both.org audit: BPF prog-id=28 op=LOAD
<剪去>
你可以看到 systemd 啟動了 hello.service 單元,它執行了 hello.sh 腳本並將輸出記錄在日誌中。如果你能在啟動階段抓到它,你也應該能看見,systemd 信息表明了它正在啟動這個腳本,另外一條信息表明了服務成功。通過觀察上面數據流中第一條 systemd 消息,你會發現 systemd 在到達基本的系統目標後很快就啟動了你的服務。
但是我想看見信息在啟動階段也被列印出來。有一種方法可以做到:在 hello.service 文件的 [Service] 段中加入下述行:
StandardOutput=journal+console
現在 hello.service 文件看起來像這樣:
# Simple service unit file to use for testing
# startup configurations with systemd.
# By David Both
# Licensed under GPL V2
#

[Unit]
Description=My hello shell script

[Service]
Type=oneshot
ExecStart=/usr/local/bin/hello.sh
StandardOutput=journal+console

[Install]
WantedBy=multi-user.target
加上這一行後,重啟系統,並在啟動過程中觀察顯示屏上滾動的數據流。你應該在它的小方框中看到信息。在啟動序列完成後,你可以查看最近的啟動日誌,然後定位到你新服務的日誌記錄。
修改次序
現在你的服務已經可用了,你可以看看它在啟動序列中哪個位置啟動的,嘗試下修改它。需要牢記的是 systemd 傾向於在每個主要目標(basic.target、multi-user.target 和 graphical.**target)中並行啟動儘可能多的服務和其他的單元類型。你應該剛剛看過最近一次開機的日誌記錄,它應該和上面我的日誌看上去類似。
注意,systemd 在它到達到基本系統目標(basic.target)後不久就啟動了你的測試服務。這正是你在在服務單元文件的 WantedBy 行中指定的,所以它是對的。在你做出修改之前,列出 /etc/systemd/system/multi-user.target.wants 目錄下的內容,你會看到一個指向服務單元文件的軟鏈接。服務單元文件的 [Install] 段指定了哪一個目標會啟動這個服務,執行 systemctl enable hello.service 命令會在適當的 targets.wants 路徑下創建軟鏈接。
hello.service -> /etc/systemd/system/hello.service
某些服務需要在 basic.target 階段啟動,其他則沒這個必要,除非系統正在啟動 graphical.target。這個實驗中的服務不會在 basic.target 期間啟動 —— 假設你直到 graphical.target 階段才需要它啟動。那麼修改 WantedBy 這一行:
WantedBy=graphical.target
一定要先禁用 hello.service 再重新啟用它,這樣可以刪除舊鏈接並且在 graphical.targets.wants 目錄下創建一個新的鏈接。我注意到如果我在修改服務需要的目標之前忘記禁用該服務,我可以運行 systemctl disable 命令,鏈接將從兩個 targets.wants 目錄中刪除。之後我只需要重新啟用這個服務然後重啟電腦。
啟動 graphical.target 下的服務有個需要注意的地方,如果電腦啟動到 multi-user.target 階段,這個服務不會自動啟動。如果這個服務需要 GUI 桌面介面,這或許是你想要的,但是它同樣可能不是你想要的。
用 -o short-monotonic 選項來查看 graphical.target 和 multi-user.target 的日誌,展示內核啟動幾秒後的日誌,精度為微秒級別:
[root@testvm1 ~]# journalctl -b -o short-monotonic
multi-user.target 的部分日誌:
[   17.264730] testvm1.both.org systemd[1]: Starting My hello shell script...
[   17.265561] testvm1.both.org systemd[1]: Starting IPv4 firewall with iptables...
<剪去>
[   19.478468] testvm1.both.org systemd[1]: Starting LSB: Init script for live image....
[   19.507359] testvm1.both.org iptables.init[844]: iptables: Applying firewall rules: [  OK  ]
[   19.507835] testvm1.both.org hello.sh[843]: ###############################
[   19.507835] testvm1.both.org hello.sh[843]: ######### Hello World! ########
[   19.507835] testvm1.both.org hello.sh[843]: ###############################
<剪去>
[   21.482481] testvm1.both.org systemd[1]: hello.service: Succeeded.
[   21.482550] testvm1.both.org smartd[856]: Opened configuration file /etc/smartmontools/smartd.conf
[   21.482605] testvm1.both.org systemd[1]: Finished My hello shell script.
還有部分 graphical.target 的日誌:
[ 19.436815] testvm1.both.org systemd[1]: Starting My hello shell script...
[ 19.437070] testvm1.both.org systemd[1]: Starting IPv4 firewall with iptables...
<剪去>
[ 19.612614] testvm1.both.org hello.sh[841]: ###############################
[ 19.612614] testvm1.both.org hello.sh[841]: ######### Hello World! ########
[ 19.612614] testvm1.both.org hello.sh[841]: ###############################
[ 19.629455] testvm1.both.org audit[1]: SERVICE_START pid=1 uid=0 auid=4294967295 ses=4294967295 msg='unit=hello comm="systemd" exe="/usr/lib/systemd/systemd" hostname=? addr=? terminal=? res=success'
[ 19.629569] testvm1.both.org audit[1]: SERVICE_STOP pid=1 uid=0 auid=4294967295 ses=4294967295 msg='unit=hello comm="systemd" exe="/usr/lib/systemd/systemd" hostname=? addr=? terminal=? res=success'
[ 19.629682] testvm1.both.org systemd[1]: hello.service: Succeeded.
[ 19.629782] testvm1.both.org systemd[1]: Finished My hello shell script.
儘管單元文件的 WantedBy 部分包含了 graphical.target,hello.service 單元在啟動後大約 19.5 或 19.6 秒後運行。但是 hello.service 在 multi-user.target 中開始於 17.24 秒,在 graphical target 中開始於 19.43 秒。
這意味著什麼呢?看看 /etc/systemd/system/default.target 這個鏈接。文件內容顯示 systemd 先啟動了默認目標 graphical.target,然後 graphical.target 觸發了 multi-user.target。
[root@testvm1 system]# cat default.target
#  SPDX-License-Identifier: LGPL-2.1+
#
#  This file is part of systemd.
#
#  systemd is free software; you can redistribute it and/or modify it
#  under the terms of the GNU Lesser General Public License as published by
#  the Free Software Foundation; either version 2.1 of the License, or
#  (at your option) any later version.

[Unit]
Description=Graphical Interface
Documentation=man:systemd.special(7)
Requires=multi-user.target
Wants=display-manager.service
Conflicts=rescue.service rescue.target
After=multi-user.target rescue.service rescue.target display-manager.service
AllowIsolate=yes
[root@testvm1 system]#
不管是用 graphical.target 還是 multi-user.target 啟動服務,hello.service 單元都在啟動後的 19.5 或 19.6 秒後啟動。基於這個事實和日誌結果(特別是使用單調輸出的日誌),你就知道這些目標是在並行啟動。再看看日誌中另外一件事:
[   28.397330] testvm1.both.org systemd[1]: Reached target Multi-User System.
[   28.397431] testvm1.both.org systemd[1]: Reached target Graphical Interface.
兩個目標幾乎是同時完成的。這是和理論一致的,因為 graphical.target 觸發了 multi-user.target,在 multi-user.target 到達(即完成)之前它是不會完成的。但是 hello.service 比這個完成的早的多。
這一切表明,這兩個目標幾乎是並行啟動的。如果你查看日誌,你會發現各種目標和來自這類主要目標的服務大多是平行啟動的。很明顯,multi-user.target 沒有必要在 graphical.target 啟動前完成。所以,簡單的使用這些主要目標來並不能很好地排序啟動序列,儘管它在保證單元只在它們被 graphical.target 需要時啟動這方面很有用。
在繼續之前,把 hello.service 單元文件回滾至 WantedBy=multi-user.target(如果還沒做的話)。
確保一個服務在網路運行後啟動
一個常見的啟動問題是保證一個單元在網路啟動運行後再啟動。Freedesktop.org 的文章《在網路啟動後運行服務》中提到,目前沒有一個真正的關於網路何時算作「啟動」的共識。然而,這篇文章提供了三個選項,滿足完全可用網路需求的是 network-online.target。需要注意的是 network.target 是在關機階段使用的而不是啟動階段,所以它對你做有序啟動方面沒什麼幫助。
在做出任何改變之前,一定要檢查下日誌,確認 hello.service 單元在網路可用之前可以正確啟動。你可以在日誌中查找 network-online.target 來確認。
你的服務並不真的需要網路服務,但是你可以把它當作是需要網路的。
因為設置 WantedBy=graphical.target 並不能保證服務會在網路啟動可用後啟動,所以你需要其他的方法來做到這一點。幸運的是,有個簡單的方法可以做到。將下面兩行代碼加入 hello.service 單元文件的 [Unit] 段:
After=network-online.target
Wants=network-online.target
兩個欄位都需要才能生效。重啟機器,在日誌中找到服務的記錄:
[ 26.083121] testvm1.both.org NetworkManager[842]: <info> [1589227764.0293] device (enp0s3): Activation: successful, device activated.
[ 26.083349] testvm1.both.org NetworkManager[842]: <info> [1589227764.0301] manager: NetworkManager state is now CONNECTED_GLOBAL
[ 26.085818] testvm1.both.org NetworkManager[842]: <info> [1589227764.0331] manager: startup complete
[ 26.089911] testvm1.both.org systemd[1]: Finished Network Manager Wait Online.
[ 26.090254] testvm1.both.org systemd[1]: Reached target Network is Online.
[ 26.090399] testvm1.both.org audit[1]: SERVICE_START pid=1 uid=0 auid=4294967295 ses=4294967295 msg='unit=NetworkManager-wait-online comm="systemd" exe="/usr/lib/systemd/systemd" hostname=? addr=? termina>"'
[ 26.091991] testvm1.both.org systemd[1]: Starting My hello shell script...
[ 26.095864] testvm1.both.org sssd[be[implicit_files]][1007]: Starting up
[ 26.290539] testvm1.both.org systemd[1]: Condition check resulted in Login and scanning of iSCSI devices being skipped.
[ 26.291075] testvm1.both.org systemd[1]: Reached target Remote File Systems (Pre).
[ 26.291154] testvm1.both.org systemd[1]: Reached target Remote File Systems.
[ 26.292671] testvm1.both.org systemd[1]: Starting Notify NFS peers of a restart...
[ 26.294897] testvm1.both.org systemd[1]: iscsi.service: Unit cannot be reloaded because it is inactive.
[ 26.304682] testvm1.both.org hello.sh[1010]: ###############################
[ 26.304682] testvm1.both.org hello.sh[1010]: ######### Hello World! ########
[ 26.304682] testvm1.both.org hello.sh[1010]: ###############################
[ 26.306569] testvm1.both.org audit[1]: SERVICE_START pid=1 uid=0 auid=4294967295 ses=4294967295 msg='unit=hello comm="systemd" exe="/usr/lib/systemd/systemd" hostname=? addr=? terminal=? res=success'
[ 26.306669] testvm1.both.org audit[1]: SERVICE_STOP pid=1 uid=0 auid=4294967295 ses=4294967295 msg='unit=hello comm="systemd" exe="/usr/lib/systemd/systemd" hostname=? addr=? terminal=? res=success'
[ 26.306772] testvm1.both.org systemd[1]: hello.service: Succeeded.
[ 26.306862] testvm1.both.org systemd[1]: Finished My hello shell script.
[ 26.584966] testvm1.both.org sm-notify[1011]: Version 2.4.3 starting
這樣證實了 hello.service 單元會在 network-online.target 之後啟動。這正是你想要的。你可能也看見了 「Hello World」 消息在啟動階段出現。還需要注意的是,在啟動時記錄出現的時間戳比之前要晚了大約 6 秒。
定義啟動序列的最好方法
本文章詳細地探討了 Linux 啟動時 systemd 和單元文件以及日誌的細節,並且發現了當錯誤被引入單元文件時候會發生什麼。作為系統管理員,我發現這類實驗有助於我理解程序或者服務出故障時的行為,並且在安全環境中有意破壞是一種學習的好方法。
文章中實驗結果證明,僅將服務單元添加至 multi-user.target 或者 graphical.target 並不能確定它在啟動序列中的位置。它僅僅決定了一個單元是否作為圖形環境一部分啟動。事實上,啟動目標 multi-user.target 和 graphical.target 和所有它們的 Wants 以及 Required 幾乎是並行啟動的。確保單元在特定位置啟動的最好方法是確定它所依賴的單元,並將新單元配置成 Want 和 After 它的依賴。
資源
網上有大量的關於 systemd 的參考資料,但是大部分都有點簡略、晦澀甚至有誤導性。除了本文中提到的資料,下列的網頁提供了跟多可靠且詳細的 systemd 入門信息。
Fedora 項目有一篇切實好用的 systemd 入門,它囊括了幾乎所有你需要知道的關於如何使用 systemd 配置、管理和維護 Fedora 計算機的信息。
Fedora 項目也有一個不錯的 備忘錄,交叉引用了過去 SystemV 命令和 systemd 命令做對比。
關於 systemd 的技術細節和創建這個項目的原因,請查看 Freedesktop.org 上的 systemd 描述。
Linux.com 的「更多 systemd 的樂趣」欄目提供了更多高級的 systemd 信息和技巧。
此外,還有一系列深度的技術文章,是由 systemd 的設計者和主要開發者 Lennart Poettering 為 Linux 系統管理員撰寫的。這些文章寫於 2010 年 4 月至 2011 年 9 月間,但它們現在和當時一樣具有現實意義。關於 systemd 及其生態的許多其他好文章都是基於這些文章:
- Rethinking PID 1
- systemd for Administrators,Part I
- systemd for Administrators,Part II
- systemd for Administrators,Part III
- systemd for Administrators,Part IV
- systemd for Administrators,Part V
- systemd for Administrators,Part VI
- systemd for Administrators,Part VII
- systemd for Administrators,Part VIII
- systemd for Administrators,Part IX
- systemd for Administrators,Part X
- systemd for Administrators,Part XI
via: https://opensource.com/article/20/5/manage-startup-systemd
作者:David Both 選題:lujun9972 譯者:tt67wq 校對:wxy
本文轉載來自 Linux 中國: https://github.com/Linux-CN/archive
對這篇文章感覺如何?
You may also like


More in:Linux中國

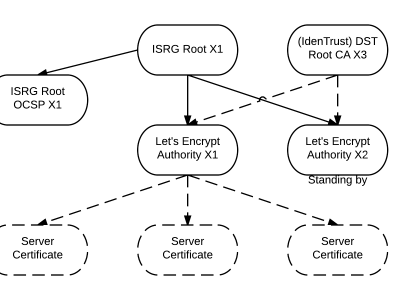
捐贈 Let's Encrypt,共建安全的互聯網
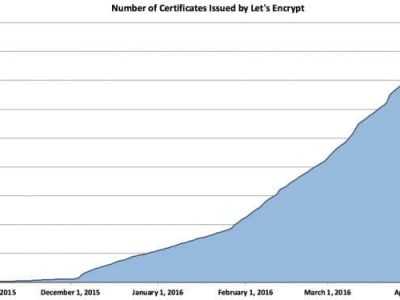
Let's Encrypt 正式發布,已經保護 380 萬個域名

關於Linux防火牆iptables的面試問答
Lets Encrypt 已被所有主流瀏覽器所信任