詳解 Ubuntu snap 包的製作過程

在這篇文章中,我們將看到如何為名為 timg 的實用程序製作對應的 snap 包。如果這是你第一次聽說 snap 安裝包,你可以先看看 如何創建你的第一個 snap 包。
今天我們將學習以下有關使用 snapcraft 製作 snap 包的內容:
- timg 源碼中的 Makefile 文件是手工編寫,我們需要修改一些 make 插件參數。
- 這個程序是用 C++ 語言寫的,依賴幾個額外的庫文件。我們需要把相關的代碼添加到 snap 包中。
- 嚴格限制還是傳統限制?我們將會討論如何在它們之間進行選擇。
首先,我們了解下 timg 有什麼用?
背景
Linux 終端模擬器已經變得非常炫酷,並且還能顯示顏色!
除了標準的顏色,大多數終端模擬器(如上圖顯示的 GNOME 終端)都支持真彩色(1600 萬種顏色)。
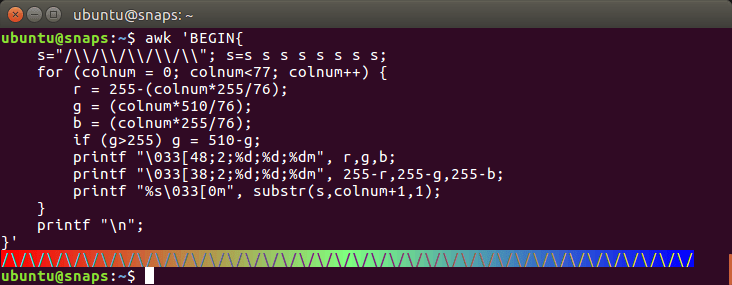
是的!終端模擬器已經支持真彩色了!從這個頁面「 多個終端和終端應用程序已經支持真彩色(1600 萬種顏色)」 可以獲取 AWK 代碼自己進行測試。你可以看到在代碼中使用了一些 轉義序列 來指定 RGB 的值(256 256 256 ~= 1600 萬種顏色)。
timg 是什麼?
好了,言歸正傳,timg 有什麼用?它能將輸入的圖片重新調整為終端窗口字元所能顯示範圍的大小(比如:80 x 25),然後在任何解析度的終端窗口用彩色字元顯示圖像。

這幅圖用彩色塊字元顯示了 Ubuntu 的 logo,原圖是一個 PNG 格式的文件。
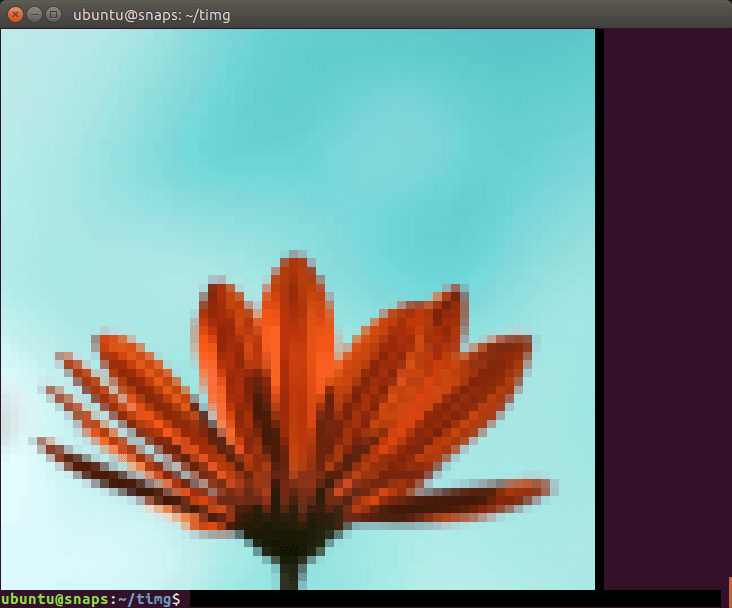
這是 @Doug8888 拍攝的花。
如果你通過遠程連接伺服器來管理自己的業務,並想要查看圖像文件,那麼 timg 將會特別有用。
除了靜態圖片,timg 同樣也可以顯示 gif 動圖。
那麼讓我們開始 snap 之旅吧!
熟悉 timg 的源碼
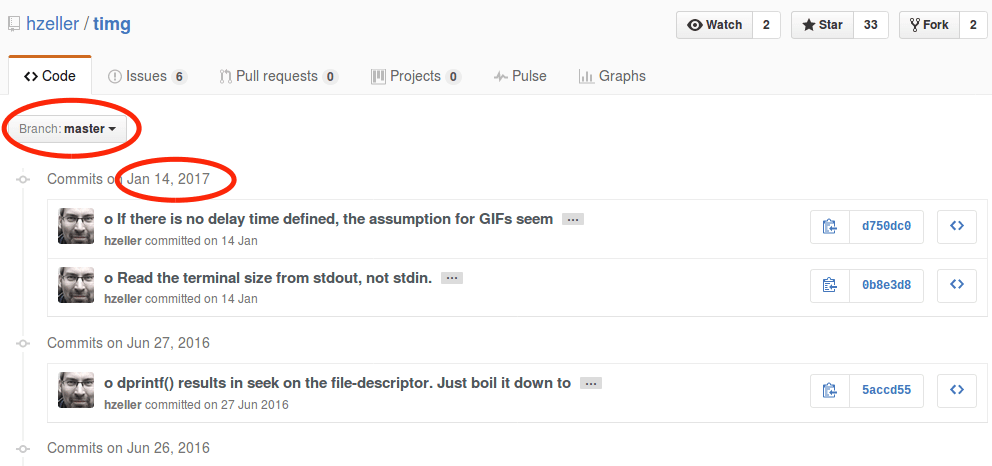
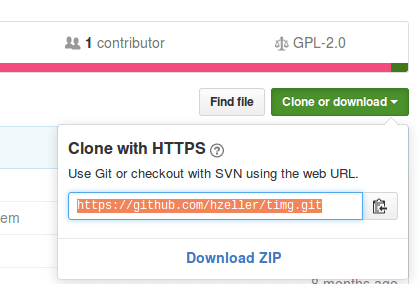
timg 的源碼可以在 https://github.com/hzeller/timg 找到。讓我們試著手動編譯它,以了解它有什麼需求。
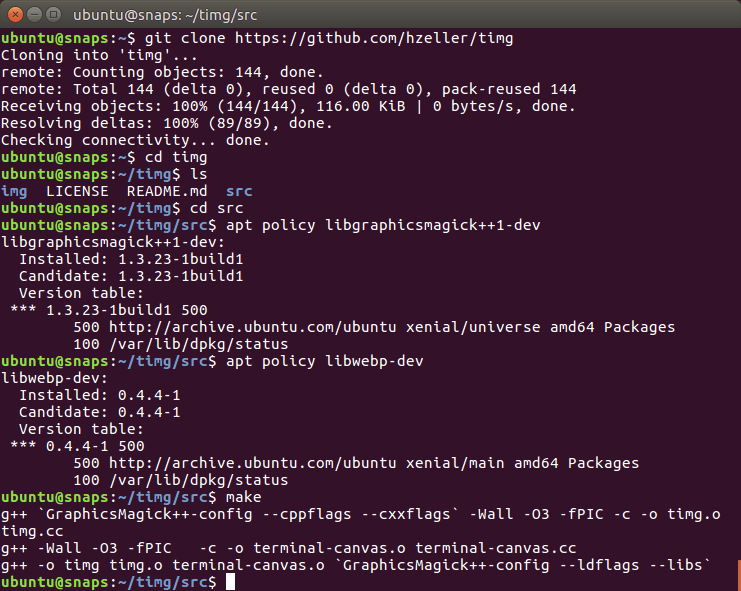
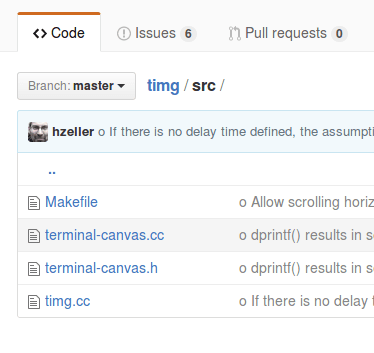
Makefile 在 src/ 子文件夾中而不是項目的根文件夾中。在 github 頁面上,他們說需要安裝兩個開發包(GraphicsMagic++ 和 WebP),然後使用 make 就能生成可執行文件。在截圖中可以看到我已經將它們安裝好了(在我讀完相關的 Readme.md 文件後)。
因此,在編寫 snapcraft.yaml 文件時已經有了四條腹稿:
Makefile在src/子文件夾中而不是項目的根文件夾中。- 這個程序編譯時需要兩個開發庫。
- 為了讓 timg 以 snap 包形式運行,我們需要將這兩個庫捆綁在 snap 包中(或者靜態鏈接它們)。
- timg 是用 C++ 編寫的,所以需要安裝 g++。在編譯之前,讓我們通過
snapcraft.yaml文件來檢查build-essential元包是否已經安裝。
從 snapcraft 開始
讓我們新建一個名為 timg-snap/ 的文件夾,並在其中運行 snapcraft init 這條命令來創建 snapcraft.yaml 工作的框架。
ubuntu@snaps:~$ mkdir timg-snap
ubuntu@snaps:~$ cd timg-snap/
ubuntu@snaps:~/timg-snap$ snapcraft init
Created snap/snapcraft.yaml.
Edit the file to your liking or run `snapcraft` to get started
ubuntu@snaps:~/timg-snap$ cat snap/snapcraft.yaml
name: my-snap-name # you probably want to 'snapcraft register <name>'
version: '0.1' # just for humans, typically '1.2+git' or '1.3.2'
summary: Single-line elevator pitch for your amazing snap # 79 char long summary
description: |
This is my-snap's description. You have a paragraph or two to tell the most important story about your snap. Keep it under 100 words though, we live in tweetspace and your description wants to look good in the snap store.
grade: devel # must be 'stable' to release into candidate/stable channels
confinement: devmode # use 'strict' once you have the right plugs and slots
parts:
my-part:
# See 'snapcraft plugins'
plugin: nil
填充元數據
snapcraft.yaml 配置文件的上半部分是元數據。我們需要一個一個把它們填滿,這算是比較容易的部分。元數據由以下欄位組成:
name(名字)—— snap 包的名字,它將公開在 Ubuntu 商店中。version(版本)—— snap 包的版本號。可以是源代碼存儲庫中一個適當的分支或者標記,如果沒有分支或標記的話,也可以是當前日期。summary(摘要)—— 不超過 80 個字元的簡短描述。description(描述)—— 長一點的描述, 100 個字以下。grade(等級)——stable(穩定)或者devel(開發)。因為我們想要在 Ubuntu 商店的穩定通道中發布這個 snap 包,所以在 snap 包能正常工作後,就把它設置成stable。confinement(限制)—— 我們首先設置為devmode(開發模式),這樣系統將不會以任何方式限制 snap 包。一旦它在devmode下能正常工作,我們再考慮選擇strict(嚴格)還是classic(傳統)限制。
我們將使用 timg 這個名字:
ubuntu@snaps:~/timg-snap$ snapcraft register timg
Registering timg.
You already own the name 'timg'.
是的,這個名字我已經註冊了 :-)。
接下來,我們應該選擇哪個版本的 timg?

當在倉庫中尋找分支或標記時,我們會發現有一個 v0.9.5 標籤,其中有 2016 年 6 月 27 日最新提交的代碼。
然而主分支(master)中有兩個看起來很重要的提交。因此我們使用主分支而不用 v0.9.5 標籤的那個。我們使用今天的日期—— 20170226 做為版本號。
我們從倉庫中搜集了摘要和描述。其中摘要的內容為 A terminal image viewer,描述的內容為 A viewer that uses 24-Bit color capabilities and unicode character blocks to display images in the terminal。
最後,將 grade (等級)設置為 stable (穩定),將 confinement 限制設置為 devmode (開發模式)(一直到 snap 包真正起作用)。
這是更新後的 snapcraft.yaml,帶有所有的元數據:
ubuntu@snaps:~/timg-snap$ cat snap/snapcraft.yaml
name: timg
version: '20170226'
summary: A terminal image viewer
description: |
  A viewer that uses 24-Bit color capabilities and unicode character blocks to display images in the terminal.

grade: stable
confinement: devmode

parts:
  my-part:
    # See 'snapcraft plugins'
    plugin: nil
弄清楚 parts: 是什麼
現在我們需要將上面已經存在的 parts: 部分替換成真實的 parts:。
Git 倉庫的 URL。
存在 Makefile,因此我們需要 make 插件。
我們已經知道 git 倉庫的 URL 鏈接,並且 timg 源碼中已有了 Makefile 文件。至於 snapcraft make 插件 的 Makefile 命令,正如文檔所言,這個插件總是會運行 make 後再運行 make install。為了確認 make 插件的用法,我查看了 snapcraft 可用插件列表。
因此,我們將最初的配置:
parts:
  my-part:
    # See 'snapcraft plugins'
    plugin: nil
修改為:
parts:
  timg:
    source: https://github.com/hzeller/timg.git
    plugin: make
這是當前 snapcraft.yaml 文件的內容:
name: timg
version: '20170226'
summary: A terminal image viewer
description: |
  A viewer that uses 24-Bit color capabilities and unicode character blocks
  to display images in the terminal.

grade: stable
confinement: devmode

parts:
  timg:
    source: https://github.com/hzeller/timg.git
    plugin: make
讓我們運行下 snapcraft prime 命令看看會發生什麼:
ubuntu@snaps:~/timg-snap$ snapcraft prime
Preparing to pull timg
Pulling timg
Cloning into '/home/ubuntu/timg-snap/parts/timg/src'...
remote: Counting objects: 144, done.
remote: Total 144 (delta 0), reused 0 (delta 0), pack-reused 144
Receiving objects: 100% (144/144), 116.00 KiB | 0 bytes/s, done.
Resolving deltas: 100% (89/89), done.
Checking connectivity... done.
Preparing to build timg
Building timg
make -j4
make: *** No targets specified and no makefile found.  Stop.
Command '['/bin/sh', '/tmp/tmpem97fh9d', 'make', '-j4']' returned non-zero exit status 2
ubuntu@snaps:~/timg-snap$
我們可以看到 snapcraft 無法在源代碼中找到 Makefile 文件,正如我們之前所暗示的,Makefile 位於 src/ 子文件夾中。那麼,我們可以讓 snapcraft 使用 src/ 文件夾中的 Makefile 文件嗎?
每個 snapcraft 插件都有自己的選項,並且有一些通用選項是所有插件共享的。在本例中,我們希望研究那些與源代碼相關的 snapcraft 選項。我們開始吧:
source-subdir:path
snapcraft 會 檢出 source 關鍵字所引用的倉庫或者解壓歸檔文件到 parts/<part-name>/src/ 中,但是它只會將特定的子目錄複製到 parts/<part-name>/build/ 中。
我們已經有了適當的選項,下面更新下 parts:
parts:
  timg:
    source: https://github.com/hzeller/timg.git
    source-subdir: src
    plugin: make
然後再次運行 snapcraft prime:
ubuntu@snaps:~/timg-snap$ snapcraft prime
The 'pull' step of 'timg' is out of date:

The 'source-subdir' part property appears to have changed.

Please clean that part's 'pull' step in order to continue
ubuntu@snaps:~/timg-snap$ snapcraft clean
Cleaning up priming area
Cleaning up staging area
Cleaning up parts directory
ubuntu@snaps:~/timg-snap$ snapcraft prime
Skipping pull timg (already ran)
Preparing to build timg
Building timg
make -j4
g++ `GraphicsMagick++-config --cppflags --cxxflags` -Wall -O3 -fPIC -c -o timg.o timg.cc
g++ -Wall -O3 -fPIC   -c -o terminal-canvas.o terminal-canvas.cc
/bin/sh: 1: GraphicsMagick++-config: not found
timg.cc:33:22: fatal error: Magick++.h: No such file or directory
compilation terminated.
Makefile:10: recipe for target 'timg.o' failed
make: *** [timg.o] Error 1
make: *** Waiting for unfinished jobs....
Command '['/bin/sh', '/tmp/tmpeeyxj5kw', 'make', '-j4']' returned non-zero exit status 2
ubuntu@snaps:~/timg-snap$
從錯誤信息我們可以得知 snapcraft 找不到 GraphicsMagick++ 這個開發庫文件。根據 snapcraft 常見關鍵字 可知,我們需要在 snapcraft.yaml 中指定這個庫文件,這樣 snapcraft 才能安裝它。
build-packages:[deb, deb, deb…]
列出構建 part 前需要在主機中安裝的 Ubuntu 包。這些包通常不會進入最終的 snap 包中,除非它們含有 snap 包中二進位文件直接依賴的庫文件(在這種情況下,可以通過 ldd 發現它們),或者在 stage-package 中顯式地指定了它們。
讓我們尋找下這個開發包的名字:
ubuntu@snaps:~/timg-snap$ apt-cache search graphicsmagick++ | grep dev
graphicsmagick-libmagick-dev-compat/xenial 1.3.23-1build1 all
libgraphicsmagick++1-dev/xenial 1.3.23-1build1 amd64
  format-independent image processing - C++ development files
libgraphicsmagick1-dev/xenial 1.3.23-1build1 amd64
  format-independent image processing - C development files
ubuntu@snaps:~/timg-snap$
可以看到包名為 libgraphicsmagick++1-dev,下面是更新後的 parts:
parts:
  timg:
    source: https://github.com/hzeller/timg.git
    source-subdir: src
    plugin: make
    build-packages:
      - libgraphicsmagick++1-dev
再次運行 snapcraft:
ubuntu@snaps:~/timg-snap$ snapcraft
Installing build dependencies: libgraphicsmagick++1-dev
[...]
The following NEW packages will be installed:
  libgraphicsmagick++-q16-12 libgraphicsmagick++1-dev libgraphicsmagick-q16-3
  libgraphicsmagick1-dev libwebp5
[...]
Building timg
make -j4
g++ `GraphicsMagick++-config --cppflags --cxxflags` -Wall -O3 -fPIC -c -o timg.o timg.cc
g++ -Wall -O3 -fPIC   -c -o terminal-canvas.o terminal-canvas.cc
g++ -o timg timg.o terminal-canvas.o `GraphicsMagick++-config --ldflags --libs`
/usr/bin/ld: cannot find -lwebp
collect2: error: ld returned 1 exit status
Makefile:7: recipe for target 'timg' failed
make: *** [timg] Error 1
Command '['/bin/sh', '/tmp/tmptma45jzl', 'make', '-j4']' returned non-zero exit status 2
ubuntu@snaps:~/timg-snap$
雖然只指定了開發庫 libgraphicsmagick+1-dev,但 Ubuntu 還安裝了一些代碼庫,包括 libgraphicsmagick ++-q16-12,以及動態代碼庫 libwebp。
這裡仍然有一個錯誤,這個是因為缺少開發版本的 webp 庫(一個靜態庫)。我們可以通過下面的命令找到它:
ubuntu@snaps:~/timg-snap$ apt-cache search libwebp | grep dev
libwebp-dev - Lossy compression of digital photographic images.
ubuntu@snaps:~/timg-snap$
上面安裝的 libwebp5 包只提供了一個動態庫(.so)。通過 libwebp-dev 包,我們可以得到相應的靜態庫(.a)。好了,讓我們更新下 parts: 部分:
parts:
  timg:
    source: https://github.com/hzeller/timg.git
    source-subdir: src
    plugin: make
    build-packages:
      - libgraphicsmagick++1-dev
      - libwebp-dev
下面是更新後的 snapcraft.yaml 文件的內容:
name: timg
version: '20170226'
summary: A terminal image viewer
description: |
  A viewer that uses 24-Bit color capabilities and unicode character blocks
  to display images in the terminal.

grade: stable
confinement: devmode

parts:
  timg:
    source: https://github.com/hzeller/timg.git
    source-subdir: src
    plugin: make
    build-packages:
      - libgraphicsmagick++1-dev
      - libwebp-dev
讓我們運行下 snapcraft prime:
ubuntu@snaps:~/timg-snap$ snapcraft prime
Skipping pull timg (already ran)
Preparing to build timg
Building timg
make -j4
g++ `GraphicsMagick++-config --cppflags --cxxflags` -Wall -O3 -fPIC -c -o timg.o timg.cc
g++ -Wall -O3 -fPIC   -c -o terminal-canvas.o terminal-canvas.cc
g++ -o timg timg.o terminal-canvas.o `GraphicsMagick++-config --ldflags --libs`
make install DESTDIR=/home/ubuntu/timg-snap/parts/timg/install
install timg /usr/local/bin
install: cannot create regular file '/usr/local/bin/timg': Permission denied
Makefile:13: recipe for target 'install' failed
make: *** [install] Error 1
Command '['/bin/sh', '/tmp/tmptq_s1itc', 'make', 'install', 'DESTDIR=/home/ubuntu/timg-snap/parts/timg/install']' returned non-zero exit status 2
ubuntu@snaps:~/timg-snap$
我們遇到了一個新問題。由於 Makefile 文件是手工編寫的,不符合 snapcraft make 插件 的參數設置,所以不能正確安裝到 prime/ 文件夾中。Makefile 會嘗試安裝到 usr/local/bin 中。
我們需要告訴 snapcraft make 插件 不要運行 make install,而是找到 timg 可執行文件然後把它放到 prime/ 文件夾中。根據文檔的描述:
- artifacts:
(列表)
將 make 生成的指定文件複製或者鏈接到 snap 包安裝目錄。如果使用,則 `make install` 這步操作將被忽略。
所以,我們需要將一些東西放到 artifacts: 中。但是具體是哪些東西?
ubuntu@snaps:~/timg-snap/parts/timg$ ls build/src/
Makefile            terminal-canvas.h  timg*     timg.o
terminal-canvas.cc  terminal-canvas.o  timg.cc
ubuntu@snaps:~/timg-snap/parts/timg$
在 build/ 子目錄中,我們可以找到 make 的輸出結果。由於我們設置了 source-subdir: 為 src,所以 artifacts: 的基目錄為 build/src。在這裡我們可以找到可執行文件 timg,我們需要將它設置為 artifacts: 的一個參數。通過 artifacts:,我們可以把 make 輸出的某些文件複製到 snap 包的安裝目錄(在 prime/ 中)。
下面是更新後 snapcraft.yaml 文件 parts: 部分的內容:
parts:
  timg:
    source: https://github.com/hzeller/timg.git
    source-subdir: src
    plugin: make
    build-packages:
      - libgraphicsmagick++1-dev
      - libwebp-dev
    artifacts: [timg]
讓我們運行 snapcraft prime:
ubuntu@snaps:~/timg-snap$ snapcraft prime
Preparing to pull timg
Pulling timg
Cloning into '/home/ubuntu/timg-snap/parts/timg/src'...
remote: Counting objects: 144, done.
remote: Total 144 (delta 0), reused 0 (delta 0), pack-reused 144
Receiving objects: 100% (144/144), 116.00 KiB | 207.00 KiB/s, done.
Resolving deltas: 100% (89/89), done.
Checking connectivity... done.
Preparing to build timg
Building timg
make -j4
g++ `GraphicsMagick++-config --cppflags --cxxflags` -Wall -O3 -fPIC -c -o timg.o timg.cc
g++ -Wall -O3 -fPIC   -c -o terminal-canvas.o terminal-canvas.cc
g++ -o timg timg.o terminal-canvas.o `GraphicsMagick++-config --ldflags --libs`
Staging timg
Priming timg
ubuntu@snaps:~/timg-snap$
我們還將繼續迭代。
導出命令
到目前為止,snapcraft 生成了可執行文件,但沒有導出給用戶使用的命令。接下來我們需要通過 apps: 導出一個命令。
首先我們需要知道命令在 prime/ 的哪個子文件夾中:
ubuntu@snaps:~/timg-snap$ ls prime/
meta/  snap/  timg*  usr/
ubuntu@snaps:~/timg-snap$
它在 prime/ 子文件夾的根目錄中。現在,我們已經準備好要在 snapcaft.yaml 中增加 apps: 的內容:
ubuntu@snaps:~/timg-snap$ cat snap/snapcraft.yaml
name: timg
version: '20170226'
summary: A terminal image viewer
description: |
  A viewer that uses 24-Bit color capabilities and unicode character blocks
  to display images in the terminal.

grade: stable
confinement: devmode

apps:
  timg:
    command: timg

parts:
  timg:
    source: https://github.com/hzeller/timg.git
    source-subdir: src
    plugin: make
    build-packages:
      - libgraphicsmagick++1-dev
      - libwebp-dev
    artifacts: [timg]
讓我們再次運行 snapcraft prime,然後測試下生成的 snap 包:
ubuntu@snaps:~/timg-snap$ snapcraft prime
Skipping pull timg (already ran)
Skipping build timg (already ran)
Skipping stage timg (already ran)
Skipping prime timg (already ran)
ubuntu@snaps:~/timg-snap$ snap try --devmode prime/
timg 20170226 mounted from /home/ubuntu/timg-snap/prime
ubuntu@snaps:~/timg-snap$
圖片來源: https://www.flickr.com/photos/mustangjoe/6091603784/
我們可以通過 snap try --devmode prime/ 啟用該 snap 包然後測試 timg 命令。這是一種高效的測試方法,可以避免生成 .snap 文件,並且無需安裝和卸載它們,因為 snap try prime/ 直接使用了 prime/ 文件夾中的內容。
限制 snap
到目前為止,snap 包一直是在不受限制的開發模式下運行的。讓我們看看如何限制它的運行:
ubuntu@snaps:~/timg-snap$ snap list
Name Version Rev Developer Notes
core 16-2 1337 canonical -
timg 20170226 x1 devmode,try
ubuntu@snaps:~/timg-snap$ snap try --jailmode prime
timg 20170226 mounted from /home/ubuntu/timg-snap/prime
ubuntu@snaps:~/timg-snap$ snap list
Name Version Rev Developer Notes
core 16-2 1337 canonical -
timg 20170226 x2 jailmode,try
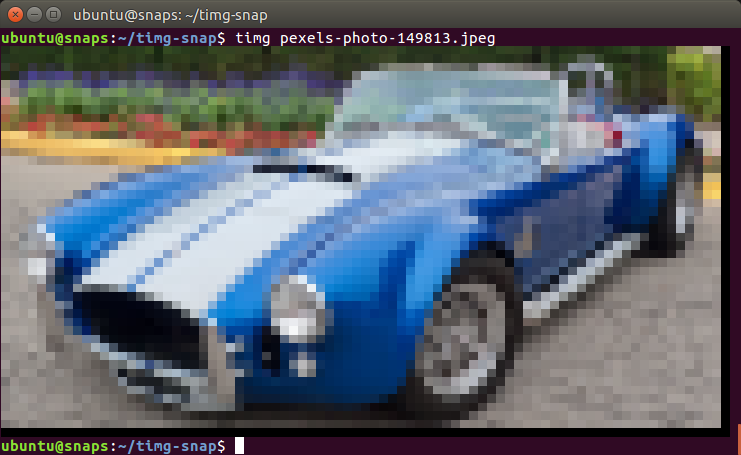
ubuntu@snaps:~/timg-snap$ timg pexels-photo-149813.jpeg
Trouble loading pexels-photo-149813.jpeg (Magick: Unable to open file (pexels-photo-149813.jpeg) reported by magick/blob.c:2828 (OpenBlob))
ubuntu@snaps:~/timg-snap$
通過這種方式,我們可以無需修改 snapcraft.yaml 文件就從開發模式(devmode)切換到限制模式(jailmode)(confinement: strict)。正如預期的那樣,timg 無法讀取圖像,因為我們沒有開放訪問文件系統的許可權。
現在,我們需要作出決定。使用限制模式,我們可以很容易授予某個命令訪問用戶 $HOME 目錄中文件的許可權,但是只能訪問那裡。如果圖像文件位於其它地方,我們總是需要複製到 $HOME 目錄並在 $HOME 的副本上運行 timg。如果我們覺得可行,那我們可以設置 snapcraf.yaml 為:
name: timg
version: '20170226'
summary: A terminal image viewer
description: |
  A viewer that uses 24-Bit color capabilities and unicode character blocks
  to display images in the terminal.

grade: stable
confinement: strict

apps:
  timg:
    command: timg
    plugs: [home]

parts:
  timg:
    source: https://github.com/hzeller/timg.git
    source-subdir: src
    plugin: make
    build-packages:
      - libgraphicsmagick++1-dev
      - libwebp-dev
    artifacts: [timg]
另一方面,如果希望 timg snap 包能訪問整個文件系統,我們可以設置傳統限制來實現。對應的 snapcraft.yaml 內容如下:
name: timg
version: '20170226'
summary: A terminal image viewer
description: |
  A viewer that uses 24-Bit color capabilities and unicode character blocks
  to display images in the terminal.

grade: stable
confinement: classic

apps:
  timg:
    command: timg

parts:
  timg:
    source: https://github.com/hzeller/timg.git
    source-subdir: src
    plugin: make
    build-packages:
      - libgraphicsmagick++1-dev
      - libwebp-dev
    artifacts: [timg]
接下來我們將選擇嚴格(strict)約束選項。因此,圖像應該只能放在 $HOME 中。
打包和測試
讓我們打包這個 snap,也就是製作 .snap 文件,然後在新安裝的 Ubuntu 系統上對它進行測試。
ubuntu@snaps:~/timg-snap$ snapcraft
Skipping pull timg (already ran)
Skipping build timg (already ran)
Skipping stage timg (already ran)
Skipping prime timg (already ran)
Snapping 'timg'
Snapped timg_20170226_amd64.snap
ubuntu@snaps:~/timg-snap$
我們如何在幾秒鐘內得到一個全新安裝的 Ubuntu 系統來對 snap 包進行測試?
請查看 嘗試在 Ubuntu 上使用 LXD 容器,並在你的系統上設置 LXD。然後回到這裡,嘗試運行下面的命令:
$ lxc launch ubuntu:x snaptesting
Creating snaptesting
Starting snaptesting
$ lxc file push timg_20170226_amd64.snap snaptesting/home/ubuntu/
$ lxc exec snaptesting -- sudo su - ubuntu
To run a command as administrator (user "root"), use "sudo <command>".
See "man sudo_root" for details.

ubuntu@snaptesting:~$ ls
timg_20170226_amd64.snap
ubuntu@snaptesting:~$ snap install timg_20170226_amd64.snap
error: access denied (try with sudo)
ubuntu@snaptesting:~$ sudo snap install timg_20170226_amd64.snap
error: cannot find signatures with metadata for snap "timg_20170226_amd64.snap"
ubuntu@snaptesting:~$ sudo snap install timg_20170226_amd64.snap --dangerous
error: cannot perform the following tasks:
- Mount snap "core" (1337) ([start snap-core-1337.mount] failed with exit status 1: Job for snap-core-1337.mount failed. See "systemctl status snap-core-1337.mount" and "journalctl -xe" for details.
)
ubuntu@snaptesting:~$ sudo apt install squashfuse
[...]
Setting up squashfuse (0.1.100-0ubuntu1~ubuntu16.04.1) ...
ubuntu@snaptesting:~$ sudo snap install timg_20170226_amd64.snap --dangerous
timg 20170226 installed
ubuntu@snaptesting:~$ wget https://farm7.staticflickr.com/6187/6091603784_d6960c8be2_z_d.jpg
[...]
2017-02-26 22:12:18 (636 KB/s) - 『6091603784_d6960c8be2_z_d.jpg』 saved [240886/240886]
ubuntu@snaptesting:~$ timg 6091603784_d6960c8be2_z_d.jpg
[it worked!]
ubuntu@snaptesting:~$
我們啟動了一個名為 snaptesting 的 LXD 容器,並將 .snap 文件複製進去。然後,通過普通用戶連接到容器,並嘗試安裝 snap 包。最初,我們安裝失敗了,因為在無特權的 LXD 容器中安裝 snap 包需要使用 sudo 。接著又失敗了,因為 .snap 沒有經過簽名(我們需要使用 --dangerous 參數)。然而還是失敗了,這次是因為我們需要安裝 squashfuse 包(Ubuntu 16.04 鏡像中沒有預裝)。最後,我們成功安裝了snap,並設法查看了圖像。
在一個全新安裝的 Linux 系統中測試 snap 包是很重要的,因為這樣才能確保 snap 包中包含所有必須的代碼庫。在這個例子中,我們使用了靜態庫並運行良好。
發布到 Ubuntu 商店
這是 發布 snap 包到 Ubuntu 商店的說明。 在之前的教程中,我們已經發布了一些 snap 包。對於 timg 來說,我們設置了嚴格限制和穩定等級。因此,我們會將它發布到穩定通道。
$ snapcraft push timg_20170226_amd64.snap
Pushing 'timg_20170226_amd64.snap' to the store.
Uploading timg_20170226_amd64.snap [                                       ]   0%
Uploading timg_20170226_amd64.snap [=======================================] 100%
Ready to release!|
Revision 6 of 'timg' created.
$ snapcraft release timg 6 stable
Track    Arch    Series    Channel    Version    Revision
latest   amd64   16        stable     20170226   6
                           candidate  ^          ^
                           beta       0.9.5      5
                           edge       0.9.5      5
The 'stable' channel is now open.
我們把 .snap 包推送到 Ubuntu 商店後,得到了一個 Revision 6。然後,我們將 timg Revision 6 發布到了 Ubuntu 商店的穩定通道。
在候選通道中沒有已發布的 snap 包,它繼承的是穩定通道的包,所以顯示 ^ 字元。
在之前的測試中,我將一些較老版本的 snap 包上傳到了測試和邊緣通道。這些舊版本使用了 timg 標籤為 0.9.5 的源代碼。
我們可以通過將穩定版本發布到測試和邊緣通道來移除舊的 0.9.5 版本的包。
$ snapcraft release timg 6 beta
Track    Arch    Series    Channel    Version    Revision
latest   amd64   16        stable     20170226   6
                           candidate  ^          ^
                           beta       20170226   6
                           edge       0.9.5      5
$ snapcraft release timg 6 edge
Track    Arch    Series    Channel    Version    Revision
latest   amd64   16        stable     20170226   6
                           candidate  ^          ^
                           beta       20170226   6
                           edge       20170226   6
使用 timg
讓我們不帶參數運行 timg:
ubuntu@snaptesting:~$ timg
Expected image filename.
usage: /snap/timg/x1/timg [options] <image> [<image>...]
Options:
    -g<w>x<h>  : Output pixel geometry. Default from terminal 80x48
    -s[<ms>]   : Scroll horizontally (optionally: delay ms (60)).
    -d<dx:dy>  : delta x and delta y when scrolling (default: 1:0).
    -w<seconds>: If multiple images given: Wait time between (default: 0.0).
    -t<seconds>: Only animation or scrolling: stop after this time.
    -c<num>    : Only Animation or scrolling: number of runs through a full cycle.
    -C         : Clear screen before showing image.
    -F         : Print filename before showing picture.
    -v         : Print version and exit.
If both -c and -t are given, whatever comes first stops.
If both -w and -t are given for some animation/scroll, -t takes precedence
ubuntu@snaptesting:~$
這裡提到當前我們終端模擬器的縮放級別,即解析度為:80 × 48。
讓我們縮小一點,並最大化 GNOME 終端窗口。
-g<w>x<h> : Output pixel geometry. Default from terminal 635x428
這是一個更好的解決方案,但我幾乎看不到字元,因為他們太小了。讓我們調用前面的命令再次顯示這輛車。

你所看到的是調整後的圖像(1080p)。雖然它是用彩色文本字元顯示的,但看起來依舊很棒。
接下來呢?timg 其實也可以播放 gif 動畫哦!
$ wget https://m.popkey.co/9b7141/QbAV_f-maxage-0.gif -O JonahHillAmazed.gif$ timg JonahHillAmazed.gif
你可以試著安裝 timg 來體驗 gif 動畫。要是不想自己動手,可以在 asciinema 上查看相關記錄 (如果視頻看上去起伏不定的,請重新運行它)。
謝謝閱讀!
譯者簡介:
經常混跡於 snapcraft.io,對 Ubuntu Core、Snaps 和 Snapcraft 有著濃厚的興趣,並致力於將這些還在快速發展的新技術通過翻譯或原創的方式介紹到中文世界。有興趣的小夥伴也可以關註譯者個人公眾號: Snapcraft
via:https://blog.simos.info/how-to-create-a-snap-for-timg-with-snapcraft-on-ubuntu/
作者:Mi blog lah! 譯者:Snapcrafter 校對:wxy
本文轉載來自 Linux 中國: https://github.com/Linux-CN/archive
對這篇文章感覺如何?
You may also like


More in:Linux中國

捐贈 Let's Encrypt,共建安全的互聯網
Let's Encrypt 正式發布,已經保護 380 萬個域名

關於Linux防火牆iptables的面試問答
Lets Encrypt 已被所有主流瀏覽器所信任