如何編寫 VS Code 擴展
Visual Studio Code(VS Code)是微軟為 Linux、Windows 和 macOS 創建的跨平台代碼編輯器。遺憾的是,微軟版本的 VS Code 是在 Microsoft Software License 下發布的,這不是一個開源的許可證。然而,它的源代碼是開源的,在 MIT 許可證下由 VSCodium 項目發布。
VSCodium 和 VS Code一樣,支持擴展、內嵌式 Git 控制、GitHub 集成、語法高亮、調試、智能代碼補完、代碼片段等。換句話說,對於大多數用戶來說,使用 VS Code 和 VSCodium 沒有什麼區別,而且後者是完全開源的!
什麼是 VS Code 擴展?
擴展 可以讓你為 VS Code 或 VSCodium 添加功能。你可以在 GUI 中或從終端安裝擴展。
你也可以構建自己的擴展。有幾個你可能想學習如何構建擴展的原因:
- 想要添加一些功能: 如果缺失你想要的功能,你可以創建一個擴展來添加它。
- 為了樂趣和學習: 擴展 API 允許你探索 VSCodium 是如何工作的,這是一件有趣的事情。
- 為了提高您的技能: 創建擴展可以提高你的編程技能。
- 為了成名: 創建一個對他人有用的擴展可以提高你的公眾形象。
安裝工具
在你開始之前,你必須已經安裝了 Node.js、npm 和 VS Code 或 VSCodium。
要生成一個擴展,你還需要以下工具:Yeoman,是一個開源的客戶端腳手架工具,可以幫助你搭建新項目;以及 vscode-generator-code,是 VS Code 團隊創建的 Yeoman 生成器。
構建一個擴展
在本教程中,你將構建一個擴展,它可以為應用程序初始化一個 Docker 鏡像。
生成一個擴展骨架
要在全局範圍內安裝並運行 Yeoman 生成器,請在命令提示符或終端中輸入以下內容:
npm install -g yo generator-code
導航到要生成擴展的文件夾,鍵入以下命令,然後按回車:
yo code
根據提示,你必須回答一些關於你的擴展的問題:
- 你想創建什麼類型的擴展? 使用上下箭頭選擇其中一個選項。在本文中,我將只介紹第一個選項,
New Extension (TypeScript)。 - 你的擴展名稱是什麼? 輸入你的擴展名稱。我的叫
initdockerapp。(我相信你會有一個更好的名字。) - 你的擴展的標識符是什麼? 請保持原樣。
- 你的擴展的描述是什麼? 寫一些關於你的擴展的內容(你可以現在填寫或稍後編輯它)。
- 初始化 Git 倉庫? 這將初始化一個 Git 倉庫,你可以稍後添加
set-remote。 - 使用哪個包管理器? 你可以選擇
yarn或npm;我使用npm。
按回車鍵後,就會開始安裝所需的依賴項。最後顯示:
"Your extension initdockerapp has been created!"
乾的漂亮!
檢查項目的結構
檢查你生成的東西和項目結構。導航到新的文件夾,並在終端中鍵入 cd initdockerapp。
一旦你進入該目錄,鍵入 .code。它將在你的編輯器中打開,看起來像這樣。

(Hussain Ansari, CC BY-SA 4.0)
最需要注意的兩個文件是 src 文件夾內的 package.json 和 extension.ts。
package.json
首先來看看 package.json,它應該是這樣的:
{
        "name": "initdockerapp",
        "displayName": "initdockerapp",
        "description": "",
        "version": "0.0.1",
        "engines": {
                "vscode": "^1.44.0"
        },
        "categories": [
                "Other"
        ],
        "activationEvents": [
                "onCommand:initdockerapp.initialize"
        ],
        "main": "./out/extension.js",
        "contributes": {
                "commands": [
                        {
                                "command": "initdockerapp.initialize",
                                "title": "Initialize A Docker Application"
                        }
                ]
        },
        "scripts": {
                "vscode:prepublish": "npm run compile",
                "compile": "tsc -p ./",
                "lint": "eslint src --ext ts",
                "watch": "tsc -watch -p ./",
                "pretest": "npm run compile && npm run lint",
                "test": "node ./out/test/runTest.js"
        },
        "devDependencies": {
                "@types/vscode": "^1.44.0",
                "@types/glob": "^7.1.1",
                "@types/mocha": "^7.0.2",
                "@types/node": "^13.11.0",
                "eslint": "^6.8.0",
                "@typescript-eslint/parser": "^2.26.0",
                "@typescript-eslint/eslint-plugin": "^2.26.0",
                "glob": "^7.1.6",
                "mocha": "^7.1.1",
                "typescript": "^3.8.3",
                "vscode-test": "^1.3.0"
        }
}
如果你是 Node.js 開發者,其中一些可能看起來很熟悉,因為 name、description、version 和 scripts 是 Node.js 項目的常見部分。
有幾個部分是非常重要的:
engines:說明該擴展將支持哪個版本的 VS Code / VSCodium。categories:設置擴展類型;你可以從Languages、Snippets、Linters、Themes、Debuggers、Formatters、Keymaps和Other中選擇。contributes:可用於與你的擴展一起運行的命令清單。main:擴展的入口點。activationEvents:指定激活事件發生的時間。具體來說,這決定了擴展何時會被載入到你的編輯器中。擴展是懶載入的,所以在激活事件觸發之前,它們不會被激活。
src/extension.ts
接下來看看 src/extension.ts,它應該是這樣的:
// The module 'vscode' contains the VSCodium extensibility API
// Import the module and reference it with the alias vscode in your code below
import * as vscode from "vscode";
const fs = require("fs");
const path = require("path");

// this method is called when your extension is activated
// your extension is activated the very first time the command is executed
export function activate(context: vscode.ExtensionContext) {

        // Use the console to output diagnostic information (console.log) and errors (console.error)
        // This line of code will only be executed once when your extension is activated
        console.log('Congratulations, your extension "initdockerapp" is now active!');

        // The command has been defined in the package.json file
        // Now provide the implementation of the command with registerCommand
        // The commandId parameter must match the command field in package.json
        let disposable = vscode.commands.registerCommand('initdockerapp.initialize', () => {
                // The code you place here will be executed every time your command is executed

                let fileContent =`
                FROM node:alpine
                WORKDIR /usr/src/app

                COPY package.json .
                RUN npm install

                COPY . .

                EXPOSE 3000
                CMD ["npm", "start"]
                `;

                fs.writeFile(path.join(vscode.workspace.rootPath, "Dockerfile"), fileContent, (err:any) => {
                        if (err) {
                                return vscode.window.showErrorMessage("Failed to initialize docker file!");
                        }
                        vscode.window.showInformationMessage("Dockerfile has been created!");
                });
        });

        context.subscriptions.push(disposable);
}

// this method is called when your extension is deactivated
export function deactivate() {}
這是為你的擴展寫代碼的地方。已經有一些自動生成的代碼了,我再來分析一下。
注意,vscode.command.registerCommand 裡面的 initdockerapp.initialize 和 package.json 裡面的命令是一樣的。它需要兩個參數。
- 要註冊的命令名稱
- 執行命令的功能
另一個需要注意的函數是 fs.writeFile,這是你寫在 vscode.command.registerCommand 函數裡面的。這將在你的項目根目錄下創建一個 Dockerfile,並在其中附加代碼來創建一個 Docker 鏡像。
調試擴展
現在你已經寫好了擴展,是時候調試它了。點擊「Run」菜單,選擇「Start Debugging」(或者直接按 F5)打開調試窗口。
在調試窗口裡面點擊「Add Folder」或「Clone Repository」按鈕,打開該項目。
接下來,用 Ctrl+Shift+P(在 macOS 上,用 Command 鍵代替 Ctrl)打開命令面板,運行 Initialize A Docker Application。
- 第一次運行此命令時,自 VSCodium 啟動後,激活函數尚未執行。因此,調用激活函數,並由激活 函數註冊該命令。
- 如果命令已註冊,那麼它將被執行。
你會看到右下角有一條信息,上面寫著:Dockerfile has been created!。這就創建了一個 Dockerfile,裡面有一些預定義的代碼,看起來是這樣的:

(Hussain Ansari, CC BY-SA 4.0)
總結
有許多有用的 API 可以幫助你創建你想要構建的擴展。VS Code 擴展 API 還有許多其他強大的方法可以使用。
你可以在 VS Code 擴展 API 文檔中了解更多關於 VS Code API 的信息。
via: https://opensource.com/article/20/6/vs-code-extension
作者:Ashique Hussain Ansari 選題:lujun9972 譯者:wxy 校對:wxy
本文轉載來自 Linux 中國: https://github.com/Linux-CN/archive
對這篇文章感覺如何?
You may also like


More in:Linux中國

捐贈 Let's Encrypt,共建安全的互聯網
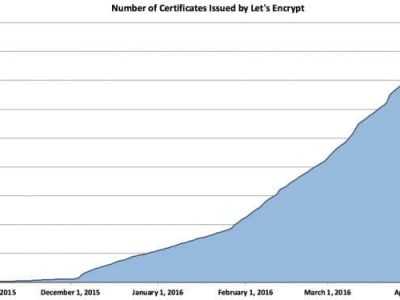
Let's Encrypt 正式發布,已經保護 380 萬個域名

關於Linux防火牆iptables的面試問答
Lets Encrypt 已被所有主流瀏覽器所信任