如何在 CentOS 7 中在 HHVM 和 Nginx 之上安裝 WordPress

在這篇教程中,我將展示給你如何在 Nginx Web 伺服器的 HHVM 上安裝 WordPress。這裡我使用 CentOS 7 作為操作系統,所以你需要懂一點 CentOS 操作的基礎。
先決條件
- CentOS 7 - 64位
- Root 許可權
步驟 1 - 配置 SELinux 並添加 EPEL 倉庫
在本教程中,我們將使用 SELinux 的強制模式,所以我們需要在系統上安裝一個 SELinux 管理工具。這裡我們使用 setools 和 setrobleshoot 來管理 SELinux 的各項配置。
CentOS 7 已經默認啟用 SELinux,我們可以通過以下命令來確認:
# sestatus
# getenforce

如圖,你能夠看到,SELinux 已經開啟了強制模式。
接下來就是使用 yum 來安裝 setools 和 setroubleshoot 了。
# yum -y install setroubleshoot setools net-tools
安裝好這兩個後,再安裝 EPEL 倉庫。
# yum -y install epel-release
步驟 2 - 安裝 Nginx
Nginx (發音:engine-x) 是一個高性能、低內存消耗的輕量級 Web 伺服器軟體。在 CentOS 中可以使用 yum 命令來安裝 Nginx 包。確保你以 root 用戶登錄系統。
使用 yum 命令從 CentOS 倉庫中安裝 nginx。
# yum -y install nginx
現在可以使用 systemctl 命令來啟動 Nginx,同時將其設置為跟隨系統啟動。
# systemctl start nginx
# systemctl enable nginx
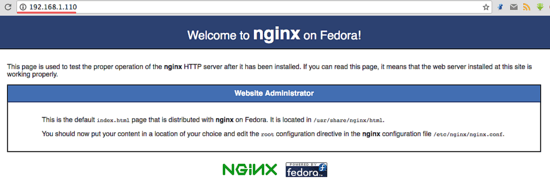
為確保 Nginx 已經正確運行於伺服器中,在瀏覽器上輸入伺服器的 IP,或者如下使用 curl 命令檢查顯示結果。
# curl 192.168.1.110
我這裡使用瀏覽器來驗證。
步驟 3 - 安裝並配置 MariaDB
MariaDB 是由原 MySQL 開發者 Monty Widenius 開發的一款開源資料庫軟體,它由 MySQL 分支而來,與 MySQL 的主要功能保持一致。在這一步中,我們要安裝 MariaDB 資料庫並為之配置好 root 密碼,然後再為所要安裝的 WordPress 創建一個新的資料庫和用戶。
安裝 mariadb 和 mariadb-server:
# yum -y install mariadb mariadb-server
啟動 MariaDB 並添加為服務,以便隨系統啟動。
# systemctl start mariadb
# systemctl enable mariadb
現在 MariaDB 已經啟動了,還需要為 mariadb/mysql 資料庫配置 root 用戶密碼。輸入以下命令來設置 MariaDB root 密碼。
# mysql_secure_installation
提示設置 root 用戶密碼時,輸入新密碼進行設置:
Set root password? [Y/n] Y
New password:
Re-enter new password:

Remove anonymous users? [Y/n] Y
 ... Success!
Disallow root login remotely? [Y/n] Y
 ... Success!
Remove test database and access to it? [Y/n] Y
Reload privilege tables now? [Y/n] Y
 ... Success!
這樣就設置好了 MariaDB 的 root 密碼。現在登錄到 MariaDB/MySQL shell 並為 WordPress 的安裝創建一個新資料庫 wordpressdb 和新用戶 wpuser,密碼設置為 wpuser@。為你的設置選用一個安全的密碼。
登錄到 MariaDB/MySQL shell:
# mysql -u root -p
接著輸入你剛剛設置的 root 用戶密碼。
創建資料庫和用戶:
MariaDB [(none)]> create database wordpressdb;
MariaDB [(none)]> create user wpuser@localhost identified by 'wpuser@';
MariaDB [(none)]> grant all privileges on wordpressdb.* to wpuser@localhost identified by 'wpuser@';
MariaDB [(none)]> flush privileges;
MariaDB [(none)]> q
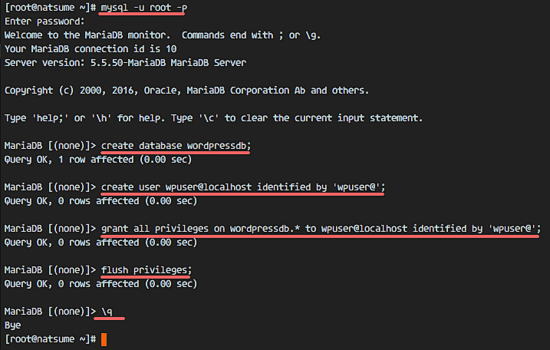
現在安裝好了 MariaDB,並為 WordPress 創建好了資料庫。
步驟 4 - 安裝 HHVM
對於 HHVM,我們需要安裝大量的依賴項。作為選擇,你可以從 GitHub 下載 HHVM 的源碼來編譯安裝,也可以從網路上獲取預編譯的包進行安裝。在本教程中,我使用的是預編譯的安裝包。
為 HHVM 安裝依賴項:
# yum -y install cpp gcc-c++ cmake git psmisc {binutils,boost,jemalloc,numactl}-devel
> {ImageMagick,sqlite,tbb,bzip2,openldap,readline,elfutils-libelf,gmp,lz4,pcre}-devel
> lib{xslt,event,yaml,vpx,png,zip,icu,mcrypt,memcached,cap,dwarf}-devel
> {unixODBC,expat,mariadb}-devel lib{edit,curl,xml2,xslt}-devel
> glog-devel oniguruma-devel ocaml gperf enca libjpeg-turbo-devel openssl-devel
> mariadb mariadb-server libc-client make
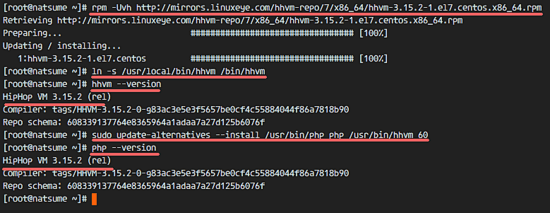
然後是使用 rpm 安裝從 HHVM 預編譯包鏡像站點 下載的 HHVM 預編譯包。
# rpm -Uvh http://mirrors.linuxeye.com/hhvm-repo/7/x86_64/hhvm-3.15.2-1.el7.centos.x86_64.rpm
# ln -s /usr/local/bin/hhvm /bin/hhvm
安裝好 HHVM 之後使用如下命令按了驗證:
# hhvm --version
為了能使用 PHP 命令,可以把 hhvm 命令設置為 php。這樣在 shell 中輸入 php 命令的時候,你會看到和輸入 hhvm 命令一樣的結果。
# sudo update-alternatives --install /usr/bin/php php /usr/bin/hhvm 60
# php --version
步驟 5 - 配置 HHVM
這一步中,我們來配置 HHVM 以系統服務來運行。我們不通過埠這種常規的方式來運行它,而是選擇使用 unix socket 文件的方式,這樣運行的更快速一點。
進入 systemd 配置目錄,並創建一個 hhvm.service 文件。
# cd /etc/systemd/system/
# vim hhvm.service
複製粘貼如下配置到文件中去。
[Unit]
Description=HHVM HipHop Virtual Machine (FCGI)
After=network.target nginx.service mariadb.service

[Service]
ExecStart=/usr/local/bin/hhvm --config /etc/hhvm/server.ini --user nginx --mode daemon -vServer.Type=fastcgi -vServer.FileSocket=/var/run/hhvm/hhvm.sock

[Install]
WantedBy=multi-user.target
保存文件退出 vim。
接下來,進入 hhvm 目錄並編輯 server.ini 文件。
# cd /etc/hhvm/
# vim server.ini
將第 7 行 hhvm.server.port 替換為 unix socket,如下:
hhvm.server.file_socket = /var/run/hhvm/hhvm.sock
保存文件並退出編輯器。
我們已在 hhvm 服務文件中定義了 hhvm 以 nginx 用戶身份運行,所以還需要把 socket 文件目錄的屬主變更為 nginx。然後我們還必須在 SELinux 中修改 hhvm 目錄的許可權上下文以便讓它可以訪問這個 socket 文件。
# chown -R nginx:nginx /var/run/hhvm/
# semanage fcontext -a -t httpd_var_run_t "/var/run/hhvm(/.*)?"
# restorecon -Rv /var/run/hhvm
伺服器重啟之後,hhvm 將不能運行,因為沒有存儲 socket 文件的目錄,所有還必須在啟動的時候自動創建一個。
使用 vim 編輯 rc.local 文件。
# vim /etc/rc.local
將以下配置粘貼到文件末行。
# mkdir -p /var/run/hhvm/
# chown -R nginx:nginx /var/run/hhvm/
# semanage fcontext -a -t httpd_var_run_t "/var/run/hhvm(/.*)?"
# restorecon -Rv /var/run/hhvm
保存文件並退出 vim。然後給文件賦予執行許可權。
# chmod +x /etc/rc.local
重新載入 systemd 服務,啟動 hhvm 並設置為隨系統啟動。
# systemctl daemon-reload
# systemctl start hhvm
# systemctl enable hhvm
要確保無誤,使用 netstat 命令驗證 hhvm 運行於 socket 文件。
# netstat -pl | grep hhvm

步驟 6 - 配置 HHVM 和 Nginx
在這個步驟中,我們將配置 HHVM 已讓它運行在 Nginx Web 服務中,這需要在 Nginx 目錄創建一個 hhvm 的配置文件。
進入 /etc/nginx 目錄,創建 hhvm.conf 文件。
# cd /etc/nginx/
# vim hhvm.conf
粘貼以下內容到文件中。
location ~ .(hh|php)$ {
    root /usr/share/nginx/html;
    fastcgi_keep_conn on;
    fastcgi_pass unix:/var/run/hhvm/hhvm.sock;
    fastcgi_index  index.php;
    fastcgi_param  SCRIPT_FILENAME $document_root$fastcgi_script_name;
    include        fastcgi_params;
}
然後,保存並退出。
接下來,編輯 nginx.conf 文件,添加 hhvm 配置文件到 include 行。
# vim nginx.conf
添加配置到第 57 行的 server 指令中。
include /etc/nginx/hhvm.conf;
保存並退出。
然後修改 SELinux 中關於 hhvm 配置文件的許可權上下文。
# semanage fcontext -a -t httpd_config_t /etc/nginx/hhvm.conf
# restorecon -v /etc/nginx/hhvm.conf
測試 Nginx 配置並重啟服務。
# nginx -t
# systemctl restart nginx
記住確保測試配置沒有錯誤。
步驟 7 - 通過 HHVM 和 Nginx 創建虛擬主機
在這一步中,我們要為 Nginx 和 hhvm 創建一個新的虛擬主機配置文件。這裡我使用域名 natsume.co 來作為例子,你可以使用你主機喜歡的域名,並在配置文件中相應位置以及 WordPress 安裝過程中進行替換。
進入 nginx 的 conf.d 目錄,我們將在該目錄存儲虛擬主機文件。
# cd /etc/nginx/conf.d/
使用 vim 創建一個名為 natsume.conf 的配置文件。
# vim natsume.conf
粘貼以下內容到虛擬主機配置文件中。
server {
    listen       80;
    server_name  natsume.co;

    # note that these lines are originally from the "location /" block
    root   /var/www/hakase;
    index index.php index.html index.htm;

    location / {
        try_files $uri $uri/ =404;
    }
    error_page 404 /404.html;
    location = /50x.html {
        root /var/www/hakase;
    }

    location ~ .php$ {
        try_files $uri =404;
        fastcgi_pass unix:/var/run/hhvm/hhvm.sock;
        fastcgi_index index.php;
        fastcgi_param SCRIPT_FILENAME $document_root$fastcgi_script_name;
        include fastcgi_params;
    }
}
保存並退出。
在這個虛擬主機配置文件中,我們定義該域名的 Web 根目錄為 /var/www/hakase。目前該目錄還不存在,所有我們要創建它,並變更屬主為 nginx 用戶和組。
# mkdir -p /var/www/hakase
# chown -R nginx:nginx /var/www/hakase
接下來,為該文件和目錄配置 SELinux 上下文。
# semanage fcontext -a -t httpd_config_t "/etc/nginx/conf.d(/.*)?"
# restorecon -Rv /etc/nginx/conf.d
最後,測試 nginx 配置文件以確保沒有錯誤後,重啟 nginx:
# nginx -t
# systemctl restart nginx
步驟 8 - 安裝 WordPress
在步驟 5 的時候,我們已經為 WordPress 配置好了虛擬主機,現在只需要下載 WordPress 和使用我們在步驟 3 的時候創建的資料庫和用戶來編輯資料庫配置就好了。
進入 Web 根目錄 /var/www/hakase 並使用 Wget 命令下載 WordPress:
# cd /var/www/hakase
# wget wordpress.org/latest.tar.gz
解壓 latest.tar.gz 並將 wordpress 文件夾中所有的文件和目錄移動到當前目錄:
# tar -xzvf latest.tar.gz
# mv wordpress/* .
下一步,複製一份 wp-config-sample.php 並更名為 wp-config.php,然後使用 vim 進行編輯:
# cp wp-config-sample.php wp-config.php
# vim wp-config.php
將 DB_NAME 設置為 wordpressdb、DB_USER 設置為 wpuser 以及 DB_PASSWORD 設置為 wpuser@。
define('DB_NAME', 'wordpressdb');
define('DB_USER', 'wpuser');
define('DB_PASSWORD', 'wpuser@');
define('DB_HOST', 'localhost');
保存並退出。

修改關於 WordPress 目錄的 SELinux 上下文。
# semanage fcontext -a -t httpd_sys_content_t "/var/www/hakase(/.*)?"
# restorecon -Rv /var/www/hakase
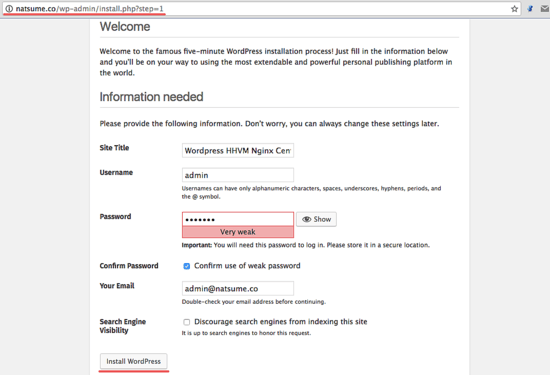
現在打開 Web 瀏覽器,在地址欄輸入你之前為 WordPress 設置的域名,我這裡是 natsume.co。
選擇語言並點擊 繼續 。

根據自身要求填寫站點標題和描述並點擊 安裝 WordPress "。
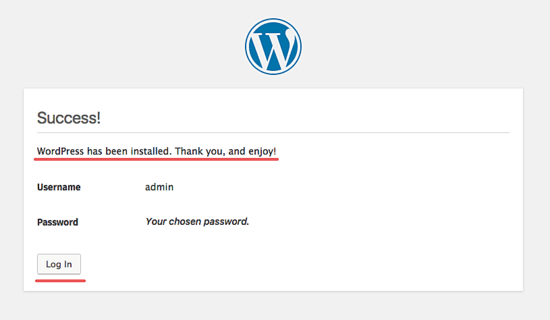
耐心等待安裝完成。你會見到如下頁面,點擊 登錄 來登錄到管理面板。
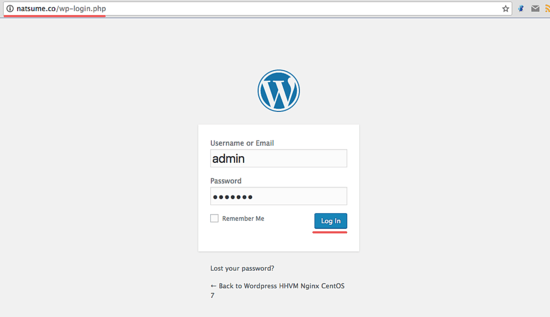
輸入你設置的管理員用戶賬號和密碼,在此點擊 登錄 。
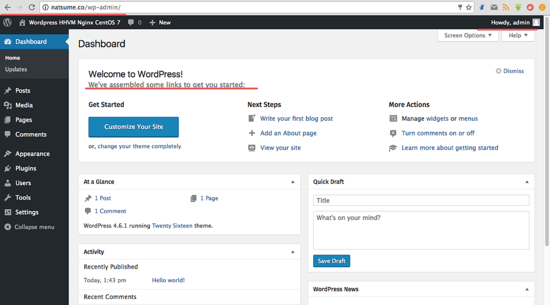
現在你已經登錄到 WordPress 的管理面板了。
WordPress 的主頁:
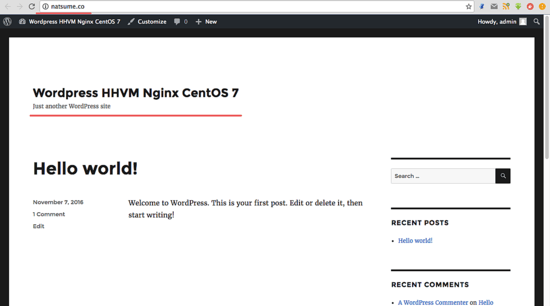
至此,我們已經在 CentOS 7 上通過 Nginx 和 HHVM 成功安裝 WordPress。
參考鏈接
譯者簡介:
GHLandy —— 劃不完粉腮柳眉泣別離。
via: https://www.howtoforge.com/tutorial/how-to-install-wordpress-with-hhvm-and-nginx-on-centos-7/
作者:Muhammad Arul 譯者:GHLandy 校對:wxy
本文轉載來自 Linux 中國: https://github.com/Linux-CN/archive
對這篇文章感覺如何?
You may also like


More in:Linux中國

捐贈 Let's Encrypt,共建安全的互聯網
Let's Encrypt 正式發布,已經保護 380 萬個域名

關於Linux防火牆iptables的面試問答
Lets Encrypt 已被所有主流瀏覽器所信任