使用腳本便捷地在 Ubuntu 中安裝最新 Linux 內核

想要安裝最新的Linux內核嗎?一個簡單的腳本就可以在Ubuntu系統中方便的完成這項工作。
Michael Murphy 寫了一個腳本用來將最新的候選版、標準版、或者低延時版的內核安裝到 Ubuntu 系統中。這個腳本會在詢問一些問題後從 Ubuntu 內核主線頁面 下載安裝最新的 Linux 內核包。
通過腳本來安裝、升級Linux內核:
1、 點擊這個 github 頁面 右上角的 「Download Zip」 來下載該腳本(註:此腳本在牆外,我已經搬運回來了,請參見下面。)。
2、滑鼠右鍵單擊用戶下載目錄下的 Zip 文件,選擇 「在此展開」 將其解壓。
3、右鍵點擊解壓後的文件夾,選擇 「在終端中打開」 到此文件夾下。
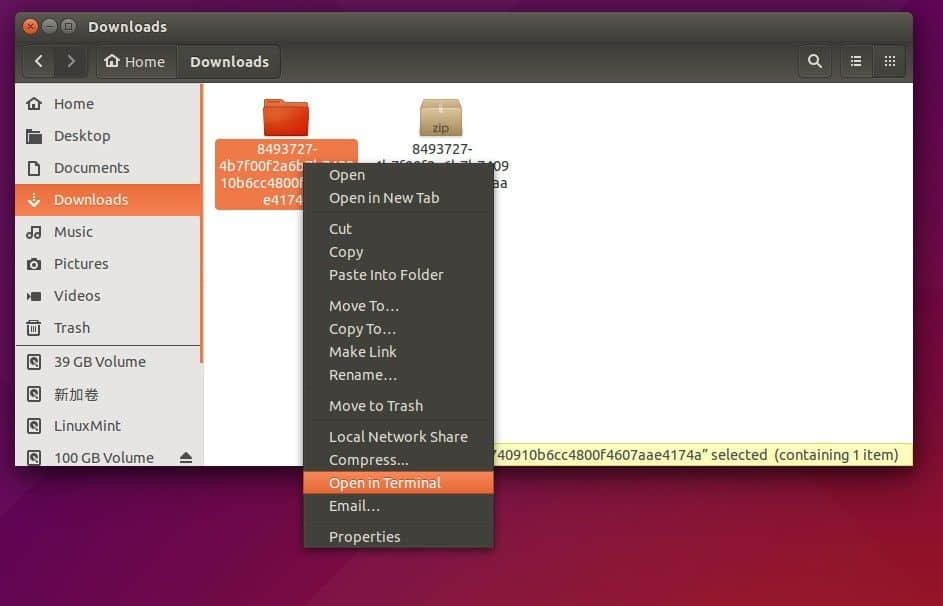
此時將會打開一個終端,並且自動導航到目標文件夾下。如果你找不到 「在終端中打開」 選項的話,在 Ubuntu 軟體中心搜索安裝 nautilus-open-terminal ,然後重新登錄系統即可(也可以再終端中運行 nautilus -q 來取代重新登錄系統的操作)。
備註:此腳本如下,你可以將它保存為一個可執行的 shell 腳本:
#!/bin/bash
cd /tmp

if ! which lynx > /dev/null; then sudo apt-get install lynx -y; fi

if [ "$(getconf LONG_BIT)" == "64" ]; then arch=amd64; else arch=i386; fi

function download() {
   wget $(lynx -dump -listonly -dont-wrap-pre $kernelURL | grep "$1" | grep "$2" | grep "$arch" | cut -d ' ' -f 4)
}

# Kernel URL
read -p "Do you want the latest RC?" rc
case "$rc" in
   y* | Y*) kernelURL=$(lynx -dump -nonumbers http://kernel.ubuntu.com/~kernel-ppa/mainline/ | tail -1) ;;
   n* | N*) kernelURL=$(lynx -dump -nonumbers http://kernel.ubuntu.com/~kernel-ppa/mainline/ | grep -v rc | tail -1) ;;
   *) exit ;;
esac

read -p "Do you want the lowlatency kernel?" lowlatency
case "$lowlatency" in
   y* | Y*) lowlatency=1 ;;
   n* | n*) lowlatency=0 ;;
   *) exit ;;
esac

# Download Kernel
if [ "$lowlatency" == "0" ]; then
   echo "Downloading the latest generic kernel."
   download generic header
   download generic image
elif [ "$lowlatency" == "1" ]; then
   echo "Downloading the latest lowlatency kernel."
   download lowlatency header
   download lowlatency image
fi

# Shared Kernel Header
wget $(lynx -dump -listonly -dont-wrap-pre $kernelURL | grep all | cut -d ' ' -f 4)

# Install Kernel
echo "Installing Linux Kernel"
sudo dpkg -i linux*.deb
echo "Done. You may now reboot."- 當進入終端後,運行以下命令來賦予腳本執行本次操作的許可權。
chmod +x *
最後,每當你想要安裝或升級 Ubuntu 的 linux 內核時都可以運行此腳本。
./*
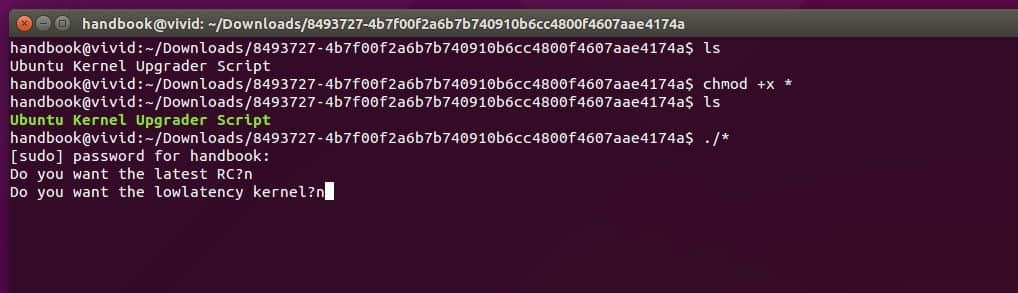
這裡之所以使用 * 替代腳本名稱是因為文件夾中只有它一個文件。
如果腳本運行成功,重啟電腦即可。
恢復並且卸載新版內核
如果因為某些原因要恢復並且移除新版內核的話,請重啟電腦,在 Grub 啟動器的 高級選項 菜單下選擇舊版內核來啟動系統。
當系統啟動後,參照下邊章節繼續執行。
如何移除舊的(或新的)內核:
- 從 Ubuntu 軟體中心安裝 Synaptic Package Manager。
- 打開 Synaptic Package Manager 然後如下操作:
- 點擊 Reload 按鈕,讓想要被刪除的新內核顯示出來.
- 在左側面板中選擇 Status -> Installed ,讓查找列表更清晰一些。
- 在 Quick filter 輸入框中輸入 linux-image- 用於查詢。
- 選擇一個內核鏡像 「linux-image-x.xx.xx-generic」 然後將其標記為removal(或者Complete Removal)
- 最後,應用變更
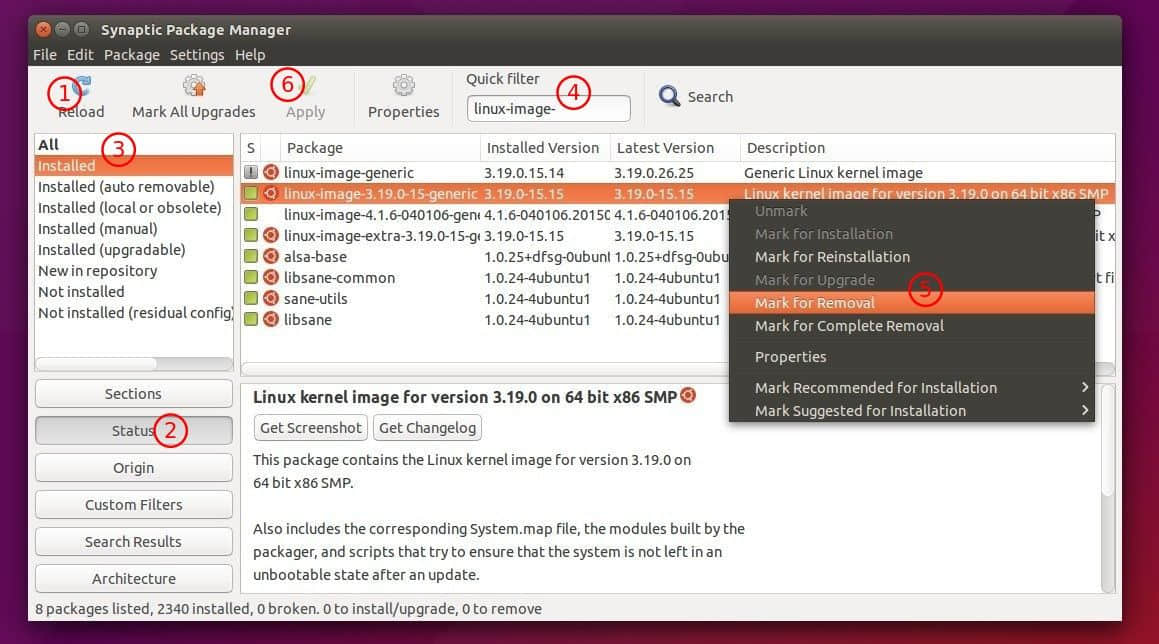
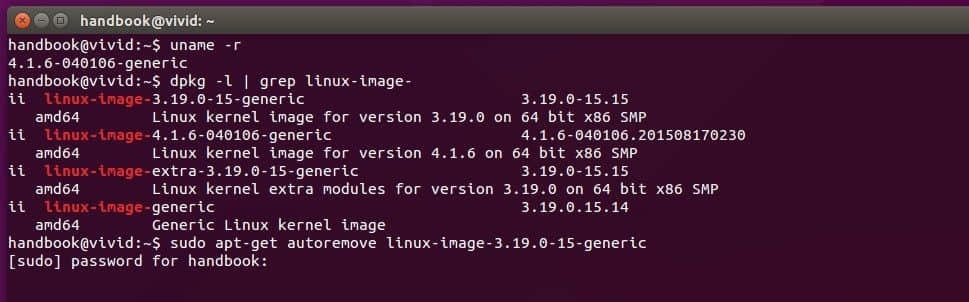
重複以上操作直到移除所有你不需要的內核。注意,不要隨意移除此刻正在運行的內核,你可以通過 uname -r 命令來查看運行的內核。
對於 Ubuntu 伺服器來說,你可以一步步運行下面的命令:
uname -r

dpkg -l | grep linux-image-

sudo apt-get autoremove KERNEL_IMAGE_NAME
via: http://ubuntuhandbook.org/index.php/2015/08/install-latest-kernel-script/
本文轉載來自 Linux 中國: https://github.com/Linux-CN/archive
對這篇文章感覺如何?
You may also like


More in:Linux中國

捐贈 Let's Encrypt,共建安全的互聯網
Let's Encrypt 正式發布,已經保護 380 萬個域名

關於Linux防火牆iptables的面試問答
Lets Encrypt 已被所有主流瀏覽器所信任