創建一個容器化的機器學習模型

數據科學家在創建機器學習模型後,必須將其部署到生產中。要在不同的基礎架構上運行它,使用容器並通過 REST API 公開模型是部署機器學習模型的常用方法。本文演示了如何在 Podman 容器中使用 Connexion 推出使用 REST API 的 TensorFlow 機器學習模型。
準備
首先,使用以下命令安裝 Podman:
sudo dnf -y install podman接下來,為容器創建一個新文件夾並切換到該目錄。
mkdir deployment_container && cd deployment_containerTensorFlow 模型的 REST API
下一步是為機器學習模型創建 REST API。這個 github 倉庫包含一個預訓練模型,以及能讓 REST API 工作的設置。
使用以下命令在 deployment_container 目錄中克隆它:
git clone https://github.com/svenboesiger/titanic_tf_ml_model.gitprediction.py 和 ml_model/
prediction.py 能進行 Tensorflow 預測,而 20x20x20 神經網路的權重位於文件夾 ml_model/ 中。
swagger.yaml
swagger.yaml 使用 Swagger規範 定義 Connexion 庫的 API。此文件包含讓你的伺服器提供輸入參數驗證、輸出響應數據驗證、URL 端點定義所需的所有信息。
額外地,Connexion 還將給你提供一個簡單但有用的單頁 Web 應用,它演示了如何使用 Javascript 調用 API 和更新 DOM。
swagger: "2.0"
info:
  description: This is the swagger file that goes with our server code
  version: "1.0.0"
  title: Tensorflow Podman Article
consumes:
  - "application/json"
produces:
  - "application/json"

basePath: "/"

paths:
  /survival_probability:
    post:
      operationId: "prediction.post"
      tags:
        - "Prediction"
      summary: "The prediction data structure provided by the server application"
      description: "Retrieve the chance of surviving the titanic disaster"
      parameters:
        - in: body
          name: passenger
          required: true
          schema:
            $ref: '#/definitions/PredictionPost'
      responses:
        '201':
          description: 'Survival probability of an individual Titanic passenger'

definitions:
  PredictionPost:
    type: object
server.py 和 requirements.txt
server.py 定義了啟動 Connexion 伺服器的入口點。
import connexion

app = connexion.App(__name__, specification_dir='./')

app.add_api('swagger.yaml')

if __name__ == '__main__':
 app.run(debug=True)
requirements.txt 定義了運行程序所需的 python 包。
connexion
tensorflow
pandas
容器化!
為了讓 Podman 構建映像,請在上面的準備步驟中創建的 deployment_container 目錄中創建一個名為 Dockerfile 的新文件:
FROM fedora:28

# File Author / Maintainer
MAINTAINER Sven Boesiger <donotspam@ujelang.com>

# Update the sources
RUN dnf -y update --refresh

# Install additional dependencies
RUN dnf -y install libstdc++

RUN dnf -y autoremove

# Copy the application folder inside the container
ADD /titanic_tf_ml_model /titanic_tf_ml_model

# Get pip to download and install requirements:
RUN pip3 install -r /titanic_tf_ml_model/requirements.txt

# Expose ports
EXPOSE 5000

# Set the default directory where CMD will execute
WORKDIR /titanic_tf_ml_model

# Set the default command to execute
# when creating a new container
CMD python3 server.py
接下來,使用以下命令構建容器鏡像:
podman build -t ml_deployment .運行容器
隨著容器鏡像的構建和準備就緒,你可以使用以下命令在本地運行它:
podman run -p 5000:5000 ml_deployment在 Web 瀏覽器中輸入 http://0.0.0.0:5000/ui 訪問 Swagger/Connexion UI 並測試模型:
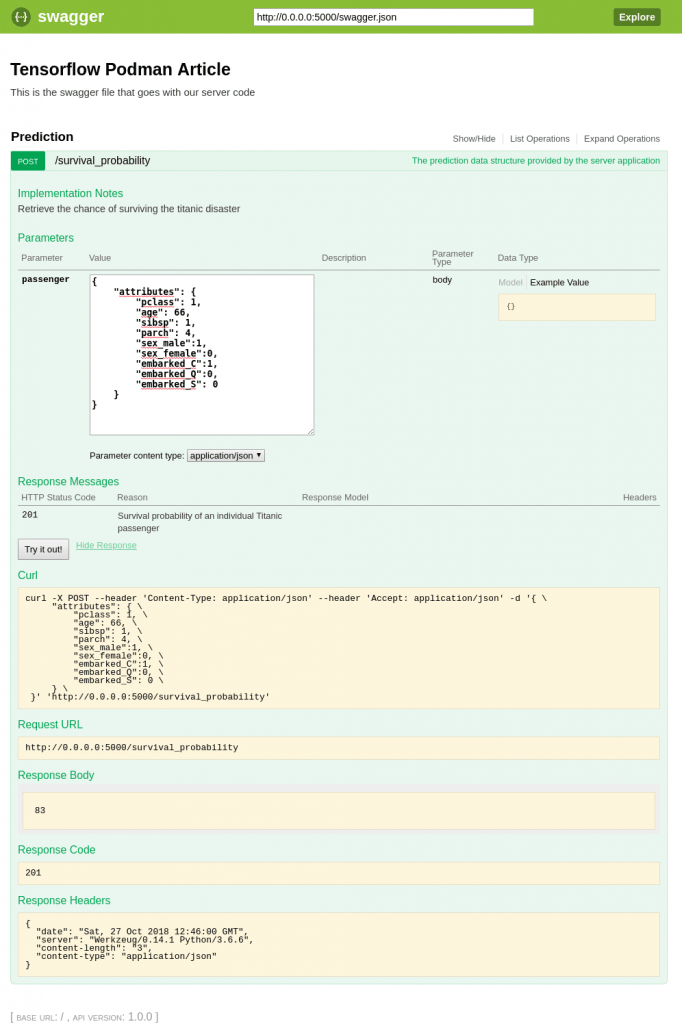
當然,你現在也可以在應用中通過 REST API 訪問模型。
via: https://fedoramagazine.org/create-containerized-machine-learning-model/
作者:Sven Bösiger 選題:lujun9972 譯者:geekpi 校對:wxy
本文轉載來自 Linux 中國: https://github.com/Linux-CN/archive
對這篇文章感覺如何?
You may also like


More in:Linux中國

捐贈 Let's Encrypt,共建安全的互聯網
Let's Encrypt 正式發布,已經保護 380 萬個域名
關於Linux防火牆iptables的面試問答
Lets Encrypt 已被所有主流瀏覽器所信任