一個使用 asyncio 協程的網路爬蟲(二)

現在該說 Python 生成器了,它使用同樣構件——代碼對象和棧幀——去完成一個不可思議的任務。
這是一個生成器函數:
>>> def gen_fn():
...     result = yield 1
...     print('result of yield: {}'.format(result))
...     result2 = yield 2
...     print('result of 2nd yield: {}'.format(result2))
...     return 'done'
...
在 Python 把 gen_fn 編譯成位元組碼的過程中,一旦它看到 yield 語句就知道這是一個生成器函數而不是普通的函數。它就會設置一個標誌來記住這個事實:
>>> # The generator flag is bit position 5.
>>> generator_bit = 1 << 5
>>> bool(gen_fn.__code__.co_flags & generator_bit)
True
當你調用一個生成器函數,Python 看到這個標誌,就不會實際運行它而是創建一個生成器:
>>> gen = gen_fn()
>>> type(gen)
<class 'generator'>
Python 生成器封裝了一個棧幀和函數體代碼的引用:
>>> gen.gi_code.co_name
'gen_fn'
所有通過調用 gen_fn 的生成器指向同一段代碼,但都有各自的棧幀。這些棧幀不再任何一個C函數棧中,而是在堆空間中等待被使用:

棧幀中有一個指向「最後執行指令」的指針。初始化為 -1,意味著它沒開始運行:
>>> gen.gi_frame.f_lasti
-1
當我們調用 send 時,生成器一直運行到第一個 yield 語句處停止,並且 send 返回 1,因為這是 gen 傳遞給 yield 表達式的值。
>>> gen.send(None)
1
現在,生成器的指令指針是 3,所編譯的Python 位元組碼一共有 56 個位元組:
>>> gen.gi_frame.f_lasti
3
>>> len(gen.gi_code.co_code)
56
這個生成器可以在任何時候、任何函數中恢復運行,因為它的棧幀並不在真正的棧中,而是堆中。在調用鏈中它的位置也是不固定的,它不必遵循普通函數先進後出的順序。它像雲一樣自由。
我們可以傳遞一個值 hello 給生成器,它會成為 yield 語句的結果,並且生成器會繼續運行到第二個 yield 語句處。
>>> gen.send('hello')
result of yield: hello
2
現在棧幀中包含局部變數 result:
>>> gen.gi_frame.f_locals
{'result': 'hello'}
其它從 gen_fn 創建的生成器有著它自己的棧幀和局部變數。
當我們再一次調用 send,生成器繼續從第二個 yield 開始運行,以拋出一個特殊的 StopIteration 異常為結束。
>>> gen.send('goodbye')
result of 2nd yield: goodbye
Traceback (most recent call last):
  File "<input>", line 1, in <module>
StopIteration: done
這個異常有一個值 "done",它就是生成器的返回值。
使用生成器構建協程
所以生成器可以暫停,可以給它一個值讓它恢復,並且它還有一個返回值。這些特性看起來很適合去建立一個不使用那種亂糟糟的意麵似的回調非同步編程模型。我們想創造一個這樣的「協程」:一個在程序中可以和其他過程合作調度的過程。我們的協程將會是標準庫 asyncio 中協程的一個簡化版本,我們將使用生成器,futures 和 yield from 語句。
首先,我們需要一種方法去代表協程所需要等待的 future 事件。一個簡化的版本是:
class Future:
    def __init__(self):
        self.result = None
        self._callbacks = []

    def add_done_callback(self, fn):
        self._callbacks.append(fn)

    def set_result(self, result):
        self.result = result
        for fn in self._callbacks:
            fn(self)
一個 future 初始化為「未解決的」,它通過調用 set_result 來「解決」。(這個 future 缺少很多東西,比如說,當這個 future 解決後, 生成 的協程應該馬上恢復而不是暫停,但是在我們的代碼中卻不沒有這樣做。參見 asyncio 的 Future 類以了解其完整實現。)
讓我們用 future 和協程來改寫我們的 fetcher。我們之前用回調寫的 fetch 如下:
class Fetcher:
    def fetch(self):
        self.sock = socket.socket()
        self.sock.setblocking(False)
        try:
            self.sock.connect(('xkcd.com', 80))
        except BlockingIOError:
            pass
        selector.register(self.sock.fileno(),
                          EVENT_WRITE,
                          self.connected)

    def connected(self, key, mask):
        print('connected!')
        # And so on....
fetch 方法開始連接一個套接字,然後註冊 connected 回調函數,它會在套接字建立連接後調用。現在我們使用協程把這兩步合併:
    def fetch(self):
        sock = socket.socket()
        sock.setblocking(False)
        try:
            sock.connect(('xkcd.com', 80))
        except BlockingIOError:
            pass

        f = Future()

        def on_connected():
            f.set_result(None)

        selector.register(sock.fileno(),
                          EVENT_WRITE,
                          on_connected)
        yield f
        selector.unregister(sock.fileno())
        print('connected!')
現在,fetch 是一個生成器,因為它有一個 yield 語句。我們創建一個未決的 future,然後 yield 它,暫停 fetch 直到套接字連接建立。內聯函數 on_connected 解決這個 future。
但是當 future 被解決,誰來恢復這個生成器?我們需要一個協程驅動器。讓我們叫它 「task」:
class Task:
    def __init__(self, coro):
        self.coro = coro
        f = Future()
        f.set_result(None)
        self.step(f)

    def step(self, future):
        try:
            next_future = self.coro.send(future.result)
        except StopIteration:
            return

        next_future.add_done_callback(self.step)

# Begin fetching http://xkcd.com/353/
fetcher = Fetcher('/353/')
Task(fetcher.fetch())

loop()
task 通過傳遞一個 None 值給 fetch 來啟動它。fetch 運行到它 yeild 出一個 future,這個 future 被作為 next_future 而捕獲。當套接字連接建立,事件循環運行回調函數 on_connected,這裡 future 被解決,step 被調用,fetch 恢復運行。
用 yield from 重構協程
一旦套接字連接建立,我們就可以發送 HTTP GET 請求,然後讀取伺服器響應。不再需要哪些分散在各處的回調函數,我們把它們放在同一個生成器函數中:
    def fetch(self):
        # ... connection logic from above, then:
        sock.send(request.encode('ascii'))

        while True:
            f = Future()

            def on_readable():
                f.set_result(sock.recv(4096))

            selector.register(sock.fileno(),
                              EVENT_READ,
                              on_readable)
            chunk = yield f
            selector.unregister(sock.fileno())
            if chunk:
                self.response += chunk
            else:
                # Done reading.
                break
從套接字中讀取所有信息的代碼看起來很通用。我們能不把它從 fetch 中提取成一個子過程?現在該 Python 3 熱捧的 yield from 登場了。它能讓一個生成器委派另一個生成器。
讓我們先回到原來那個簡單的生成器例子:
>>> def gen_fn():
...     result = yield 1
...     print('result of yield: {}'.format(result))
...     result2 = yield 2
...     print('result of 2nd yield: {}'.format(result2))
...     return 'done'
...
為了從其他生成器調用這個生成器,我們使用 yield from 委派它:
>>> # Generator function:
>>> def caller_fn():
...     gen = gen_fn()
...     rv = yield from gen
...     print('return value of yield-from: {}'
...           .format(rv))
...
>>> # Make a generator from the
>>> # generator function.
>>> caller = caller_fn()
這個 caller 生成器的行為的和它委派的生成器 gen 表現的完全一致:
>>> caller.send(None)
1
>>> caller.gi_frame.f_lasti
15
>>> caller.send('hello')
result of yield: hello
2
>>> caller.gi_frame.f_lasti  # Hasn't advanced.
15
>>> caller.send('goodbye')
result of 2nd yield: goodbye
return value of yield-from: done
Traceback (most recent call last):
  File "<input>", line 1, in <module>
StopIteration
當 caller 自 gen 生成(yield),caller 就不再前進。注意到 caller 的指令指針保持15不變,就是 yield from 的地方,即使內部的生成器 gen 從一個 yield 語句運行到下一個 yield,它始終不變。(事實上,這就是「yield from」在 CPython 中工作的具體方式。函數會在執行每個語句之前提升其指令指針。但是在外部生成器執行「yield from」後,它會將其指令指針減一,以保持其固定在「yield form」語句上。然後其生成其 caller。這個循環不斷重複,直到內部生成器拋出 StopIteration,這裡指向外部生成器最終允許它自己進行到下一條指令的地方。)從 caller 外部來看,我們無法分辨 yield 出的值是來自 caller 還是它委派的生成器。而從 gen 內部來看,我們也不能分辨傳給它的值是來自 caller 還是 caller 的外面。yield from 語句是一個光滑的管道,值通過它進出 gen,一直到 gen 結束。
協程可以用 yield from 把工作委派給子協程,並接收子協程的返回值。注意到上面的 caller 列印出「return value of yield-from: done」。當 gen 完成後,它的返回值成為 caller 中 yield from 語句的值。
rv = yield from gen
前面我們批評過基於回調的非同步編程模式,其中最大的不滿是關於 「 堆棧撕裂 」:當一個回調拋出異常,它的堆棧回溯通常是毫無用處的。它只顯示出事件循環運行了它,而沒有說為什麼。那麼協程怎麼樣?
>>> def gen_fn():
...     raise Exception('my error')
>>> caller = caller_fn()
>>> caller.send(None)
Traceback (most recent call last):
  File "<input>", line 1, in <module>
  File "<input>", line 3, in caller_fn
  File "<input>", line 2, in gen_fn
Exception: my error
這還是非常有用的,當異常拋出時,堆棧回溯顯示出 caller_fn 委派了 gen_fn。令人更欣慰的是,你可以在一次異常處理器中封裝這個調用到一個子過程中,像正常函數一樣:
>>> def gen_fn():
...     yield 1
...     raise Exception('uh oh')
...
>>> def caller_fn():
...     try:
...         yield from gen_fn()
...     except Exception as exc:
...         print('caught {}'.format(exc))
...
>>> caller = caller_fn()
>>> caller.send(None)
1
>>> caller.send('hello')
caught uh oh
所以我們可以像提取子過程一樣提取子協程。讓我們從 fetcher 中提取一些有用的子協程。我們先寫一個可以讀一塊數據的協程 read:
def read(sock):
    f = Future()

    def on_readable():
        f.set_result(sock.recv(4096))

    selector.register(sock.fileno(), EVENT_READ, on_readable)
    chunk = yield f  # Read one chunk.
    selector.unregister(sock.fileno())
    return chunk
在 read 的基礎上,read_all 協程讀取整個信息:
def read_all(sock):
    response = []
    # Read whole response.
    chunk = yield from read(sock)
    while chunk:
        response.append(chunk)
        chunk = yield from read(sock)

    return b''.join(response)
如果你換個角度看,拋開 yield form 語句的話,它們就像在做阻塞 I/O 的普通函數一樣。但是事實上,read 和 read_all 都是協程。yield from read 暫停 read_all 直到 I/O 操作完成。當 read_all 暫停時,asyncio 的事件循環正在做其它的工作並等待其他的 I/O 操作。read 在下次循環中當事件就緒,完成 I/O 操作時,read_all 恢復運行。
最終,fetch 調用了 read_all:
class Fetcher:
    def fetch(self):
         # ... connection logic from above, then:
        sock.send(request.encode('ascii'))
        self.response = yield from read_all(sock)
神奇的是,Task 類不需要做任何改變,它像以前一樣驅動外部的 fetch 協程:
Task(fetcher.fetch())
loop()
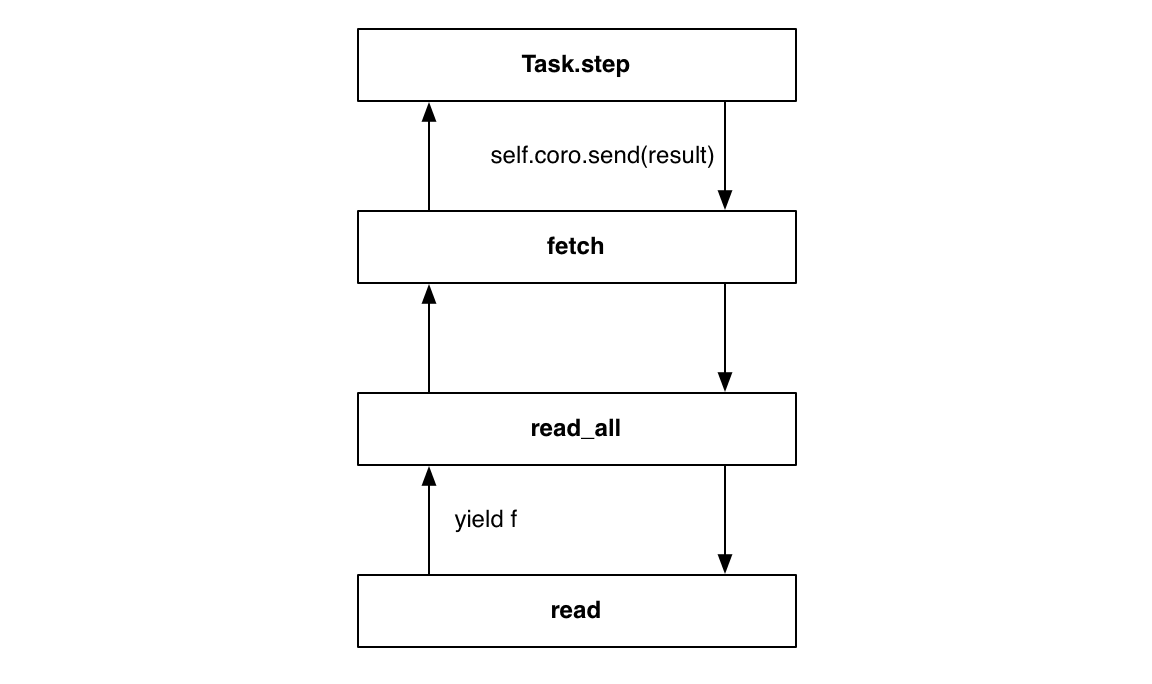
當 read yield 一個 future 時,task 從 yield from 管道中接收它,就像這個 future 直接從 fetch yield 一樣。當循環解決一個 future 時,task 把它的結果送給 fetch,通過管道,read 接受到這個值,這完全就像 task 直接驅動 read 一樣:

為了完善我們的協程實現,我們再做點打磨:當等待一個 future 時,我們的代碼使用 yield;而當委派一個子協程時,使用 yield from。不管是不是協程,我們總是使用 yield form 會更精鍊一些。協程並不需要在意它在等待的東西是什麼類型。
在 Python 中,我們從生成器和迭代器的高度相似中獲得了好處,將生成器進化成 caller,迭代器也可以同樣獲得好處。所以,我們可以通過特殊的實現方式來迭代我們的 Future 類:
    # Method on Future class.
    def __iter__(self):
        # Tell Task to resume me here.
        yield self
        return self.result
future 的 __iter__ 方法是一個 yield 它自身的一個協程。當我們將代碼替換如下時:
# f is a Future.
yield f
以及……:
# f is a Future.
yield from f
……結果是一樣的!驅動 Task 從它的調用 send 中接收 future,併當 future 解決後,它發回新的結果給該協程。
在每個地方都使用 yield from 的好處是什麼?為什麼比用 field 等待 future 並用 yield from 委派子協程更好?之所以更好的原因是,一個方法可以自由地改變其實行而不影響到其調用者:它可以是一個當 future 解決後返回一個值的普通方法,也可以是一個包含 yield from 語句並返回一個值的協程。無論是哪種情況,調用者僅需要 yield from 該方法以等待結果就行。
親愛的讀者,我們已經完成了對 asyncio 協程探索。我們深入觀察了生成器的機制,實現了簡單的 future 和 task。我們指出協程是如何利用兩個世界的優點:比線程高效、比回調清晰的並發 I/O。當然真正的 asyncio 比我們這個簡化版本要複雜的多。真正的框架需要處理zero-copy I/0、公平調度、異常處理和其他大量特性。
使用 asyncio 編寫協程代碼比你現在看到的要簡單的多。在前面的代碼中,我們從基本原理去實現協程,所以你看到了回調,task 和 future,甚至非阻塞套接字和 select 調用。但是當用 asyncio 編寫應用,這些都不會出現在你的代碼中。我們承諾過,你可以像這樣下載一個網頁:
    @asyncio.coroutine
    def fetch(self, url):
        response = yield from self.session.get(url)
        body = yield from response.read()
對我們的探索還滿意么?回到我們原始的任務:使用 asyncio 寫一個網路爬蟲。
(題圖素材來自:ruth-tay.deviantart.com)
via: http://aosabook.org/en/500L/pages/a-web-crawler-with-asyncio-coroutines.html
作者:A. Jesse Jiryu Davis , Guido van Rossum 譯者:qingyunha 校對:wxy
本文轉載來自 Linux 中國: https://github.com/Linux-CN/archive


