在Debian 7/Ubuntu 13.10 上使用隧道封裝SSH連接

在本篇中,我會描述如何通過SSL水稻封裝SSH。這個步驟非常簡單。你需要在你的客戶端PC和遠程PC都已經安裝運行了sshd。
我正在使用下面提到的兩個系統。
遠程系統:
操作系統: Debian 7
IP 地址: 192.168.1.200/24
客戶端(本地) 系統:
操作系統: Ubuntu 13.04 desktop
IP 地址: 192.168.1.100/24
配置遠程系統
讓我們在遠程Debian 7伺服器上安裝stunnel包。
# apt-get install stunnel4
現在讓我們像下面那樣創建一個SSL證書。
# openssl genrsa 1024 > stunnel.key
示例輸出:
Generating RSA private key, 1024 bit long modulus
............................................++++++
...................++++++
e is 65537 (0x10001)

# openssl req -new -key stunnel.key -x509 -days 1000 -out stunnel.crt
你會被詢問若干個問題如國家、州、公司細節等。
You are about to be asked to enter information that will be incorporated
into your certificate request.
What you are about to enter is what is called a Distinguished Name or a DN.
There are quite a few fields but you can leave some blank
For some fields there will be a default value,
If you enter '.', the field will be left blank.
--Country Name (2 letter code) [AU]:IN
State or Province Name (full name) [Some-State]:Tamilnadu
Locality Name (eg, city) []:Erode
Organization Name (eg, company) [Internet Widgits Pty Ltd]:unixmen
Organizational Unit Name (eg, section) []:Technical
Common Name (e.g. server FQDN or YOUR name) []:server.unixmen.com
Email Address []:sk@unixmen.com

# cat stunnel.crt stunnel.key > stunnel.pem
# mv stunnel.pem /etc/stunnel/
現在我們需要配置stunnel來將 443(https)隧道到22(ssh)。這可以通過在/etc/stunnel/目錄下創建stunnel.conf文件來實現:
# vi /etc/stunnel/stunnel.conf
並加入下面的行:
pid = /var/run/stunnel.pid
cert = /etc/stunnel/stunnel.pem
[ssh]
accept = 192.168.1.200:443
connect = 127.0.0.1:22
上面的幾行說明了stunnel在哪裡尋找證書文件和哪裡接收和轉發ssh鏈接。在本例中,stunnel會接收來自443埠的流量並會轉發給22埠。
保存並關閉文件。
現在讓我們啟用stunnel服務。要這麼做,編輯文件 /etc/default/stunnel4:
# vi /etc/default/stunnel4
改變行從 ENABLED = 0 到 1。
# /etc/default/stunnel
# Julien LEMOINE <speedblue@debian.org>
# September 2003

# Change to one to enable stunnel automatic startup
ENABLED=1
FILES="/etc/stunnel/*.conf"
OPTIONS=""

# Change to one to enable ppp restart scripts
PPP_RESTART=0
接著使用命令啟用stunnel服務:
# service stunnel4 start
配置本地系統
用這個命令安裝stunnel:
$ sudo apt-get install stunnel4
我們需要遠程系統上相同的證書文件(stunnel.pem)。複製遠程系統上的 stunnel.pem文件到我們本地系統中並在相同的位置保存(也就是 /etc/stunnel)。
在 /etc/stunnel/目錄下創建新的文件stunnel.conf:
$ sudo vi /etc/stunnel/stunnel.conf
加入下面的行:
pid = /var/run/stunnel.pid
cert = /etc/stunnel/stunnel.pem
client=yes
[ssh]
accept=443
connect=192.168.1.200:443
保存並關閉文件。這裡的192.168.1.200是我們的遠程系統IP。
現在讓我們啟用stunnel服務。要這麼做,編輯文件/etc/default/stunnel4:
$ sudo vi /etc/default/stunnel4
改變行從 ENABLED = 0 到 1.
# /etc/default/stunnel
# Julien LEMOINE <speedblue@debian.org>
# September 2003

# Change to one to enable stunnel automatic startup
ENABLED=1
FILES="/etc/stunnel/*.conf"
OPTIONS=""

# Change to one to enable ppp restart scripts
PPP_RESTART=0
接著使用命令啟用stunnel服務:
$ sudo service stunnel4 start
測試SSH連接
現在這樣已經很好了,你可以使用命令連接到你的遠程機器上了:
$ ssh sk@localhost -v -p 443
示例輸出:
OpenSSH_6.1p1 Debian-4, OpenSSL 1.0.1c 10 May 2012
debug1: Reading configuration data /etc/ssh/ssh_config
debug1: /etc/ssh/ssh_config line 19: Applying options for *
debug1: Connecting to localhost [127.0.0.1] port 443.
debug1: Connection established.
debug1: identity file /home/sk/.ssh/id_rsa type -1
debug1: identity file /home/sk/.ssh/id_rsa-cert type -1
debug1: identity file /home/sk/.ssh/id_dsa type -1
debug1: identity file /home/sk/.ssh/id_dsa-cert type -1
debug1: identity file /home/sk/.ssh/id_ecdsa type -1
debug1: identity file /home/sk/.ssh/id_ecdsa-cert type -1
debug1: Remote protocol version 2.0, remote software version OpenSSH_6.0p1 Debian-4
debug1: match: OpenSSH_6.0p1 Debian-4 pat OpenSSH*
debug1: Enabling compatibility mode for protocol 2.0
debug1: Local version string SSH-2.0-OpenSSH_6.1p1 Debian-4
debug1: SSH2_MSG_KEXINIT sent
debug1: SSH2_MSG_KEXINIT received
debug1: kex: server->client aes128-ctr hmac-md5 none
debug1: kex: client->server aes128-ctr hmac-md5 none
debug1: sending SSH2_MSG_KEX_ECDH_INIT
debug1: expecting SSH2_MSG_KEX_ECDH_REPLY
debug1: Server host key: ECDSA 78:05:ba:1b:73:02:75:86:10:33:8c:0f:21:61:d4:de
debug1: Host '[localhost]:443' is known and matches the ECDSA host key.
debug1: Found key in /home/sk/.ssh/known_hosts:12
debug1: ssh_ecdsa_verify: signature correct
debug1: SSH2_MSG_NEWKEYS sent
debug1: expecting SSH2_MSG_NEWKEYS
debug1: SSH2_MSG_NEWKEYS received
debug1: Roaming not allowed by server
debug1: SSH2_MSG_SERVICE_REQUEST sent
debug1: SSH2_MSG_SERVICE_ACCEPT received
debug1: Authentications that can continue: publickey,password
debug1: Next authentication method: publickey
debug1: Trying private key: /home/sk/.ssh/id_rsa
debug1: Trying private key: /home/sk/.ssh/id_dsa
debug1: Trying private key: /home/sk/.ssh/id_ecdsa
debug1: Next authentication method: password
sk@localhost's password: #   ## Enter your remote system user password
debug1: Authentication succeeded (password).
Authenticated to localhost ([127.0.0.1]:443).
debug1: channel 0: new [client-session]
debug1: Requesting no-more-sessions@openssh.com
debug1: Entering interactive session.
debug1: Sending environment.
debug1: Sending env LC_PAPER = en_IN.UTF-8
debug1: Sending env LC_ADDRESS = en_IN.UTF-8
debug1: Sending env LC_MONETARY = en_IN.UTF-8
debug1: Sending env LC_NUMERIC = en_IN.UTF-8
debug1: Sending env LC_TELEPHONE = en_IN.UTF-8
debug1: Sending env LC_IDENTIFICATION = en_IN.UTF-8
debug1: Sending env LANG = en_US.UTF-8
debug1: Sending env LC_MEASUREMENT = en_IN.UTF-8
debug1: Sending env LC_TIME = en_IN.UTF-8
debug1: Sending env LC_NAME = en_IN.UTF-8
Linux server 3.2.0-4-486 #1 Debian 3.2.51-1 i686

The programs included with the Debian GNU/Linux system are free software;
the exact distribution terms for each program are described in the
individual files in /usr/share/doc/*/copyright.

Debian GNU/Linux comes with ABSOLUTELY NO WARRANTY, to the extent
permitted by applicable law.
You have new mail.
Last login: Mon Dec 30 15:12:22 2013 from localhost
sk@server:~$
或者你可以簡單地使用下面的命令:
$ ssh -p 443 sk@localhost
示例輸出:
sk@localhost's password:
Linux server 3.2.0-4-486 #1 Debian 3.2.51-1 i686

The programs included with the Debian GNU/Linux system are free software;
the exact distribution terms for each program are described in the
individual files in /usr/share/doc/*/copyright.

Debian GNU/Linux comes with ABSOLUTELY NO WARRANTY, to the extent
permitted by applicable law.
You have new mail.
Last login: Mon Dec 30 15:22:08 2013 from localhost
sk@server:~$
現在你可以用ssh連接到你的遠程機器上了,但是所有的流量通過SSL隧道。
你已經完成了!即使ssh的默認埠被防火牆阻止了,你仍然可以使用SSH到你的遠程系統。
參考鏈接:
via: http://www.unixmen.com/tunnel-ssh-connections-ssl-using-stunnel-debian-7-ubuntu-13-10/
本文轉載來自 Linux 中國: https://github.com/Linux-CN/archive
對這篇文章感覺如何?
You may also like


More in:Linux中國

捐贈 Let's Encrypt,共建安全的互聯網
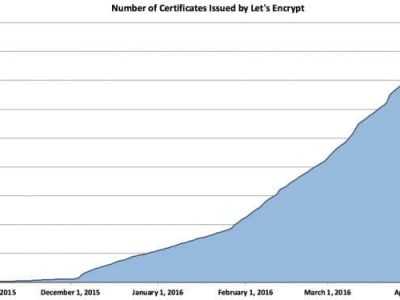
Let's Encrypt 正式發布,已經保護 380 萬個域名

關於Linux防火牆iptables的面試問答
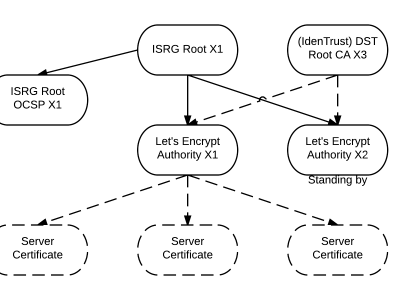
Lets Encrypt 已被所有主流瀏覽器所信任