LaTeX 排版(3):排版

本 系列 介紹了 LaTeX 中的基本格式。第 1 部分 介紹了列表。第 2 部分 闡述了表格。在第 3 部分中,你將了解 LaTeX 的另一個重要特性:細膩靈活的文檔排版。本文介紹如何自定義頁面布局、目錄、標題部分和頁面樣式。
頁面維度
當你第一次編寫 LaTeX 文檔時,你可能已經注意到默認邊距比你想像的要大一些。頁邊距與指定的紙張類型有關,例如 A4、letter 和 documentclass(article、book、report) 等等。要修改頁邊距,有幾個選項,最簡單的選項之一是使用 fullpage 包。
該軟體包設置頁面的主體,可以使主體幾乎佔滿整個頁面。
—— FULLPAGE PACKAGE DOCUMENTATION
另一個選擇是使用 geometry 包。在探索 geometry 包如何操縱頁邊距之前,請首先查看如下所示的頁面尺寸。
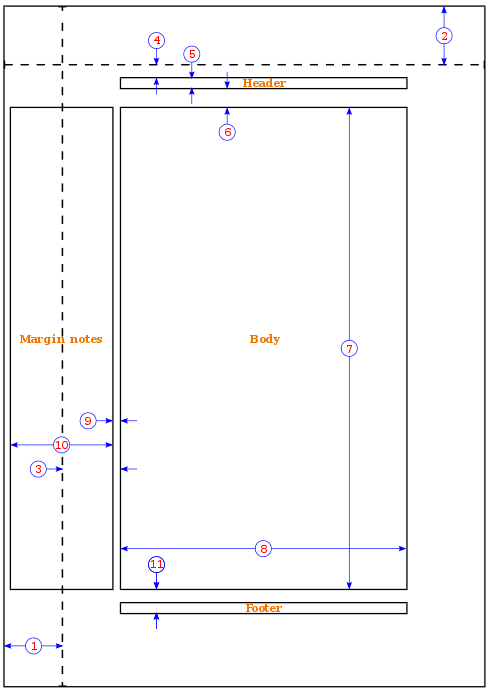
- 1 英寸 +
hoffset - 1 英寸 +
voffset oddsidemargin= 31pttopmargin= 20ptheadheight= 12ptheadsep= 25pttextheight= 592pttextwidth= 390ptmarginparsep= 35ptmarginparwidth= 35ptfootskip= 30pt
要使用 geometry 包將邊距設置為 1 英寸,請使用以下示例
usepackage{geometry}
geometry{a4paper, margin=1in}
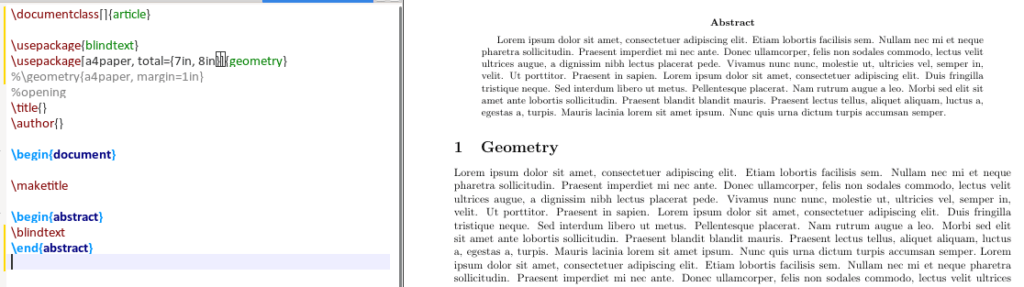
除上述示例外,geometry 命令還可以修改紙張尺寸和方向。要更改紙張尺寸,請使用以下示例:
usepackage[a4paper, total={7in, 8in}]{geometry}
要更改頁面方向,需要將橫向(landscape)添加到 geometery 選項中,如下所示:
usepackage{geometery}
geometry{a4paper, landscape, margin=1.5in

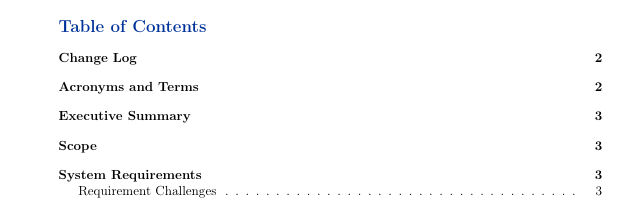
目錄
默認情況下,目錄的標題為 「contents」。有時,你想將標題更改為 「Table of Content」,更改目錄和章節第一節之間的垂直間距,或者只更改文本的顏色。
若要更改文本,請在導言區中添加以下行,用所需語言替換英語(english):
usepackage[english]{babel}
addtocaptionsenglish{
renewcommand{contentsname}
{bfseries{Table of Contents}}}
要操縱目錄與圖、小節和章節列表之間的虛擬間距,請使用 tocloft 軟體包。本文中使用的兩個選項是 cftbeforesecskip 和 cftaftertoctitleskip。
tocloft 包提供了控制目錄、圖表列表和表格列表的排版方法。
—— TOCLOFT PACKAGE DOUCMENTATION
usepackage{tocloft}
setlengthctfbeforesecskip{2pt}
setlengthcftaftertoctitleskip{30pt}
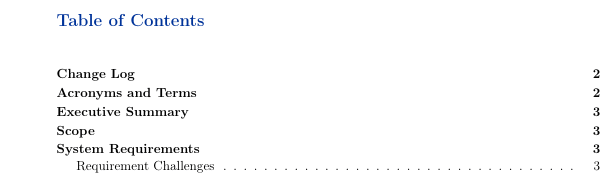
默認目錄
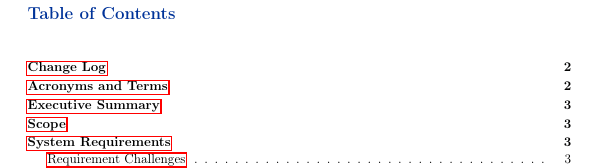
定製目錄
邊框
在文檔中使用包 hyperref 時,目錄中的 LaTeX 章節列表和包含 url 的引用都有邊框,如下圖所示。
要刪除這些邊框,請在導言區中包括以下內容,你將看到目錄中沒有任何邊框。
usepackage{hyperref}
hypersetup{ pdfborder = {0 0 0}}
要修改標題部分的字體、樣式或顏色,請使用程序包 titlesec。在本例中,你將更改節、子節和三級子節的字體大小、字體樣式和字體顏色。首先,在導言區中增加以下內容。
usepackage{titlesec}
titleformat*{section}{Hugebfseriescolor{darkblue}}
titleformat*{subsection}{hugebfseriescolor{darkblue}}
titleformat*{subsubsection}{Largebfseriescolor{darkblue}}
仔細看看代碼,titleformat*{section} 指定要使用的節的深度。上面的示例最多使用第三個深度。{Hugebfseriescolor{darkblue}} 部分指定字體大小、字體樣式和字體顏色。
頁面樣式
要自定義的頁眉和頁腳,請使用 fancyhdr。此示例使用此包修改頁面樣式、頁眉和頁腳。下面的代碼簡要描述了每個選項的作用。
pagestyle{fancy} %for header to be on each page
fancyhead[L]{} %keep left header blank
fancyhead[C]{} %keep centre header blank
fancyhead[R]{leftmark} %add the section/chapter to the header right
fancyfoot[L]{Static Content} %add static test to the left footer
fancyfoot[C]{} %keep centre footer blank
fancyfoot[R]{thepage} %add the page number to the right footer
setlengthvoffset{-0.25in} %space between page border and header (1in + space)
setlengthheadheight{12pt} %height of the actual header.
setlengthheadsep{25pt} %separation between header and text.
renewcommand{headrulewidth}{2pt} % add header horizontal line
renewcommand{footrulewidth}{1pt} % add footer horizontal line
結果如下所示:

頁眉

頁腳
小貼士
集中導言區
如果要編寫許多 TeX 文檔,可以根據文檔類別創建一個包含所有導言區的 .tex 文件並引用此文件。例如,我使用結構 .tex 如下所示。
$ cat article_structure.tex
usepackage[english]{babel}
addtocaptionsenglish{
renewcommand{contentsname}
{bfseries{color{darkblue}Table of Contents}}
} % Relable the contents
%usepackage[margin=0.5in]{geometry} % specifies the margin of the document
usepackage[utf8]{inputenc}
usepackage[T1]{fontenc}
usepackage{graphicx} % allows you to add graphics to the document
usepackage{hyperref} % permits redirection of URL from a PDF document
usepackage{fullpage} % formate the content to utilise the full page
%usepackage{a4wide}
usepackage[export]{adjustbox} % to force image position
%usepackage[section]{placeins} % to have multiple images in a figure
usepackage{tabularx} % for wrapping text in a table
%usepackage{rotating}
usepackage{multirow}
usepackage{subcaption} % to have multiple images in a figure
%usepackage{smartdiagram} % initialise smart diagrams
usepackage{enumitem} % to manage the spacing between lists and enumeration
usepackage{fancyhdr} %, graphicx} %for header to be on each page
pagestyle{fancy} %for header to be on each page
%fancyhf{}
fancyhead[L]{}
fancyhead[C]{}
fancyhead[R]{leftmark}
fancyfoot[L]{Static Content} %includegraphics[width=0.02textwidth]{virgin_voyages.png}}
fancyfoot[C]{} % clear center
fancyfoot[R]{thepage}
setlengthvoffset{-0.25in} %Space between page border and header (1in + space)
setlengthheadheight{12pt} %Height of the actual header.
setlengthheadsep{25pt} %Separation between header and text.
renewcommand{headrulewidth}{2pt} % adds horizontal line
renewcommand{footrulewidth}{1pt} % add horizontal line (footer)
%renewcommand{oddsidemargin}{2pt} % adjuct the margin spacing
%renewcommand{pagenumbering}{roman} % change the numbering style
%renewcommand{hoffset}{20pt}
%usepackage{color}
usepackage[table]{xcolor}
hypersetup{ pdfborder = {0 0 0}} % removes the red boarder from the table of content
%usepackage{wasysym} %add checkbox
%newcommandinsq[1]{%
% Square #1quad%
%} % specify the command to add checkbox
%usepackage{xcolor}
%usepackage{colortbl}
%definecolor{Gray}{gray}{0.9} % create new colour
%definecolor{LightCyan}{rgb}{0.88,1,1} % create new colour
%usepackage[first=0,last=9]{lcg}
%newcommand{ra}{rand0.arabic{rand}}
%newcolumntype{g}{>{columncolor{LightCyan}}c} % create new column type g
%usesmartdiagramlibrary{additions}
%setcounter{figure}{0}
setcounter{secnumdepth}{0} % sections are level 1
usepackage{csquotes} % the proper was of using double quotes
%usepackage{draftwatermark} % Enable watermark
%SetWatermarkText{DRAFT} % Specify watermark text
%SetWatermarkScale{5} % Toggle watermark size
usepackage{listings} % add code blocks
usepackage{titlesec} % Manipulate section/subsection
titleformat{section}{Hugebfseriescolor{darkblue}} % update sections to bold with the colour blue titleformat{subsection}{hugebfseriescolor{darkblue}} % update subsections to bold with the colour blue
titleformat*{subsubsection}{Largebfseriescolor{darkblue}} % update subsubsections to bold with the colour blue
usepackage[toc]{appendix} % Include appendix in TOC
usepackage{xcolor}
usepackage{tocloft} % For manipulating Table of Content virtical spacing
%setlengthcftparskip{-2pt}
setlengthcftbeforesecskip{2pt} %spacing between the sections
setlengthcftaftertoctitleskip{30pt} % space between the first section and the text ``Table of Contents''
definecolor{navyblue}{rgb}{0.0,0.0,0.5}
definecolor{zaffre}{rgb}{0.0, 0.08, 0.66}
definecolor{white}{rgb}{1.0, 1.0, 1.0}
definecolor{darkblue}{rgb}{0.0, 0.2, 0.6}
definecolor{darkgray}{rgb}{0.66, 0.66, 0.66}
definecolor{lightgray}{rgb}{0.83, 0.83, 0.83}
%pagenumbering{roman}
在你的文章中,請參考以下示例中所示的方法引用 structure.tex 文件:
documentclass[a4paper,11pt]{article}
input{/path_to_structure.tex}}
begin{document}
......
end{document}
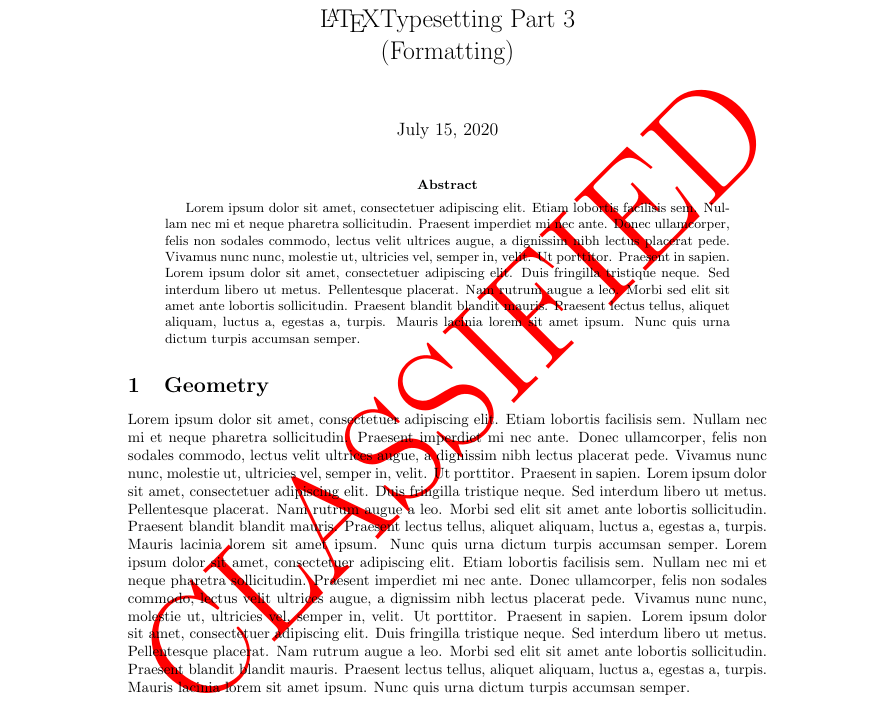
添加水印
要在 LaTeX 文檔中啟用水印,請使用 draftwatermark 軟體包。下面的代碼段和圖像演示了如何在文檔中添加水印。默認情況下,水印顏色為灰色,可以將其修改為所需的顏色。
usepackage{draftwatermark}
SetWatermarkText{color{red}Classified} %add watermark text
SetWatermarkScale{4} %specify the size of the text
結論
在本系列中,你了解了 LaTeX 提供的一些基本但豐富的功能,這些功能可用於自定義文檔以滿足你的需要或將文檔呈現給的受眾。LaTeX 海洋中,還有許多軟體包需要大家自行去探索。
via: https://fedoramagazine.org/latex-typesetting-part-3-formatting/
作者:Earl Ramirez 選題:Chao-zhi 譯者:Chao-zhi 校對:wxy
本文轉載來自 Linux 中國: https://github.com/Linux-CN/archive
對這篇文章感覺如何?
You may also like


More in:Linux中國

捐贈 Let's Encrypt,共建安全的互聯網
Let's Encrypt 正式發布,已經保護 380 萬個域名

關於Linux防火牆iptables的面試問答
Lets Encrypt 已被所有主流瀏覽器所信任