如何在Linux的命令行中使用Evernote

Geeknote 的安裝
Geeknote是使用Python開發的。因此,在開始之前請確保你已經安裝了Python(最好是2.7的版本)和git。
在 Debian、 Ubuntu 和 Linux Mint 中
$ sudo apt-get install python2.7 git python-setuptools
$ git clone git://github.com/VitaliyRodnenko/geeknote.git
$ cd geeknote
$ sudo python2.7 setup.py install
在 Fedora 或者 CentOS/RHEL 中
$ sudo yum install git
$ git clone git://github.com/VitaliyRodnenko/geeknote.git
$ cd geeknote
$ sudo python setup.py install
在 Arch Linux 中
對於ArchLinux用戶,只需要使用AUR中的包。
Geeknote 的基本使用
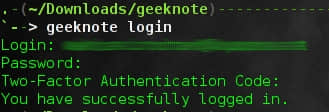
一旦你安裝完Geeknote後,你應該將Geeknote與你的Evernote賬號關聯:
$ geeknote login
接著輸入你的email地址、密碼和你的二步驗證碼。如果你沒有後者的話,忽略它並按下回車。
顯然你需要一個Evernote賬號來完成這些,因此先去註冊吧。
完成這些之後,你就可以開始創建新的筆記並編輯它們了。
不過首先,你還需要設置你最喜歡的文本編輯器:
$ geeknote settings --editor vim
然後,一般創建一條新筆記的語法是:
$ geeknote create --title [title of the new note] (--content [content] --tags [comma-separated tags] --notebook [comma-separated notebooks])
上面的命令中,只有『title』是必須的,它會與一條新筆記的標題相關聯。其他的標註可以為筆記添加額外的元數據:添加標籤來與你的筆記關聯、指定放在那個筆記本里。同樣,如果你的標題或者內容中有空格,不要忘記將它們放在引號中。
比如:
$ geeknote create --title "My note" --content "This is a test note" --tags "finance, business, important" --notebook "Family"
然後,你可以編輯你的筆記。語法很相似:
$ geeknote edit --note [title of the note to edit] (--title [new title] --tags [new tags] --notebook [new notebooks])
注意可選的參數如新的標題、標籤和筆記本,用來修改筆記的元數據。你也可以用下面的命令重命名筆記:
$ geeknote edit --note [old title] --title [new title]
現在基本的創建和編輯已經完成了,更高級的特性是搜索和刪除。你可以下面的語法搜索你的筆記:
$ geeknote find --search [text-to-search] --tags [comma-separated tags] --notebook [comma-separated notebooks] --date [date-or-date-range] --content-search
默認地上面的命令會通過標題搜索筆記。 用"--content-search"選項,就可以按內容搜索。
比如:
$ geeknote find --search "*restaurant" --notebooks "Family" --date 31.03.2014-31.08.2014
顯示指定標題的筆記:
$ geeknote show [title]
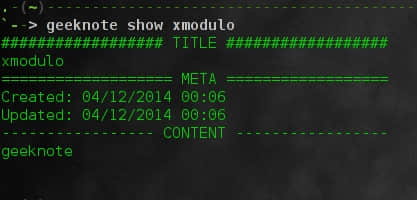
我最喜歡使用的一個技巧是使用:
$ geeknote show "*"
這會顯示所有的筆記並允許你在這中選擇一個。
刪除一條筆記:
$ geeknote remove --note [title]
小心這是真正的刪除。它會從雲存儲中刪除這條筆記。
最後有很多的選項來管理標籤和筆記本。我想最有用的就是顯示筆記本列表。
$ geeknote notebook-list

下面的命令非常相像。你可以猜到,可以用下面的命令列出所有的標籤:
$ geeknote tag-list
創建一個筆記本:
$ geeknote notebook-create --title [notebook title]
創建一個標籤:
$ geeknote tag-create --title [tag title]
一旦你了解了竅門,很明顯這些語法是非常自然明確的。
如果你想要了解更多,不要忘記查看官方文檔。
福利
作為福利,Geeknote自帶的gnsync工具可以讓你在Evernote和本地計算機之間同步。不過,我發現它的語法有點枯燥:
$ gnsync --path [where to sync] (--mask [what kind of file to sync] --format [in which format] --logpath [where to write the log] --notebook [which notebook to use])
下面是這些參數的意義。
- --path /home/adrien/Documents/notes/: 與Evernote同步筆記的位置。
- *--mask ".txt"**: 只同步純文本文件。默認gnsync會嘗試同步所有文件。
- --format markdown: 你希望它們是純文本或者markdown格式(默認是純文本)。
- --logpath /home/adrien/gnsync.log: 同步日誌的位置。為防出錯,gnsync會在那裡寫入日誌信息。
- --notebook "Family": 同步哪個筆記本中的筆記。如果留空,程序會創建一個以你同步文件夾命令的筆記本。
總的來說,Geeknote是一款漂亮的Evernote的命令行客戶端。我個人不常使用Evernote,但它仍然很漂亮和有用。命令行一方面讓它變得很極客且很容易與shell腳本結合。此外,在Git上還有Geeknote的一個分支項目,在ArchLinux AUR上稱為geeknote-improved-git,貌似它有更多的特性和比其他分支更積極的開發。我覺得值得去看看。
你認為Geeknote怎麼樣? 有什麼你想用的么?或者你更喜歡使用傳統的程序?在評論區中讓我們知道。
via: http://xmodulo.com/evernote-command-line-linux.html
作者:Adrien Brochard 譯者:geekpi 校對:wxy
本文轉載來自 Linux 中國: https://github.com/Linux-CN/archive


