如何在 Ubuntu 上設置時間同步

你可能設置過 cron 任務 來在特定時間備份重要文件或執行系統相關任務。也許你配置了一個日誌伺服器在特定時間間隔輪轉日誌。但如果你的時鐘不同步,這些任務將無法按時執行。這就是要在 Linux 系統上設置正確的時區並保持時鐘與互聯網同步的原因。本指南介紹如何在 Ubuntu Linux 上設置時間同步。下面的步驟已經在 Ubuntu 18.04 上進行了測試,但是對於使用 systemd 的 timesyncd 服務的其他基於 Ubuntu 的系統它們是相同的。
在 Ubuntu 上設置時間同步
通常,我們在安裝時設置時區。但是,你可以根據需要更改或設置不同的時區。
首先,讓我們使用 date 命令查看 Ubuntu 系統中的當前時區:
$ date示例輸出:
Tue Jul 30 11:47:39 UTC 2019如上所見,date 命令顯示實際日期和當前時間。這裡,我當前的時區是 UTC,代表協調世界時。
或者,你可以在 /etc/timezone 文件中查找當前時區。
$ cat /etc/timezone
UTC
現在,讓我們看看時鐘是否與互聯網同步。只需運行:
$ timedatectl示例輸出:
Local time: Tue 2019-07-30 11:53:58 UTC
Universal time: Tue 2019-07-30 11:53:58 UTC
RTC time: Tue 2019-07-30 11:53:59
Time zone: Etc/UTC (UTC, +0000)
System clock synchronized: yes
systemd-timesyncd.service active: yes
RTC in local TZ: no如你所見,timedatectl 命令顯示本地時間、世界時、時區以及系統時鐘是否與互聯網伺服器同步,以及 systemd-timesyncd.service 是處於活動狀態還是非活動狀態。就我而言,系統時鐘已與互聯網時間伺服器同步。
如果時鐘不同步,你會看到下面截圖中顯示的 System clock synchronized: no。

時間同步已禁用。
注意:上面的截圖是舊截圖。這就是你看到不同日期的原因。
如果你看到 System clock synchronized: 值設置為 no,那麼 timesyncd 服務可能處於非活動狀態。因此,只需重啟服務並看下是否正常。
$ sudo systemctl restart systemd-timesyncd.service現在檢查 timesyncd 服務狀態:
$ sudo systemctl status systemd-timesyncd.service
● systemd-timesyncd.service - Network Time Synchronization
Loaded: loaded (/lib/systemd/system/systemd-timesyncd.service; enabled; vendor preset: enabled)
Active: active (running) since Tue 2019-07-30 10:50:18 UTC; 1h 11min ago
Docs: man:systemd-timesyncd.service(8)
Main PID: 498 (systemd-timesyn)
Status: "Synchronized to time server [2001:67c:1560:8003::c7]:123 (ntp.ubuntu.com)."
Tasks: 2 (limit: 2319)
CGroup: /system.slice/systemd-timesyncd.service
└─498 /lib/systemd/systemd-timesyncd

Jul 30 10:50:30 ubuntuserver systemd-timesyncd[498]: Network configuration changed, trying to estab
Jul 30 10:50:31 ubuntuserver systemd-timesyncd[498]: Network configuration changed, trying to estab
Jul 30 10:50:31 ubuntuserver systemd-timesyncd[498]: Network configuration changed, trying to estab
Jul 30 10:50:32 ubuntuserver systemd-timesyncd[498]: Network configuration changed, trying to estab
Jul 30 10:50:32 ubuntuserver systemd-timesyncd[498]: Network configuration changed, trying to estab
Jul 30 10:50:35 ubuntuserver systemd-timesyncd[498]: Network configuration changed, trying to estab
Jul 30 10:50:35 ubuntuserver systemd-timesyncd[498]: Network configuration changed, trying to estab
Jul 30 10:50:35 ubuntuserver systemd-timesyncd[498]: Network configuration changed, trying to estab
Jul 30 10:50:35 ubuntuserver systemd-timesyncd[498]: Network configuration changed, trying to estab
Jul 30 10:51:06 ubuntuserver systemd-timesyncd[498]: Synchronized to time server [2001:67c:1560:800
如果此服務已啟用並處於活動狀態,那麼系統時鐘應與互聯網時間伺服器同步。
你可以使用命令驗證是否啟用了時間同步:
$ timedatectl如果仍然不起作用,請運行以下命令以啟用時間同步:
$ sudo timedatectl set-ntp true現在,你的系統時鐘將與互聯網時間伺服器同步。
使用 timedatectl 命令更改時區
如果我想使用 UTC 以外的其他時區怎麼辦?這很容易!
首先,使用命令列出可用時區:
$ timedatectl list-timezones你將看到類似於下圖的輸出。
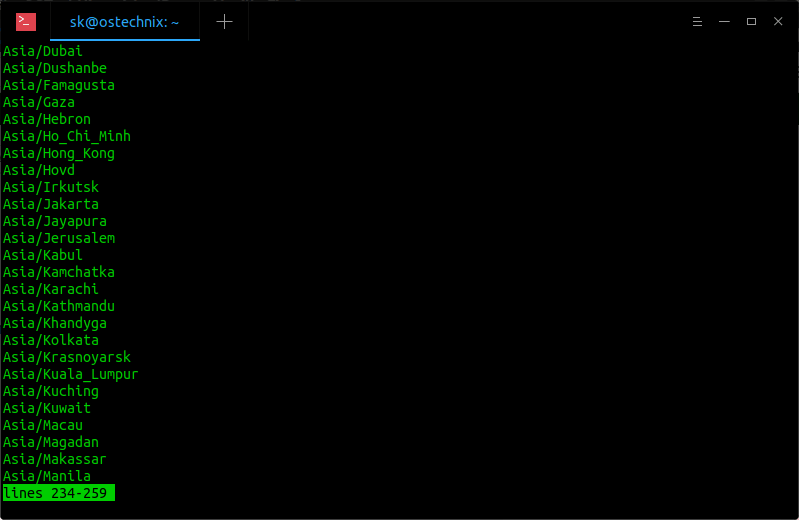
使用 timedatectl 命令列出時區
你可以使用以下命令設置所需的時區(例如,Asia/Shanghai):
(LCTT 譯註:本文原文使用印度時區作為示例,這裡為了便於使用,換為中國標準時區 CST。另外,在時區設置中,要注意 CST 這個縮寫會代表四個不同的時區,因此建議使用城市和 UTC+8 來說設置。)
$ sudo timedatectl set-timezone Asia/Shanghai使用 date 命令再次檢查時區是否已真正更改:
$ date
Tue Jul 30 20:22:33 CST 2019
或者,如果需要詳細輸出,請使用 timedatectl 命令:
$ timedatectl
Local time: Tue 2019-07-30 20:22:35 CST
Universal time: Tue 2019-07-30 12:22:35 UTC
RTC time: Tue 2019-07-30 12:22:36
Time zone: Asia/Shanghai (CST, +0800)
System clock synchronized: yes
systemd-timesyncd.service active: yes
RTC in local TZ: no
如你所見,我已將時區從 UTC 更改為 CST(中國標準時間)。()
要切換回 UTC 時區,只需運行:
$ sudo timedatectl set-timezone UTC使用 tzdata 更改時區
在較舊的 Ubuntu 版本中,沒有 timedatectl 命令。這種情況下,你可以使用 tzdata(Time zone data)來設置時間同步。
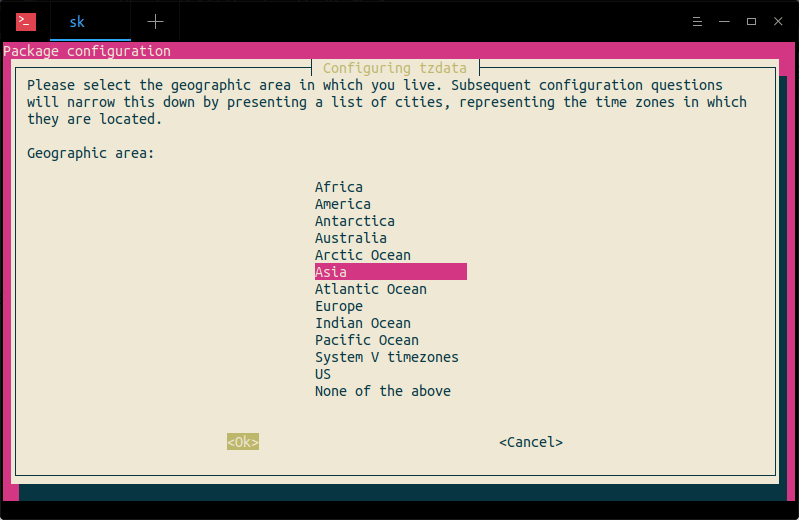
$ sudo dpkg-reconfigure tzdata選擇你居住的地理區域。對我而言,我選擇 Asia。選擇 OK,然後按回車鍵。
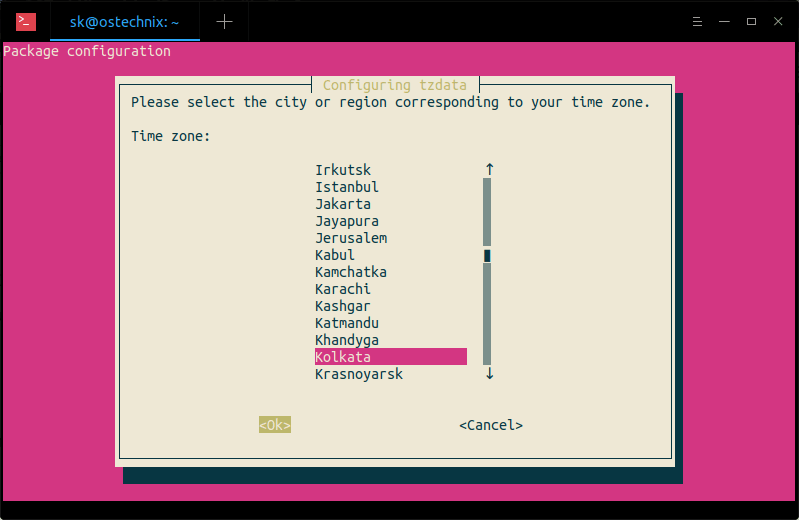
接下來,選擇與你的時區對應的城市或地區。這裡,我選擇了 Kolkata(LCTT 譯註:中國用戶請相應使用 Shanghai 等城市)。
最後,你將在終端中看到類似下面的輸出。
Current default time zone: 'Asia/Shanghai'
Local time is now: Tue Jul 30 21:59:25 CST 2019.
Universal Time is now: Tue Jul 30 13:59:25 UTC 2019.
在圖形模式下配置時區
有些用戶可能對命令行方式不太滿意。如果你是其中之一,那麼你可以輕鬆地在圖形模式的系統設置面板中進行設置。
點擊 Super 鍵(Windows 鍵),在 Ubuntu dash 中輸入 settings,然後點擊設置圖標。

從 Ubuntu dash 啟動系統的設置
或者,單擊位於 Ubuntu 桌面右上角的向下箭頭,然後單擊左上角的「設置」圖標。
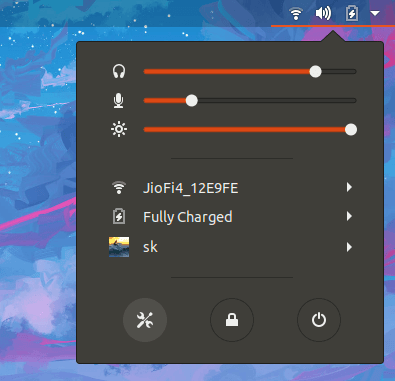
從頂部面板啟動系統的設置
在下一個窗口中,選擇「細節」,然後單擊「日期與時間」選項。打開「自動的日期與時間」和「自動的時區」。
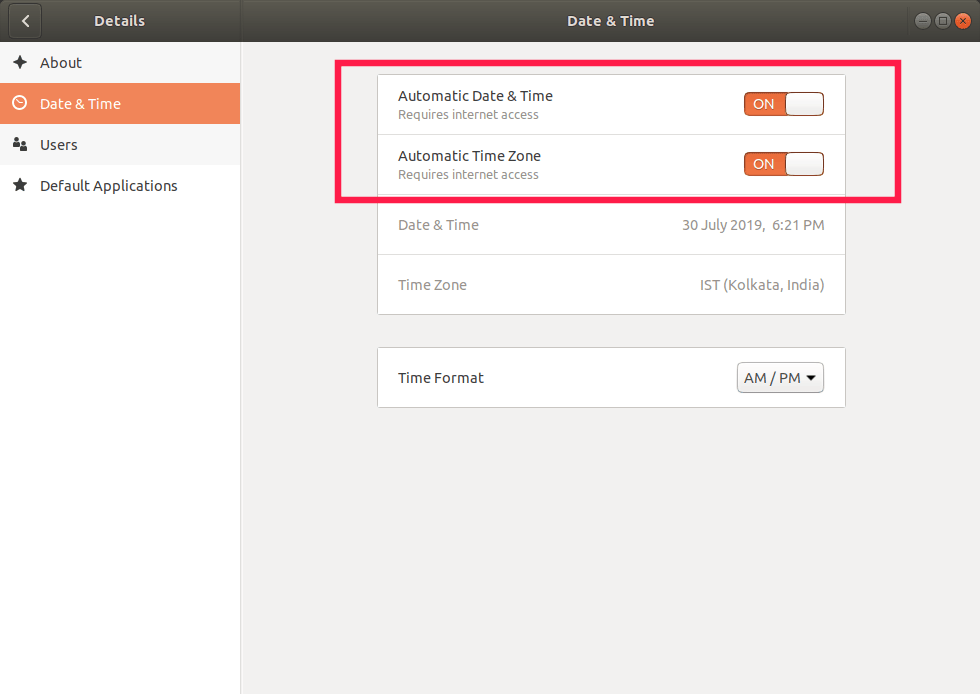
在 Ubuntu 中設置自動時區
關閉設置窗口就行了!你的系統始終應該與互聯網時間伺服器同步了。
via: https://www.ostechnix.com/how-to-set-up-time-synchronization-on-ubuntu/
作者:sk 選題:lujun9972 譯者:geekpi 校對:wxy
本文轉載來自 Linux 中國: https://github.com/Linux-CN/archive


