使用 Fedora 31 和 Nextcloud 伺服器構建自己的雲

Nextcloud 是用於跨多個設備存儲和同步數據的軟體套件。你可以從 https://github.com/nextcloud/server 了解有關 Nextcloud 伺服器的更多特性信息。
本文通過幾個簡單的步驟演示了如何使用 Fedora 和 Nextcloud 構建個人雲。對於本教程,你將需要一台獨立計算機或運行 Fedora 31 伺服器版的虛擬機,還需要互聯網連接。
步驟 1:預先安裝條件
在安裝和配置 Nextcloud 之前,必須滿足一些預先條件。
首先,安裝 Apache Web 伺服器:
# dnf install httpd接下來,安裝 PHP 和一些其他模塊。確保所安裝的 PHP 版本符合 Nextcloud 的要求:
# dnf install php php-gd php-mbstring php-intl php-pecl-apcu php-mysqlnd php-pecl-redis php-opcache php-imagick php-zip php-process安裝 PHP 後,啟用並啟動 Apache Web 伺服器:
# systemctl enable --now httpd接下來,允許 HTTP 流量穿過防火牆:
# firewall-cmd --permanent --add-service=http
# firewall-cmd --reload
接下來,安裝 MariaDB 伺服器和客戶端:
# dnf install mariadb mariadb-server然後啟用並啟動 MariaDB 伺服器
# systemctl enable --now mariadb現在,MariaDB 正在運行,你可以運行 mysql_secure_installation 命令來保護它:
# mysql_secure_installation
NOTE: RUNNING ALL PARTS OF THIS SCRIPT IS RECOMMENDED FOR ALL
MariaDB SERVERS IN PRODUCTION USE! PLEASE READ EACH STEP
CAREFULLY!
In order to log into MariaDB to secure it, we'll need the
current password for the root user. If you've just installed
MariaDB, and you haven't set the root password yet, the password
will be blank, so you should just press enter here.
Enter current password for root (enter for none): <ENTER>
OK, successfully used password, moving on...
Setting the root password ensures that nobody can log into
the MariaDB root user without the proper authorization.
Set root password? [Y/n] <ENTER>
New password: Your_Password_Here
Re-enter new password: Your_Password_Here
Password updated successfully!
Reloading privilege tables...
... Success!
By default, a MariaDB installation has an anonymous user,
allowing anyone to log into MariaDB without having to have
a user account created for them. This is intended only for
testing, and to make the installation go a bit smoother. You
should remove them before moving into a production environment.
Remove anonymous users? [Y/n] <ENTER>
... Success!
Normally, root should only be allowed to connect from
'localhost'. This ensures that someone cannot guess at the
root password from the network.
Disallow root login remotely? [Y/n] <ENTER>
... Success!
By default, MariaDB comes with a database named 'test' that
anyone can access. This is also intended only for testing, and
should be removed before moving into a production environment.
Remove test database and access to it? [Y/n] <ENTER>
- Dropping test database...
... Success!
- Removing privileges on test database...
... Success!
Reloading the privilege tables will ensure that all changes
made so far will take effect immediately.
Reload privilege tables now? [Y/n] <ENTER>
... Success!
Cleaning up...
All done! If you've completed all of the above steps, your
MariaDB installation should now be secure.
Thanks for using MariaDB!接下來,為你的 Nextcloud 實例創建獨立的用戶和資料庫:
# mysql -p
> create database nextcloud;
> create user 'nc_admin'@'localhost' identified by 'SeCrEt';
> grant all privileges on nextcloud.* to 'nc_admin'@'localhost';
> flush privileges;
> exit;
步驟 2:安裝 Nextcloud 伺服器
現在,你已滿足 Nextcloud 安裝的預先條件,請下載並解壓 Nextcloud 壓縮包:
# wget https://download.nextcloud.com/server/releases/nextcloud-17.0.2.zip
# unzip nextcloud-17.0.2.zip -d /var/www/html/
接下來,創建一個數據文件夾,並授予 Apache 對 nextcloud 目錄樹的讀寫訪問許可權:
# mkdir /var/www/html/nextcloud/data
# chown -R apache:apache /var/www/html/nextcloud
SELinux 必須配置為可與 Nextcloud 一起使用。基本命令如下所示,但在 nexcloud 安裝中還有很多其他的命令,發布在這裡:Nextcloud SELinux 配置。
# semanage fcontext -a -t httpd_sys_rw_content_t '/var/www/html/nextcloud/config(/.*)?'
# semanage fcontext -a -t httpd_sys_rw_content_t '/var/www/html/nextcloud/apps(/.*)?'
# semanage fcontext -a -t httpd_sys_rw_content_t '/var/www/html/nextcloud/data(/.*)?'
# semanage fcontext -a -t httpd_sys_rw_content_t '/var/www/html/nextcloud/.user.ini'
# semanage fcontext -a -t httpd_sys_rw_content_t '/var/www/html/nextcloud/3rdparty/aws/aws-sdk-php/src/data/logs(/.*)?'
# restorecon -Rv '/var/www/html/nextcloud/'
步驟 3:配置 Nextcloud
可以使用它的 Web 界面或在命令行配置 Nextcloud。
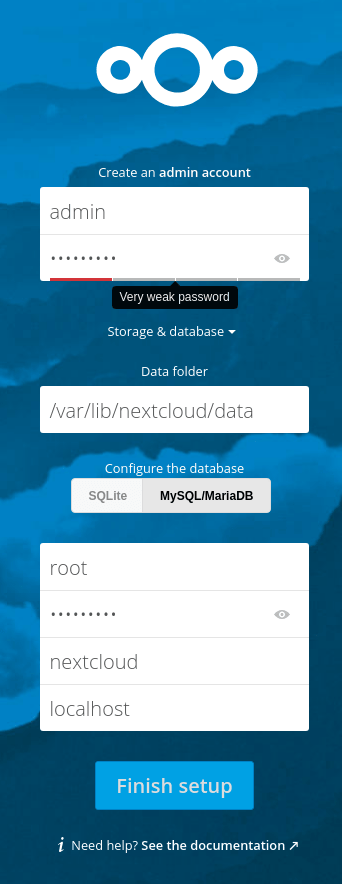
使用 Web 界面
在你喜歡的瀏覽器中,訪問 http://your_server_ip/nextcloud 並輸入欄位:
使用命令行
在命令行中,只需輸入以下內容,使用你之前在 MariaDB 中創建的獨立 Nextcloud 用戶替換相應的值:
# sudo -u apache php occ maintenance:install --data-dir /var/www/html/nextcloud/data/ --database "mysql" --database-name "nextcloud" --database-user "nc_admin" --database-pass "DB_SeCuRe_PaSsWoRd" --admin-user "admin" --admin-pass "Admin_SeCuRe_PaSsWoRd"最後幾點
- 我使用的是 http 協議,但是 Nextcloud 也可以在 https 上運行。我可能會在以後的文章中寫一篇有關保護 Nextcloud 的文章。
- 我禁用了 SELinux,但是如果配置它,你的伺服器將更加安全。
- Nextcloud 的建議 PHP 內存限制為 512M。要更改它,請編輯
/etc/php.ini配置文件中的memory_limit變數,然後重新啟動 httpd 服務。 - 默認情況下,只能使用 http://localhost/ URL 訪問 Web 界面。如果要允許使用其他域名訪問,你可編輯 /var/www/html/nextcloud/config/config.php 來進行此操作。
*字元可用於繞過域名限制,並允許任何解析為伺服器 IP 的 URL 訪問。
'trusted_domains' =>
array (
    0 => 'localhost',
    1 => '*',
),
via: https://fedoramagazine.org/build-your-own-cloud-with-fedora-31-and-nextcloud-server/
作者:storyteller 選題:lujun9972 譯者:geekpi 校對:wxy
本文轉載來自 Linux 中國: https://github.com/Linux-CN/archive
對這篇文章感覺如何?
You may also like


More in:Linux中國
捐贈 Let's Encrypt,共建安全的互聯網
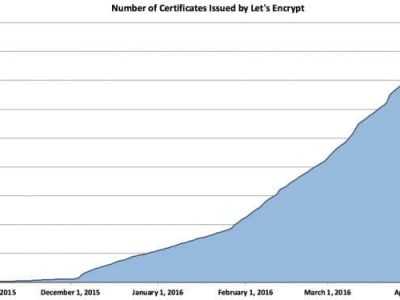
Let's Encrypt 正式發布,已經保護 380 萬個域名
關於Linux防火牆iptables的面試問答
Lets Encrypt 已被所有主流瀏覽器所信任