Linux中國
apt-get 和 apt-cache 命令實例展示

示例:1 列出所有可用包
linuxtechi@localhost:~$ apt-cache pkgnames
account-plugin-yahoojp
ceph-fuse
dvd+rw-tools
e3
gnome-commander-data
grub-gfxpayload-lists
gweled
.......................................
示例:2 用關鍵字搜索包
這個命令在你不確定包名時很有用,只要在apt-cache(LCTT 譯註:這裡原文是apt-get,應為筆誤)後面輸入與包相關的關鍵字即可。
linuxtechi@localhost:~$ apt-cache search "web server"
apache2 - Apache HTTP Server
apache2-bin - Apache HTTP Server (binary files and modules)
apache2-data - Apache HTTP Server (common files)
apache2-dbg - Apache debugging symbols
apache2-dev - Apache HTTP Server (development headers)
apache2-doc - Apache HTTP Server (on-site documentation)
apache2-utils - Apache HTTP Server (utility programs for web servers)
......................................................................
注意: 如果你安裝了「apt-file」包,我們就可以像下面那樣用配置文件搜索包。
linuxtechi@localhost:~$ apt-file search nagios.cfg
ganglia-nagios-bridge: /usr/share/doc/ganglia-nagios-bridge/nagios.cfg
nagios3-common: /etc/nagios3/nagios.cfg
nagios3-common: /usr/share/doc/nagios3-common/examples/nagios.cfg.gz
pnp4nagios-bin: /etc/pnp4nagios/nagios.cfg
pnp4nagios-bin: /usr/share/doc/pnp4nagios/examples/nagios.cfg
示例:3 顯示特定包的基本信息
linuxtechi@localhost:~$ apt-cache show postfix
Package: postfix
Priority: optional
Section: mail
Installed-Size: 3524
Maintainer: LaMont Jones <lamont@debian.org>
Architecture: amd64
Version: 2.11.1-1
Replaces: mail-transport-agent
Provides: default-mta, mail-transport-agent
.....................................................
示例:4 列出包的依賴
linuxtechi@localhost:~$ apt-cache depends postfix
postfix
 Depends: libc6
 Depends: libdb5.3
 Depends: libsasl2-2
 Depends: libsqlite3-0
 Depends: libssl1.0.0
 |Depends: debconf
 Depends: <debconf-2.0>
 cdebconf
 debconf
 Depends: netbase
 Depends: adduser
 Depends: dpkg
............................................
示例:5 使用apt-cache顯示緩存統計
linuxtechi@localhost:~$ apt-cache stats
Total package names: 60877 (1,218 k)
Total package structures: 102824 (5,758 k)
 Normal packages: 71285
 Pure virtual packages: 1102
 Single virtual packages: 9151
 Mixed virtual packages: 1827
 Missing: 19459
Total distinct versions: 74913 (5,394 k)
Total distinct descriptions: 93792 (2,251 k)
Total dependencies: 573443 (16.1 M)
Total ver/file relations: 78007 (1,872 k)
Total Desc/File relations: 93792 (2,251 k)
Total Provides mappings: 16583 (332 k)
Total globbed strings: 171 (2,263 )
Total dependency version space: 2,665 k
Total slack space: 37.3 k
Total space accounted for: 29.5 M
示例:6 使用 「apt-get update」 更新倉庫
使用命令「apt-get update」, 我們可以重新從源倉庫中同步文件索引。包的索引從「/etc/apt/sources.list」中檢索。
linuxtechi@localhost:~$ sudo apt-get update
 Ign http://extras.ubuntu.com utopic InRelease
 Hit http://extras.ubuntu.com utopic Release.gpg
 Hit http://extras.ubuntu.com utopic Release
 Hit http://extras.ubuntu.com utopic/main Sources
 Hit http://extras.ubuntu.com utopic/main amd64 Packages
 Hit http://extras.ubuntu.com utopic/main i386 Packages
 Ign http://in.archive.ubuntu.com utopic InRelease
 Ign http://in.archive.ubuntu.com utopic-updates InRelease
 Ign http://in.archive.ubuntu.com utopic-backports InRelease
 ................................................................
示例:7 使用apt-get安裝包
linuxtechi@localhost:~$ sudo apt-get install icinga
上面的命令會安裝叫「icinga」的包。
示例:8 升級所有已安裝的包
linuxtechi@localhost:~$ sudo apt-get upgrade
示例:9 更新特定的包
在apt-get命令中的「install」選項後面接上「-only-upgrade」用來更新一個特定的包,如下所示:
linuxtechi@localhost:~$ sudo apt-get install filezilla --only-upgrade
示例:10 使用apt-get卸載包
linuxtechi@localhost:~$ sudo apt-get remove skype
上面的命令只會刪除skype包,如果你想要刪除它的配置文件,在apt-get命令中使用「purge」選項。如下所示:
linuxtechi@localhost:~$ sudo apt-get purge skype
我們可以結合使用上面的兩個命令:
linuxtechi@localhost:~$ sudo apt-get remove --purge skype
示例:11 在當前的目錄中下載包
linuxtechi@localhost:~$ sudo apt-get download icinga
Get:1 http://in.archive.ubuntu.com/ubuntu/ utopic/universe icinga amd64 1.11.6-1build1 [1,474 B]
Fetched 1,474 B in 1s (1,363 B/s)
上面的目錄會把icinga包下載到你的當前工作目錄。
示例:12 清理本地包佔用的磁碟空間
linuxtechi@localhost:~$ sudo apt-get clean
上面的命令會清空apt-get所下載的包佔用的磁碟空間。
我們也可以使用「autoclean」選項來代替「clean」,兩者之間主要的區別是autoclean清理不再使用且沒用的下載。
linuxtechi@localhost:~$ sudo apt-get autoclean
Reading package lists... Done
Building dependency tree
Reading state information... Done
示例:13 使用「autoremove」刪除包
當在apt-get命令中使用「autoremove」時,它會刪除為了滿足依賴而安裝且現在沒用的包。
linuxtechi@localhost:~$ sudo apt-get autoremove icinga
示例:14 顯示包的更新日誌
linuxtechi@localhost:~$ sudo apt-get changelog apache2
Get:1 Changelog for apache2 (http://changelogs.ubuntu.com/changelogs/pool/main/a/apache2/apache2_2.4.10-1ubuntu1/changelog) [195 kB]
Fetched 195 kB in 3s (60.9 kB/s)
上面的命令會下載apache2的更新日誌,並在你屏幕上分頁顯示。
示例:15 使用 「check」 選項顯示損壞的依賴關係
linuxtechi@localhost:~$ sudo apt-get check
Reading package lists... Done
Building dependency tree
Reading state information... Done
via: http://www.linuxtechi.com/ubuntu-apt-get-apt-cache-commands-examples/
作者:Pradeep Kumar 譯者:geekpi 校對:wxy
本文轉載來自 Linux 中國: https://github.com/Linux-CN/archive
對這篇文章感覺如何?
太棒了
0
不錯
0
愛死了
0
不太好
0
感覺很糟
0
You may also like


More in:Linux中國

捐贈 Let's Encrypt,共建安全的互聯網
隨著 Mozilla、蘋果和谷歌對沃通和 StartCom 這兩家 CA 公司處罰落定,很多使用這兩家 CA 所簽發證書的網站紛紛尋求新的證書籤發商。有一個非盈利組織可以為大家提供了免費、可靠和安全的 SSL 證書服務,這就是 Let's Encrypt 項目。現在,它需要您的幫助
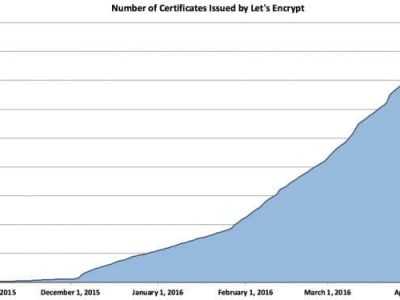
Let's Encrypt 正式發布,已經保護 380 萬個域名
由於 Let's Encrypt 讓安裝 X.509 TLS 證書變得非常簡單,所以這個數量增長迅猛。

關於Linux防火牆iptables的面試問答
Nishita Agarwal是Tecmint的用戶,她將分享關於她剛剛經歷的一家公司(印度的一家私人公司Pune)的面試經驗。在面試中她被問及許多不同的問題,但她是iptables方面的專家,因此她想分享這些關於iptables的問題和相應的答案給那些以後可能會進行相關面試的人。 所有的問題和相應的答案都基於Nishita Agarwal的記憶並經過了重寫。 嗨,朋友!我叫Nishita Agarwal。我已經取得了理學學士學位,我的專業集中在UNIX和它的變種(BSD,Linux)。它們一直深深的吸引著我。我在存儲方面有1年多的經驗。我正在尋求職業上的變化,並將供職於印度的P
Lets Encrypt 已被所有主流瀏覽器所信任
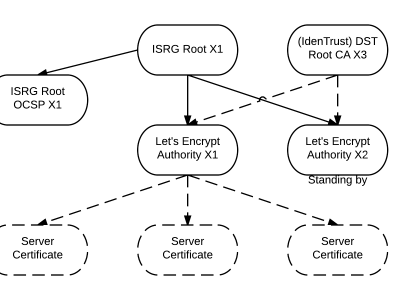
旨在讓每個網站都能使用 HTTPS 加密的非贏利組織 Lets Encrypt 已經得了 IdenTrust的交叉簽名,這意味著其證書現在已經可以被所有主流的瀏覽器所信任。從這個裡程碑事件開始,訪問者訪問使用了Lets Encrypt 證書的網站不再需要特別配置就可以得到 HTTPS 安全保護了。 Lets Encrypt 的兩個中級證書 ...
關注 LinuxStory 微信公眾號,獲取最新的 Linux 和操作系統資訊,每天為您帶來熱騰騰的開源新聞與新鮮溫暖的科技故事。