使用 HTTPie 進行 API 測試

HTTPie 是一個非常易用、易於升級的 HTTP 客戶端。它的發音為 「aitch-tee-tee-pie」 並以 http 命令運行,它是一個用 Python 編寫的來用於訪問 Web 的命令行工具。
由於這是一篇關於 HTTP 客戶端的指導文章,因此你需要一個 HTTP 伺服器來試用它。在這裡,訪問 httpbin.org,它是一個簡單的開源 HTTP 請求和響應服務。httpbin.org 網站是一種測試 Web API 的強大方式,並能仔細管理並顯示請求和響應內容,不過現在讓我們專註於 HTTPie 的強大功能。
Wget 和 cURL 的替代品
你可能聽說過古老的 Wget 或稍微新一些的 cURL 工具,它們允許你從命令行訪問 Web。它們是為訪問網站而編寫的,而 HTTPie 則用於訪問 Web API。
網站請求發生在計算機和正在閱讀並響應它所看到的內容的最終用戶之間,這並不太依賴於結構化的響應。但是,API 請求會在兩台計算機之間進行結構化調用,人並不是該流程內的一部分,像 HTTPie 這樣的命令行工具的參數可以有效地處理這個問題。
安裝 HTTPie
有幾種方法可以安裝 HTTPie。你可以通過包管理器安裝,無論你使用的是 brew、apt、yum 還是 dnf。但是,如果你已配置 virtualenvwrapper,那麼你可以用自己的方式安裝:
$ mkvirtualenv httpie
...
(httpie) $ pip install httpie
...
(httpie) $ deactivate
$ alias http=~/.virtualenvs/httpie/bin/http
$ http -b GET https://httpbin.org/get
{
    "args": {},
    "headers": {
        "Accept": "*/*",
        "Accept-Encoding": "gzip, deflate",
        "Host": "httpbin.org",
        "User-Agent": "HTTPie/1.0.2"
    },
    "origin": "104.220.242.210, 104.220.242.210",
    "url": "https://httpbin.org/get"
}
通過將 http 別名指向為虛擬環境中的命令,即使虛擬環境在非活動狀態,你也可以運行它。你可以將 alias 命令放在 .bash_profile 或 .bashrc 中,這樣你就可以使用以下命令升級 HTTPie:
$ ~/.virtualenvs/httpie/bin/pip install -U pip使用 HTTPie 查詢網站
HTTPie 可以簡化查詢和測試 API。上面使用了一個選項,-b(即 --body)。沒有它,HTTPie 將默認列印整個響應,包括響應頭:
$ http GET https://httpbin.org/get
HTTP/1.1 200 OK
Access-Control-Allow-Credentials: true
Access-Control-Allow-Origin: *
Connection: keep-alive
Content-Encoding: gzip
Content-Length: 177
Content-Type: application/json
Date: Fri, 09 Aug 2019 20:19:47 GMT
Referrer-Policy: no-referrer-when-downgrade
Server: nginx
X-Content-Type-Options: nosniff
X-Frame-Options: DENY
X-XSS-Protection: 1; mode=block

{
    "args": {},
    "headers": {
        "Accept": "*/*",
        "Accept-Encoding": "gzip, deflate",
        "Host": "httpbin.org",
        "User-Agent": "HTTPie/1.0.2"
    },
    "origin": "104.220.242.210, 104.220.242.210",
    "url": "https://httpbin.org/get"
}
這在調試 API 服務時非常重要,因為大量信息在響應頭中發送。例如,查看發送的 cookie 通常很重要。httpbin.org 提供了通過 URL 路徑設置 cookie(用於測試目的)的方式。以下設置一個標題為 opensource, 值為 awesome 的 cookie:
$ http GET https://httpbin.org/cookies/set/opensource/awesome
HTTP/1.1 302 FOUND
Access-Control-Allow-Credentials: true
Access-Control-Allow-Origin: *
Connection: keep-alive
Content-Length: 223
Content-Type: text/html; charset=utf-8
Date: Fri, 09 Aug 2019 20:22:39 GMT
Location: /cookies
Referrer-Policy: no-referrer-when-downgrade
Server: nginx
Set-Cookie: opensource=awesome; Path=/
X-Content-Type-Options: nosniff
X-Frame-Options: DENY
X-XSS-Protection: 1; mode=block

<!DOCTYPE HTML PUBLIC "-//W3C//DTD HTML 3.2 Final//EN">
<title>Redirecting...</title>
<h1>Redirecting...</h1>
<p>You should be redirected automatically to target URL:
<a href="/cookies">/cookies</a>.  If not click the link.
注意 Set-Cookie: opensource=awesome; Path=/ 的響應頭。這表明你預期設置的 cookie 已正確設置,路徑為 /。另請注意,即使你得到了 302 重定向,http 也不會遵循它。如果你想要遵循重定向,則需要明確使用 --follow 標誌請求:
$ http --follow GET https://httpbin.org/cookies/set/opensource/awesome
HTTP/1.1 200 OK
Access-Control-Allow-Credentials: true
Access-Control-Allow-Origin: *
Connection: keep-alive
Content-Encoding: gzip
Content-Length: 66
Content-Type: application/json
Date: Sat, 10 Aug 2019 01:33:34 GMT
Referrer-Policy: no-referrer-when-downgrade
Server: nginx
X-Content-Type-Options: nosniff
X-Frame-Options: DENY
X-XSS-Protection: 1; mode=block

{
    "cookies": {
        "opensource": "awesome"
    }
}
但此時你無法看到原來的 Set-Cookie 頭。為了看到中間響應,你需要使用 --all:
$ http --headers --all --follow GET https://httpbin.org/cookies/set/opensource/awesome
HTTP/1.1 302 FOUND
Access-Control-Allow-Credentials: true
Access-Control-Allow-Origin: *
Content-Type: text/html; charset=utf-8
Date: Sat, 10 Aug 2019 01:38:40 GMT
Location: /cookies
Referrer-Policy: no-referrer-when-downgrade
Server: nginx
Set-Cookie: opensource=awesome; Path=/
X-Content-Type-Options: nosniff
X-Frame-Options: DENY
X-XSS-Protection: 1; mode=block
Content-Length: 223
Connection: keep-alive

HTTP/1.1 200 OK
Access-Control-Allow-Credentials: true
Access-Control-Allow-Origin: *
Content-Encoding: gzip
Content-Type: application/json
Date: Sat, 10 Aug 2019 01:38:41 GMT
Referrer-Policy: no-referrer-when-downgrade
Server: nginx
X-Content-Type-Options: nosniff
X-Frame-Options: DENY
X-XSS-Protection: 1; mode=block
Content-Length: 66
Connection: keep-alive
列印響應體並不有趣,因為你大多數時候只關心 cookie。如果你想看到中間請求的響應頭,而不是最終請求中的響應體,你可以使用:
$ http --print hb --history-print h --all --follow GET https://httpbin.org/cookies/set/opensource/awesome
HTTP/1.1 302 FOUND
Access-Control-Allow-Credentials: true
Access-Control-Allow-Origin: *
Content-Type: text/html; charset=utf-8
Date: Sat, 10 Aug 2019 01:40:56 GMT
Location: /cookies
Referrer-Policy: no-referrer-when-downgrade
Server: nginx
Set-Cookie: opensource=awesome; Path=/
X-Content-Type-Options: nosniff
X-Frame-Options: DENY
X-XSS-Protection: 1; mode=block
Content-Length: 223
Connection: keep-alive

HTTP/1.1 200 OK
Access-Control-Allow-Credentials: true
Access-Control-Allow-Origin: *
Content-Encoding: gzip
Content-Type: application/json
Date: Sat, 10 Aug 2019 01:40:56 GMT
Referrer-Policy: no-referrer-when-downgrade
Server: nginx
X-Content-Type-Options: nosniff
X-Frame-Options: DENY
X-XSS-Protection: 1; mode=block
Content-Length: 66
Connection: keep-alive

{
  "cookies": {
    "opensource": "awesome"
  }
}
你可以使用 --print 精確控制列印的內容(h:響應頭;b:響應體),並使用 --history-print 覆蓋中間請求的列印內容設置。
使用 HTTPie 下載二進位文件
有時響應體並不是文本形式,它需要發送到可被不同應用打開的文件:
$ http GET https://httpbin.org/image/jpeg
HTTP/1.1 200 OK
Access-Control-Allow-Credentials: true
Access-Control-Allow-Origin: *
Connection: keep-alive
Content-Length: 35588
Content-Type: image/jpeg
Date: Fri, 09 Aug 2019 20:25:49 GMT
Referrer-Policy: no-referrer-when-downgrade
Server: nginx
X-Content-Type-Options: nosniff
X-Frame-Options: DENY
X-XSS-Protection: 1; mode=block

+-----------------------------------------+
| NOTE: binary data not shown in terminal |
+-----------------------------------------+
要得到正確的圖片,你需要保存到文件:
$ http --download GET https://httpbin.org/image/jpeg
HTTP/1.1 200 OK
Access-Control-Allow-Credentials: true
Access-Control-Allow-Origin: *
Connection: keep-alive
Content-Length: 35588
Content-Type: image/jpeg
Date: Fri, 09 Aug 2019 20:28:13 GMT
Referrer-Policy: no-referrer-when-downgrade
Server: nginx
X-Content-Type-Options: nosniff
X-Frame-Options: DENY
X-XSS-Protection: 1; mode=block

Downloading 34.75 kB to "jpeg.jpe"
Done. 34.75 kB in 0.00068s (50.05 MB/s)
試一下!圖片很可愛。
使用 HTTPie 發送自定義請求
你可以發送指定的請求頭。這對於需要非標準頭的自定義 Web API 很有用:
$ http GET https://httpbin.org/headers X-Open-Source-Com:Awesome
{
  "headers": {
    "Accept": "*/*",
    "Accept-Encoding": "gzip, deflate",
    "Host": "httpbin.org",
    "User-Agent": "HTTPie/1.0.2",
    "X-Open-Source-Com": "Awesome"
  }
}
最後,如果要發送 JSON 欄位(儘管可以指定確切的內容),對於許多嵌套較少的輸入,你可以使用快捷方式:
$ http --body PUT https://httpbin.org/anything open-source=awesome author=moshez
{
  "args": {},
  "data": "{"open-source": "awesome", "author": "moshez"}",
  "files": {},
  "form": {},
  "headers": {
    "Accept": "application/json, */*",
    "Accept-Encoding": "gzip, deflate",
    "Content-Length": "46",
    "Content-Type": "application/json",
    "Host": "httpbin.org",
    "User-Agent": "HTTPie/1.0.2"
  },
  "json": {
    "author": "moshez",
    "open-source": "awesome"
  },
  "method": "PUT",
  "origin": "73.162.254.113, 73.162.254.113",
  "url": "https://httpbin.org/anything"
}
下次在調試 Web API 時,無論是你自己的還是別人的,記得放下 cURL,試試 HTTPie 這個命令行工具。
via: https://opensource.com/article/19/8/getting-started-httpie
作者:Moshe Zadka 選題:lujun9972 譯者:geekpi 校對:wxy
本文轉載來自 Linux 中國: https://github.com/Linux-CN/archive
對這篇文章感覺如何?
You may also like


More in:Linux中國

捐贈 Let's Encrypt,共建安全的互聯網
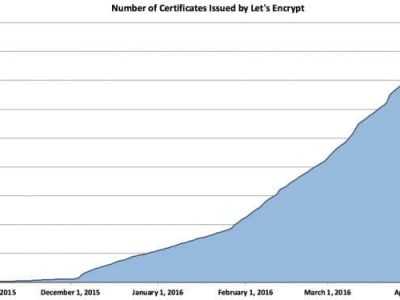
Let's Encrypt 正式發布,已經保護 380 萬個域名

關於Linux防火牆iptables的面試問答
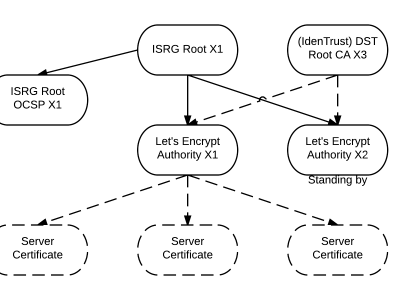
Lets Encrypt 已被所有主流瀏覽器所信任