用 Python 測試 API 的 3 種方式

在這個教程中,你將學到如何對執行 HTTP 請求代碼的進行單元測試。也就是說,你將看到用 Python 對 API 進行單元測試的藝術。
單元測試是指對單個行為的測試。在測試中,一個眾所周知的經驗法則就是隔離那些需要外部依賴的代碼。
比如,當測試一段執行 HTTP 請求的代碼時,建議在測試過程中,把真正的調用替換成一個假的的調用。這種情況下,每次運行測試的時候,就可以對它進行單元測試,而不需要執行一個真正的 HTTP 請求。
問題就是,怎樣才能隔離這些代碼?
這就是我希望在這篇博文中回答的問題!我不僅會向你展示如果去做,而且也會權衡不同方法之間的優點和缺點。
要求:
- Python 3.8
- pytest-mock
- requests
- flask
- responses
- VCR.py
使用一個天氣狀況 REST API 的演示程序
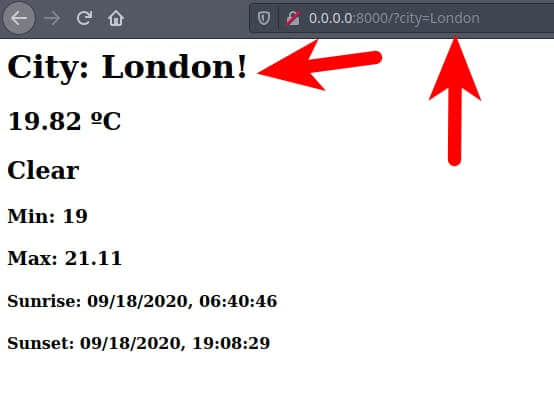
為了更好的解決這個問題,假設你正在創建一個天氣狀況的應用。這個應用使用第三方天氣狀況 REST API 來檢索一個城市的天氣信息。其中一個需求是生成一個簡單的 HTML 頁面,像下面這個圖片:

倫敦的天氣,OpenWeatherMap。圖片是作者自己製作的。
為了獲得天氣的信息,必須得去某個地方找。幸運的是,通過 OpenWeatherMap 的 REST API 服務,可以獲得一切需要的信息。
好的,很棒,但是我該怎麼用呢?
通過發送一個 GET 請求到:https://api.openweathermap.org/data/2.5/weather?q={city_name}&appid={api_key}&units=metric,就可以獲得你所需要的所有東西。在這個教程中,我會把城市名字設置成一個參數,並確定使用公制單位。
檢索數據
使用 requests 模塊來檢索天氣數據。你可以創建一個接收城市名字作為參數的函數,然後返回一個 JSON。JSON 包含溫度、天氣狀況的描述、日出和日落時間等數據。
下面的例子演示了這樣一個函數:
def find_weather_for(city: str) -> dict:
    """Queries the weather API and returns the weather data for a particular city."""
    url = API.format(city_name=city, api_key=API_KEY)
    resp = requests.get(url)
    return resp.json()
這個 URL 是由兩個全局變數構成:
BASE_URL = "https://api.openweathermap.org/data/2.5/weather"
API = BASE_URL + "?q={city_name}&appid={api_key}&units=metric"
API 以這個格式返回了一個 JSON:
{
  "coord": {
    "lon": -0.13,
    "lat": 51.51
  },
  "weather": [
    {
      "id": 800,
      "main": "Clear",
      "description": "clear sky",
      "icon": "01d"
    }
  ],
  "base": "stations",
  "main": {
    "temp": 16.53,
    "feels_like": 15.52,
    "temp_min": 15,
    "temp_max": 17.78,
    "pressure": 1023,
    "humidity": 72
  },
  "visibility": 10000,
  "wind": {
    "speed": 2.1,
    "deg": 40
  },
  "clouds": {
    "all": 0
  },
  "dt": 1600420164,
  "sys": {
    "type": 1,
    "id": 1414,
    "country": "GB",
    "sunrise": 1600407646,
    "sunset": 1600452509
  },
  "timezone": 3600,
  "id": 2643743,
  "name": "London",
  "cod": 200
當調用 resp.json() 的時候,數據是以 Python 字典的形式返回的。為了封裝所有細節,可以用 dataclass 來表示它們。這個類有一個工廠方法,可以獲得這個字典並且返回一個 WeatherInfo 實例。
這種辦法很好,因為可以保持這種表示方法的穩定。比如,如果 API 改變了 JSON 的結構,就可以在同一個地方(from_dict 方法中)修改邏輯。其他代碼不會受影響。你也可以從不同的源獲得信息,然後把它們都整合到 from_dict 方法中。
@dataclass
class WeatherInfo:
    temp: float
    sunset: str
    sunrise: str
    temp_min: float
    temp_max: float
    desc: str

    @classmethod
    def from_dict(cls, data: dict) -> "WeatherInfo":
        return cls(
            temp=data["main"]["temp"],
            temp_min=data["main"]["temp_min"],
            temp_max=data["main"]["temp_max"],
            desc=data["weather"][0]["main"],
            sunset=format_date(data["sys"]["sunset"]),
            sunrise=format_date(data["sys"]["sunrise"]),
        )
現在來創建一個叫做 retrieve_weather 的函數。使用這個函數調用 API,然後返回一個 WeatherInfo,這樣就可創建你自己的 HTML 頁面。
def retrieve_weather(city: str) -> WeatherInfo:
    """Finds the weather for a city and returns a WeatherInfo instance."""
    data = find_weather_for(city)
    return WeatherInfo.from_dict(data)
很好,我們的 app 現在有一些基礎了。在繼續之前,對這些函數進行單元測試。
1、使用 mock 測試 API
根據維基百科, 模擬對象 是通過模模擬實對象來模擬它行為的一個對象。在 Python 中,你可以使用 unittest.mock 庫來 模擬 任何對象,這個庫是標準庫中的一部分。為了測試 retrieve_weather 函數,可以模擬 requests.get,然後返回靜態數據。
pytest-mock
在這個教程中,會使用 pytest 作為測試框架。通過插件,pytest 庫是非常具有擴展性的。為了完成我們的模擬目標,要用 pytest-mock。這個插件抽象化了大量 unittest.mock 中的設置,也會讓你的代碼更簡潔。如果你感興趣的話,我在 另一篇博文中 會有更多的討論。
好的,言歸正傳,現在看代碼。
下面是一個 retrieve_weather 函數的完整測試用例。這個測試使用了兩個 fixture:一個是由 pytest-mock 插件提供的 mocker fixture, 還有一個是我們自己的。就是從之前請求中保存的靜態數據。
@pytest.fixture()
def fake_weather_info():
    """Fixture that returns a static weather data."""
    with open("tests/resources/weather.json") as f:
        return json.load(f)
def test_retrieve_weather_using_mocks(mocker, fake_weather_info):
    """Given a city name, test that a HTML report about the weather is generated
    correctly."""
    # Creates a fake requests response object
    fake_resp = mocker.Mock()
    # Mock the json method to return the static weather data
    fake_resp.json = mocker.Mock(return_value=fake_weather_info)
    # Mock the status code
    fake_resp.status_code = HTTPStatus.OK

    mocker.patch("weather_app.requests.get", return_value=fake_resp)

    weather_info = retrieve_weather(city="London")
    assert weather_info == WeatherInfo.from_dict(fake_weather_info)
如果運行這個測試,會獲得下面的輸出:
============================= test session starts ==============================
...[omitted]...
tests/test_weather_app.py::test_retrieve_weather_using_mocks PASSED      [100%]
============================== 1 passed in 0.20s ===============================
Process finished with exit code 0
很好,測試通過了!但是...生活並非一帆風順。這個測試有優點,也有缺點。現在來看一下。
優點
好的,有一個之前討論過的優點就是,通過模擬 API 的返回值,測試變得簡單了。將通信和 API 隔離,這樣測試就可以預測了。這樣總會返回你需要的東西。
缺點
對於缺點,問題就是,如果不再想用 requests 了,並且決定回到標準庫的 urllib,怎麼辦。每次改變 find_weather_for 的代碼,都得去適配測試。好的測試是,當你修改代碼實現的時候,測試時不需要改變的。所以,通過模擬,你最終把測試和實現耦合在了一起。
而且,另一個不好的方面是你需要在調用函數之前進行大量設置——至少是三行代碼。
...
    # Creates a fake requests response object
    fake_resp = mocker.Mock()
    # Mock the json method to return the static weather data
    fake_resp.json = mocker.Mock(return_value=fake_weather_info)
    # Mock the status code
    fake_resp.status_code = HTTPStatus.OK
...
我可以做的更好嗎?
是的,請繼續看。我現在看看怎麼改進一點。
使用 responses
用 mocker 功能模擬 requests 有點問題,就是有很多設置。避免這個問題的一個好辦法就是使用一個庫,可以攔截 requests 調用並且給它們 打補丁 。有不止一個庫可以做這件事,但是對我來說最簡單的是 responses。我們來看一下怎麼用,並且替換 mock。
@responses.activate
def test_retrieve_weather_using_responses(fake_weather_info):
    """Given a city name, test that a HTML report about the weather is generated
    correctly."""
    api_uri = API.format(city_name="London", api_key=API_KEY)
    responses.add(responses.GET, api_uri, json=fake_weather_info, status=HTTPStatus.OK)

    weather_info = retrieve_weather(city="London")
    assert weather_info == WeatherInfo.from_dict(fake_weather_info)
這個函數再次使用了我們的 fake_weather_info fixture。
然後運行測試:
============================= test session starts ==============================
...
tests/test_weather_app.py::test_retrieve_weather_using_responses PASSED  [100%]
============================== 1 passed in 0.19s ===============================
非常好!測試也通過了。但是...並不是那麼棒。
優點
使用諸如 responses 這樣的庫,好的方面就是不需要再給 requests 打補丁 。通過將這層抽象交給庫,可以減少一些設置。然而,如果你沒注意到的話,還是有一些問題。
缺點
和 unittest.mock 很像,測試和實現再一次耦合了。如果替換 requests,測試就不能用了。
2、使用適配器測試 API
如果用模擬讓測試耦合了,我能做什麼?
設想下面的場景:假如說你不能再用 requests 了,而且必須要用 urllib 替換,因為這是 Python 自帶的。不僅僅是這樣,你了解了不要把測試代碼和實現耦合,並且你想今後都避免這種情況。你想替換 urllib,也不想重寫測試了。
事實證明,你可以抽象出執行 GET 請求的代碼。
真的嗎?怎麼做?
可以使用 適配器 來抽象它。適配器是一種用來封裝其他類的介面,並作為新介面暴露出來的一種設計模式。用這種方式,就可以修改適配器而不需要修改代碼了。比如,在 find_weather_for 函數中,封裝關於 requests 的所有細節,然後把這部分暴露給只接受 URL 的函數。
所以,這個:
def find_weather_for(city: str) -> dict:
    """Queries the weather API and returns the weather data for a particular city."""
    url = API.format(city_name=city, api_key=API_KEY)
    resp = requests.get(url)
    return resp.json()
變成這樣:
def find_weather_for(city: str) -> dict:
    """Queries the weather API and returns the weather data for a particular city."""
    url = API.format(city_name=city, api_key=API_KEY)
    return adapter(url)
然後適配器變成這樣:
def requests_adapter(url: str) -> dict:
    resp = requests.get(url)
    return resp.json()
現在到了重構 retrieve_weather 函數的時候:
def retrieve_weather(city: str) -> WeatherInfo:
    """Finds the weather for a city and returns a WeatherInfo instance."""
    data = find_weather_for(city, adapter=requests_adapter)
    return WeatherInfo.from_dict(data)
所以,如果你決定改為使用 urllib 的實現,只要換一下適配器:
def urllib_adapter(url: str) -> dict:
    """An adapter that encapsulates urllib.urlopen"""
    with urllib.request.urlopen(url) as response:
        resp = response.read()
    return json.loads(resp)
def retrieve_weather(city: str) -> WeatherInfo:
    """Finds the weather for a city and returns a WeatherInfo instance."""
    data = find_weather_for(city, adapter=urllib_adapter)
    return WeatherInfo.from_dict(data)
好的,那測試怎麼做?
為了測試 retrieve_weather, 只要創建一個在測試過程中使用的假的適配器:
@responses.activate
def test_retrieve_weather_using_adapter(
    fake_weather_info,
):
    def fake_adapter(url: str):
        return fake_weather_info

    weather_info = retrieve_weather(city="London", adapter=fake_adapter)
    assert weather_info == WeatherInfo.from_dict(fake_weather_info)
如果運行測試,會獲得:
============================= test session starts ==============================
tests/test_weather_app.py::test_retrieve_weather_using_adapter PASSED    [100%]
============================== 1 passed in 0.22s ===============================
優點
這個方法的優點是可以成功將測試和實現解耦。使用 依賴注入 在測試期間注入一個假的適配器。你也可以在任何時候更換適配器,包括在運行時。這些事情都不會改變任何行為。
缺點
缺點就是,因為你在測試中用了假的適配器,如果在實現中往適配器中引入了一個 bug,測試的時候就不會發現。比如說,往 requests 傳入了一個有問題的參數,像這樣:
def requests_adapter(url: str) -> dict:
    resp = requests.get(url, headers=<some broken headers>)
    return resp.json()
在生產環境中,適配器會有問題,而且單元測試沒辦法發現。但是事實是,之前的方法也會有同樣的問題。這就是為什麼不僅要單元測試,並且總是要集成測試。也就是說,要考慮另一個選項。
3、使用 VCR.py 測試 API
現在終於到了討論我們最後一個選項了。誠實地說,我也是最近才發現這個。我用 模擬 也很長時間了,而且總是有一些問題。VCR.py 是一個庫,它可以簡化很多 HTTP 請求的測試。
它的工作原理是將第一次運行測試的 HTTP 交互記錄為一個 YAML 文件,叫做 cassette。請求和響應都會被序列化。當第二次運行測試的時候,VCT.py 將攔截對請求的調用,並且返回一個響應。
現在看一下下面如何使用 VCR.py 測試 retrieve_weather:
@vcr.use_cassette()
def test_retrieve_weather_using_vcr(fake_weather_info):
    weather_info = retrieve_weather(city="London")
    assert weather_info == WeatherInfo.from_dict(fake_weather_info)
天吶,就這樣?沒有設置?@vcr.use_cassette() 是什麼?
是的,就這樣!沒有設置,只要一個 pytest 標註告訴 VCR 去攔截調用,然後保存 cassette 文件。
cassette 文件是什麼樣?
好問題。這個文件里有很多東西。這是因為 VCR 保存了交互中的所有細節。
interactions:
- request:
body: null
headers:
Accept:
- '*/*'
Accept-Encoding:
- gzip, deflate
Connection:
- keep-alive
User-Agent:
- python-requests/2.24.0
method: GET
uri: https://api.openweathermap.org/data/2.5/weather?q=London&appid=<YOUR API KEY HERE>&units=metric
response:
body:
string: '{"coord":{"lon":-0.13,"lat":51.51},"weather":[{"id":800,"main":"Clear","description":"clearsky","icon":"01d"}],"base":"stations","main":{"temp":16.53,"feels_like":15.52,"temp_min":15,"temp_max":17.78,"pressure":1023,"humidity":72},"visibility":10000,"wind":{"speed":2.1,"deg":40},"clouds":{"all":0},"dt":1600420164,"sys":{"type":1,"id":1414,"country":"GB","sunrise":1600407646,"sunset":1600452509},"timezone":3600,"id":2643743,"name":"London","cod":200}'
headers:
Access-Control-Allow-Credentials:
- 'true'
Access-Control-Allow-Methods:
- GET, POST
Access-Control-Allow-Origin:
- '*'
Connection:
- keep-alive
Content-Length:
- '454'
Content-Type:
- application/json; charset=utf-8
Date:
- Fri, 18 Sep 2020 10:53:25 GMT
Server:
- openresty
X-Cache-Key:
- /data/2.5/weather?q=london&units=metric
status:
code: 200
message: OK
version: 1
確實很多!
真的!好的方面就是你不需要留意它。VCR.py 會為你安排好一切。
優點
現在看一下優點,我可以至少列出五個:
- 沒有設置代碼。
- 測試仍然是分離的,所以很快。
- 測試是確定的。
- 如果你改了請求,比如說用了錯誤的 header,測試會失敗。
- 沒有與代碼實現耦合,所以你可以換適配器,而且測試會通過。唯一有關係的東西就是請求必須是一樣的。
缺點
再與模擬相比較,除了避免了錯誤,還是有一些問題。
如果 API 提供者出於某種原因修改了數據格式,測試仍然會通過。幸運的是,這種情況並不經常發生,而且在這種重大改變之前,API 提供者通常會給他們的 API 提供不同版本。
另一個需要考慮的事情是 就地 端到端 測試。每次伺服器運行的時候,這些測試都會調用。顧名思義,這是一個範圍更廣、更慢的測試。它們會比單元測試覆蓋更多。事實上,並不是每個項目都需要使用它們。所以,就我看來,VCR.py 對於大多數人的需求來說都綽綽有餘。
總結
就這麼多了。我希望今天你了解了一些有用的東西。測試 API 客戶端應用可能會有點嚇人。然而,當武裝了合適的工具和知識,你就可以馴服這個野獸。
在 我的 Github 上可以找到這個完整的應用。
這篇文章最早發表在 作者的個人博客,授權轉載
via: https://opensource.com/article/21/9/unit-test-python
作者:Miguel Brito 選題:lujun9972 譯者:Yufei-Yan 校對:wxy
本文轉載來自 Linux 中國: https://github.com/Linux-CN/archive


