为什么我喜欢使用 IPython shell 和 Jupyter 笔记本

Jupyter 项目最初是以 IPython 和 IPython 笔记本的形式出现的。它最初是一个专门针对 Python 的交互式 shell 和笔记本环境,后来扩展为不分语言的环境,支持 Julia、Python 和 R 以及其他任何语言。

IPython 是一个 Python shell,类似于你在命令行输入 python 或者 python3 时看到的,但它更聪明、更有用。如果你曾经在 Python shell 中输入过多行命令,并且想重复它,你就会理解每次都要一行一行地滚动浏览历史记录的挫败感。有了 IPython,你可以一次滚动浏览整个块,同时还可以逐行浏览和编辑这些块的部分内容。

它具有自动补全,并提供上下文感知的建议:

它默认会整理输出:

它甚至允许你运行 shell 命令:

它还提供了一些有用的功能,比如将 ? 添加到对象中,作为运行 help() 的快捷方式,而不会破坏你的流程:

如果你使用的是虚拟环境(参见我关于 virtualenvwrapper 的帖子),可以在环境中用 pip 安装:
pip install ipython
要在全系统范围内安装,你可以在 Debian、Ubuntu 或树莓派上使用 apt:
sudo apt install ipython3
或使用 pip:
sudo pip3 install ipython
Jupyter 笔记本
Jupyter 笔记本将 IPython shell 提升到了一个新的高度。首先,它们是基于浏览器的,而不是基于终端的。要开始使用,请安装 jupyter。
如果你使用的是虚拟环境,请在环境中使用 pip 进行安装:
pip install jupyter
要在全系统范围内安装,你可以在 Debian、Ubuntu 或树莓派上使用 apt:
sudo apt install jupyter-notebook
或使用 pip:
sudo pip3 install jupyter
启动笔记本:
jupyter notebook
这将在你的浏览器中打开:

你可以使用 “New” 下拉菜单创建一个新的 Python 3 笔记本:

现在你可以在 In[ ] 字段中编写和执行命令。使用 Enter 在代码块中换行,使用 Shift+Enter 来执行:

你可以编辑和重新运行代码块,你可以重新排序、删除,复制/粘贴,等等。你可以以任何顺序运行代码块,但是要注意的是,任何创建的变量的作用域都将根据执行的时间而不是它们在笔记本中出现的顺序。你可以在 “Kernel” 菜单中重启并清除输出或重启并运行所有的代码块。
使用 print 函数每次都会输出。但是如果你有一条没有分配的语句,或者最后一条语句没有分配,那么它总是会输出:

你甚至可以把 In 和 Out 作为可索引对象:

所有的 IPython 功能都可以使用,而且通常也会表现得更漂亮一些:

你甚至可以使用 Matplotlib 进行内联绘图:

最后,你可以保存你的笔记本,并将其包含在 Git 仓库中,如果你将其推送到 GitHub,它们将作为已完成的笔记本被渲染:输出、图形和所有一切(如 本例):

本文原载于 Ben Nuttall 的 Tooling Tuesday 博客,经许可后重用。
via: https://opensource.com/article/21/3/ipython-shell-jupyter-notebooks
作者:Ben Nuttall 选题:lujun9972 译者:geekpi 校对:wxy
本文转载来自 Linux 中国: https://github.com/Linux-CN/archive
对这篇文章感觉如何?
You may also like


More in:Linux中国

捐赠 Let's Encrypt,共建安全的互联网
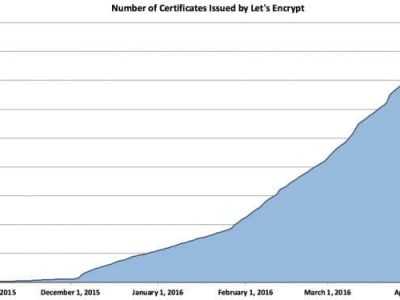
Let's Encrypt 正式发布,已经保护 380 万个域名
关于Linux防火墙iptables的面试问答
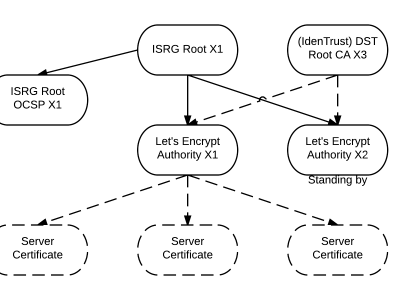
Lets Encrypt 已被所有主流浏览器所信任