使用 Fedora 31 和 Nextcloud 服务器构建自己的云

Nextcloud 是用于跨多个设备存储和同步数据的软件套件。你可以从 https://github.com/nextcloud/server 了解有关 Nextcloud 服务器的更多特性信息。
本文通过几个简单的步骤演示了如何使用 Fedora 和 Nextcloud 构建个人云。对于本教程,你将需要一台独立计算机或运行 Fedora 31 服务器版的虚拟机,还需要互联网连接。
步骤 1:预先安装条件
在安装和配置 Nextcloud 之前,必须满足一些预先条件。
首先,安装 Apache Web 服务器:
# dnf install httpd接下来,安装 PHP 和一些其他模块。确保所安装的 PHP 版本符合 Nextcloud 的要求:
# dnf install php php-gd php-mbstring php-intl php-pecl-apcu php-mysqlnd php-pecl-redis php-opcache php-imagick php-zip php-process安装 PHP 后,启用并启动 Apache Web 服务器:
# systemctl enable --now httpd接下来,允许 HTTP 流量穿过防火墙:
# firewall-cmd --permanent --add-service=http
# firewall-cmd --reload
接下来,安装 MariaDB 服务器和客户端:
# dnf install mariadb mariadb-server然后启用并启动 MariaDB 服务器
# systemctl enable --now mariadb现在,MariaDB 正在运行,你可以运行 mysql_secure_installation 命令来保护它:
# mysql_secure_installation
NOTE: RUNNING ALL PARTS OF THIS SCRIPT IS RECOMMENDED FOR ALL
MariaDB SERVERS IN PRODUCTION USE! PLEASE READ EACH STEP
CAREFULLY!
In order to log into MariaDB to secure it, we'll need the
current password for the root user. If you've just installed
MariaDB, and you haven't set the root password yet, the password
will be blank, so you should just press enter here.
Enter current password for root (enter for none): <ENTER>
OK, successfully used password, moving on...
Setting the root password ensures that nobody can log into
the MariaDB root user without the proper authorization.
Set root password? [Y/n] <ENTER>
New password: Your_Password_Here
Re-enter new password: Your_Password_Here
Password updated successfully!
Reloading privilege tables...
... Success!
By default, a MariaDB installation has an anonymous user,
allowing anyone to log into MariaDB without having to have
a user account created for them. This is intended only for
testing, and to make the installation go a bit smoother. You
should remove them before moving into a production environment.
Remove anonymous users? [Y/n] <ENTER>
... Success!
Normally, root should only be allowed to connect from
'localhost'. This ensures that someone cannot guess at the
root password from the network.
Disallow root login remotely? [Y/n] <ENTER>
... Success!
By default, MariaDB comes with a database named 'test' that
anyone can access. This is also intended only for testing, and
should be removed before moving into a production environment.
Remove test database and access to it? [Y/n] <ENTER>
- Dropping test database...
... Success!
- Removing privileges on test database...
... Success!
Reloading the privilege tables will ensure that all changes
made so far will take effect immediately.
Reload privilege tables now? [Y/n] <ENTER>
... Success!
Cleaning up...
All done! If you've completed all of the above steps, your
MariaDB installation should now be secure.
Thanks for using MariaDB!接下来,为你的 Nextcloud 实例创建独立的用户和数据库:
# mysql -p
> create database nextcloud;
> create user 'nc_admin'@'localhost' identified by 'SeCrEt';
> grant all privileges on nextcloud.* to 'nc_admin'@'localhost';
> flush privileges;
> exit;
步骤 2:安装 Nextcloud 服务器
现在,你已满足 Nextcloud 安装的预先条件,请下载并解压 Nextcloud 压缩包:
# wget https://download.nextcloud.com/server/releases/nextcloud-17.0.2.zip
# unzip nextcloud-17.0.2.zip -d /var/www/html/
接下来,创建一个数据文件夹,并授予 Apache 对 nextcloud 目录树的读写访问权限:
# mkdir /var/www/html/nextcloud/data
# chown -R apache:apache /var/www/html/nextcloud
SELinux 必须配置为可与 Nextcloud 一起使用。基本命令如下所示,但在 nexcloud 安装中还有很多其他的命令,发布在这里:Nextcloud SELinux 配置。
# semanage fcontext -a -t httpd_sys_rw_content_t '/var/www/html/nextcloud/config(/.*)?'
# semanage fcontext -a -t httpd_sys_rw_content_t '/var/www/html/nextcloud/apps(/.*)?'
# semanage fcontext -a -t httpd_sys_rw_content_t '/var/www/html/nextcloud/data(/.*)?'
# semanage fcontext -a -t httpd_sys_rw_content_t '/var/www/html/nextcloud/.user.ini'
# semanage fcontext -a -t httpd_sys_rw_content_t '/var/www/html/nextcloud/3rdparty/aws/aws-sdk-php/src/data/logs(/.*)?'
# restorecon -Rv '/var/www/html/nextcloud/'
步骤 3:配置 Nextcloud
可以使用它的 Web 界面或在命令行配置 Nextcloud。
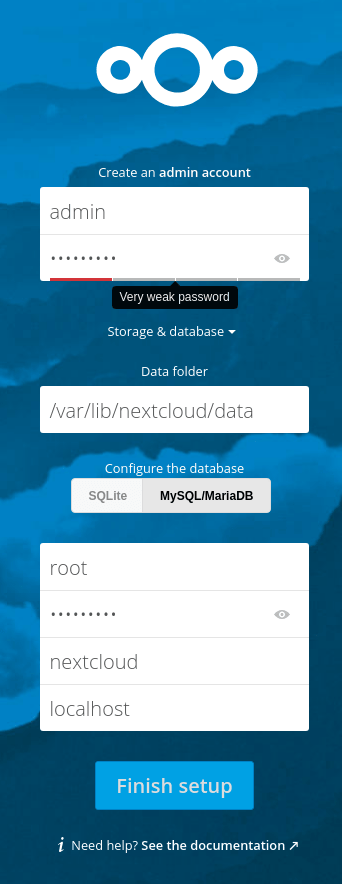
使用 Web 界面
在你喜欢的浏览器中,访问 http://your_server_ip/nextcloud 并输入字段:
使用命令行
在命令行中,只需输入以下内容,使用你之前在 MariaDB 中创建的独立 Nextcloud 用户替换相应的值:
# sudo -u apache php occ maintenance:install --data-dir /var/www/html/nextcloud/data/ --database "mysql" --database-name "nextcloud" --database-user "nc_admin" --database-pass "DB_SeCuRe_PaSsWoRd" --admin-user "admin" --admin-pass "Admin_SeCuRe_PaSsWoRd"最后几点
- 我使用的是 http 协议,但是 Nextcloud 也可以在 https 上运行。我可能会在以后的文章中写一篇有关保护 Nextcloud 的文章。
- 我禁用了 SELinux,但是如果配置它,你的服务器将更加安全。
- Nextcloud 的建议 PHP 内存限制为 512M。要更改它,请编辑
/etc/php.ini配置文件中的memory_limit变量,然后重新启动 httpd 服务。 - 默认情况下,只能使用 http://localhost/ URL 访问 Web 界面。如果要允许使用其他域名访问,你可编辑 /var/www/html/nextcloud/config/config.php 来进行此操作。
*字符可用于绕过域名限制,并允许任何解析为服务器 IP 的 URL 访问。
'trusted_domains' =>
array (
    0 => 'localhost',
    1 => '*',
),
via: https://fedoramagazine.org/build-your-own-cloud-with-fedora-31-and-nextcloud-server/
作者:storyteller 选题:lujun9972 译者:geekpi 校对:wxy
本文转载来自 Linux 中国: https://github.com/Linux-CN/archive
对这篇文章感觉如何?
You may also like


More in:Linux中国
捐赠 Let's Encrypt,共建安全的互联网
Let's Encrypt 正式发布,已经保护 380 万个域名
关于Linux防火墙iptables的面试问答
Lets Encrypt 已被所有主流浏览器所信任